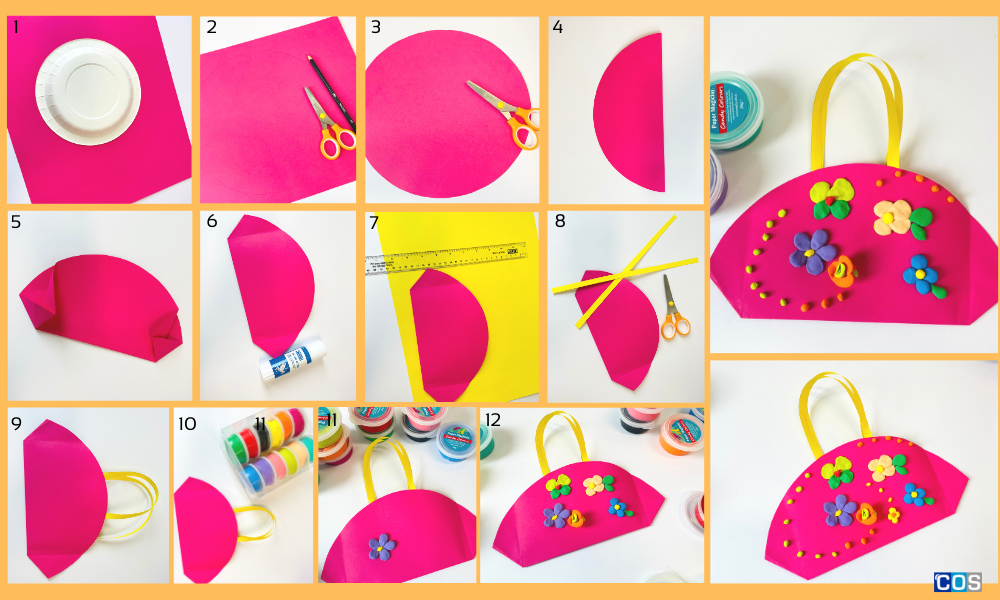
Origami Paper Purse
This Mother’s Day, let creativity bloom in classrooms as children express their love through charming DIY crafts. From personalised handbags adorned with vibrant clay flowers to paddlepop stick frames embellished with an array of colourful buttons, these crafts not only serve as tokens of affection but also instil a sense of joy in creating something special for their beloved mums, grandmothers, or other maternal figures.
Below you’ll find step-by-step instructions for each craft project, ensuring that children can create a memorable and heartfelt Mother’s Day surprise for the special women who fill their lives with love and warmth.
Things you’ll need:
- Modelling craft clay
- Coloured copy paper
- Circle-shaped object or a compass to trace around
- Permanent Marker
- Scissors
- Glue stick
- Pencil
- Ruler
Instructions:
1. Begin by choosing an A3 copy paper of your mother’s favourite colour for adding a personal touch to the paper bag.
2. Take a round object, a compass or a plate to draw a circle marking from the centre of the copy paper.
3. Carefully cut out the drawn circle using a pair of scissors.
4. Once the circle is cut out, fold it from the centre, allowing the edges to overlap.
5. Fold approximately 3 cm from both sides of the circle, creating a triangular shape that adds depth and dimension to the design.
6. Carefully fold the triangles from both sides, creating a nice crease. Now, fold the triangle shape inward on both sides to create a bag structure.
7. Secure the folded triangle using a glue stick to keep the bag intact.
8. For the handles, cut two strips of paper, each measuring 2 cm in width and 15 cm in length. Stick both strips inside the bag on top using the glue stick.
9. Once it’s completed, take magic clay or any other craft clay to create flowers or any design. Mold the clay into cute floral designs and adorn the bag, adding a charming and personalised touch.
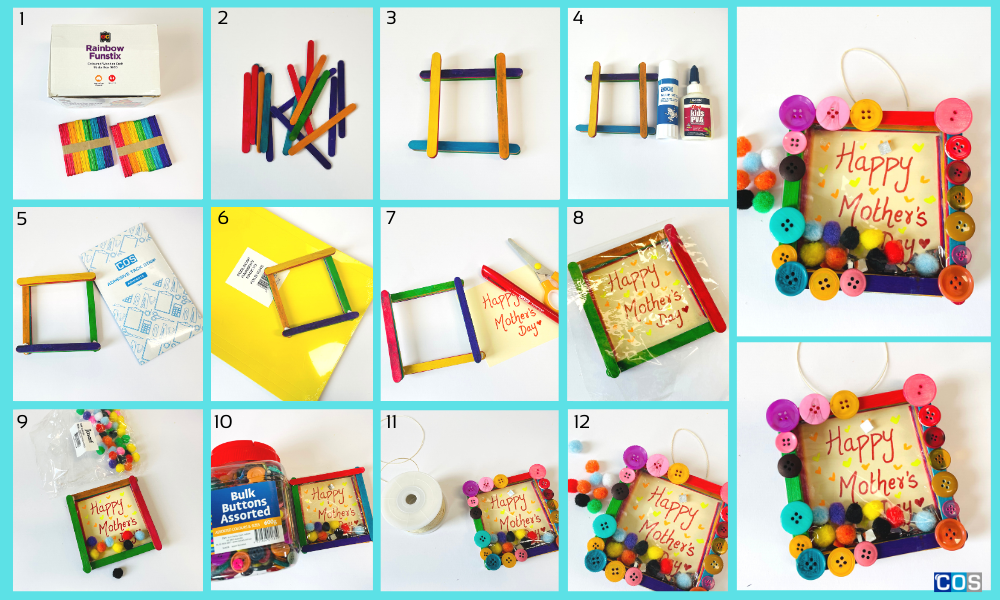
Popstick Box Display Frame
Things you’ll need:
- Coloured board
- Rainbow timber popsticks
- PVA Glue
- Adhesive tack
- Decorations of your choice – pom poms, sequins, buttons, and glitter pens!
- Permanent Marker
- Scissors
- Glue stick
- Pencil
- Twine
Instructions:
1. To construct a frame, begin by arranging popsticks into a square shape on a flat surface.
2. Use PVA glue or adhesive tack to carefully bond the popsicle sticks, ensuring secure connections at the corners for the base of the frame.
3. Once the base is set, glue additional popsicle sticks around the edges to create a border. This will add a decorative touch to your frame.
4. Allow the glue to dry completely before moving on to this step.
5. Cut a piece of cardboard or thick paper to fit the back of your frame. This will serve as the backing. Paint or decorate the backing if desired.
6. Attach the cardboard backing using the PVA glue. This will create a sturdy structure for your frame.
7. Place photos or handwritten Mother’s Day messages inside the frame. If you’d like, you can put some buttons, pom-poms, or pictures directly on the backing or use small clips to hold them in place.
8. To prevent items from falling out, place a transparent sheet over the frame and affix it securely using PVA glue.
9. If you want to hang the frame, attach a ribbon or twine to the back. Simply glue each end of the ribbon or twine to the top corners of the frame.
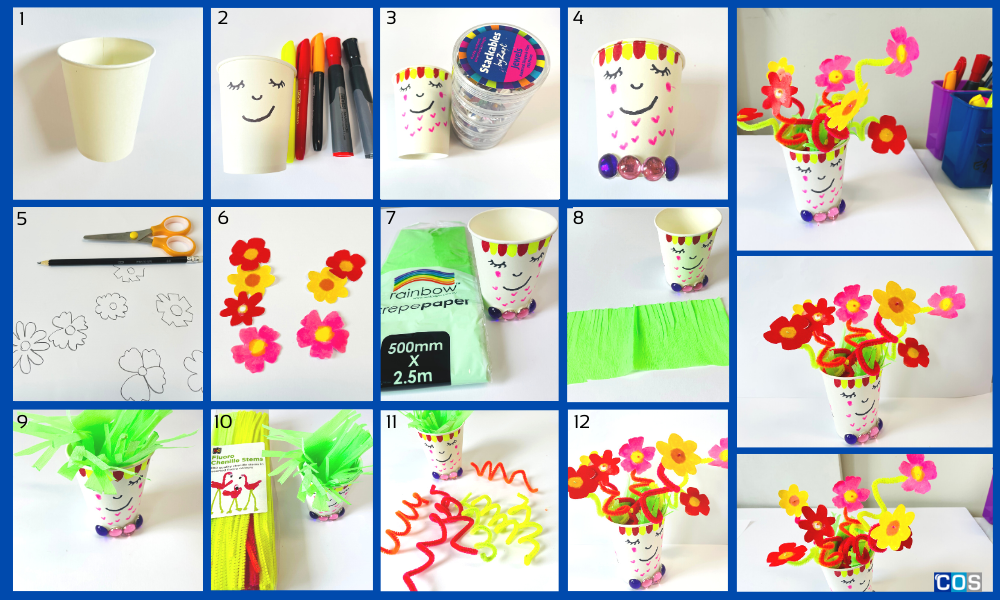
Paper Cup Flower Bouquet
Things you’ll need:
- Coloured copy paper
- Paper cup
- Crepe paper
- Chenille stems (Pipe cleaners)
- Decorations of your choice – pom poms, sequins, or buttons
- Permanent Marker
- Scissors
- Glue stick
- Pencil
Instructions:
1. To begin with, draw flowers on coloured paper. You can choose various colours to make the flowers vibrant.
2. Now, take one paper cup, if your paper cup is not already coloured, you can decorate it by glueing or wrapping coloured paper around the outside. You can make some cute drawings or can add some buttons, pom-poms, or rhinestones.
3. Take a green coloured crepe paper and cut strips using scissors and place them inside the cup to create a grass-like appearance.
4. Once your cup and flowers are ready, cut chenille stems to your desired length for the flower stems. Twist and shape the chenille stems to create a realistic-looking flower stem.
5. Apply glue to the end of the chenille stem and insert it into the bottom of the paper cup, securing the flower head in place.
6. You can also tie a ribbon around the bouquet for an extra decorative touch. This step is optional but can enhance the overall presentation.
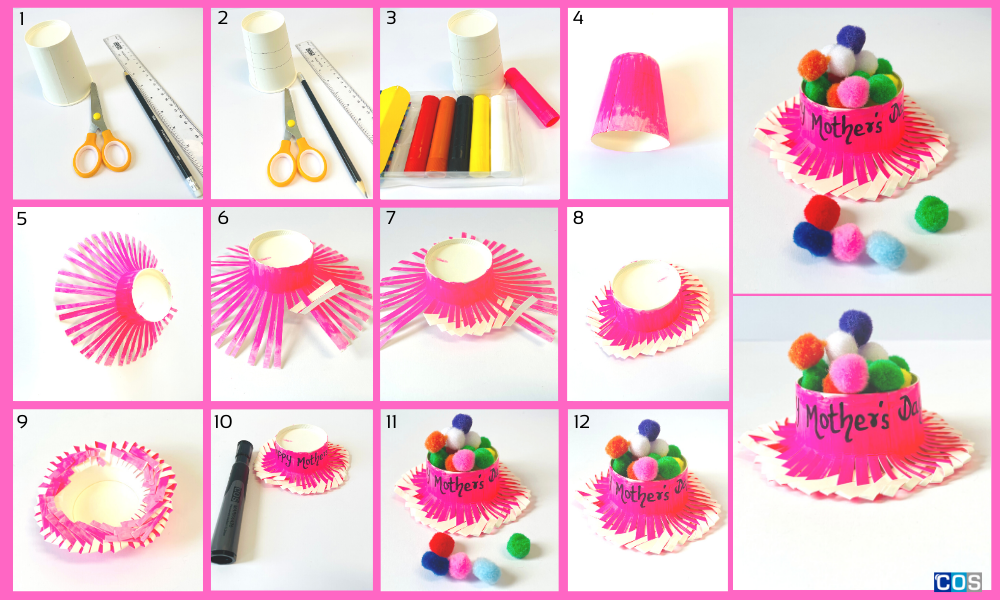
Paper Cup Decoration Hat
Things you’ll need:
- Paper cup
- Water colours, crayons, or slick colour sticks
- Decorations of your choice – pom poms, sequins, or buttons
- Permanent Marker
- Scissors
- Glue stick
- Pencil
Instructions:
1.Take a paper cup, if the paper cup is white, you can colour it using water colours, crayons, or slick paint sticks.
2. After colouring, measure and mark 2.5cm from the top of the cup, then make another mark 2.5cm further down. Draw 0.5cm lines at these markings for making strips.
3. Carefully cut along the rim of the cup to remove it, creating a flat, circular shape.
4. Next, cut along the 0.5cm markings up to the 2.5cm marking to create strips.
5. After cutting the strips, flatten the cup from top.
6. Take one strip and fold it upwards, then take another strip on top of it and repeat the process until you achieve a structure resembling image 8.
7. Once completed, take coloured marker and write your message.
8. Feel free to add embellishments such as a bow or other decorations to enhance the hat’s appearance.