As Easter approaches, the timeless tradition of crafting Easter bonnets for kids can once again take centre stage in the festivities. Whether you’re a teacher planning a classroom activity or a parent looking for an engaging project to do with your little ones at home, these Easter hat craft projects are bound to bring smiles and infuse a creative spirit into the season.
We’ve compiled some cute DIY Easter bonnet patterns for teachers, parents, and kids that combine fun, imagination, and a dash of festive spirit. With a range of materials at their disposal, from colourful ribbons and fluffy feathers to sparkling sequins and cheerful pom-poms, kids can transform simple hats into masterpieces that will reflect their unique personalities. So, let the crafting adventure begin!
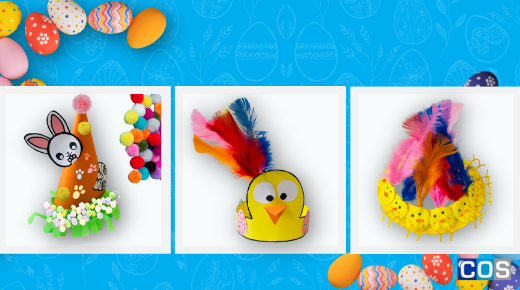
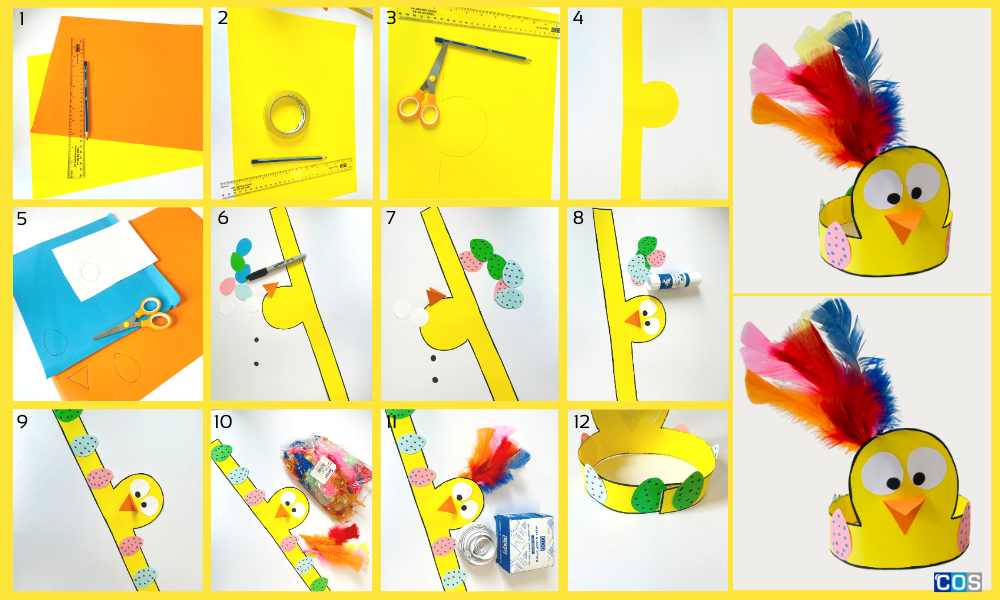
DIY Chicken Headband
Things you’ll need:
- Coloured copy paper
- A round object for drawing a circle
- Decoration material: Buttons/jewels and rhinestones/pom-poms
- Marker
- Scissors
- Glue stick
- Ruler
- Pencil
- Colourful craft feathers
- Hook & Loop fastener
Instructions:
- To start, grab a coloured copy paper of your choice and measure 24cm in length and 4cm in width, marking the dimensions for the headband’s base.
- Before cutting, identify the centre and use a round object to outline the chicken head. Carefully cut along the marked areas.
- Carefully cut out the marked areas, ensuring there’s enough width for the hat’s brim.
- Now take a different coloured copy paper to create egg shapes and make sure they are of the same size, which can easily fit on the side of the headband, and cut them out.
- Before sticking the eggs on the headband, make it more appealing by drawing on the egg cut-outs or adding jewels, rhinestones, or pom-poms; stick the decorated eggs to the headband side using a glue stick.
- For crafting chicken eyes, cut two small circles on white construction paper and cut smaller circles on black paper for pupils.
- Stick the black circles onto the white ones and affix them to the chicken head on the hat.
- For the beak, use another piece of orange paper and cut a small diamond shape; fold it in half to form a triangular beak; and glue the folded side onto the hat.
- To fashion the chicken comb, take coloured features and stick them around the brim of the hat. Use hoop and loop fastener spots at the ends of the headband to secure the hat in place.
- Now you have a fun and festive chicken hat to wear for various occasions. Enjoy your feathered creation!
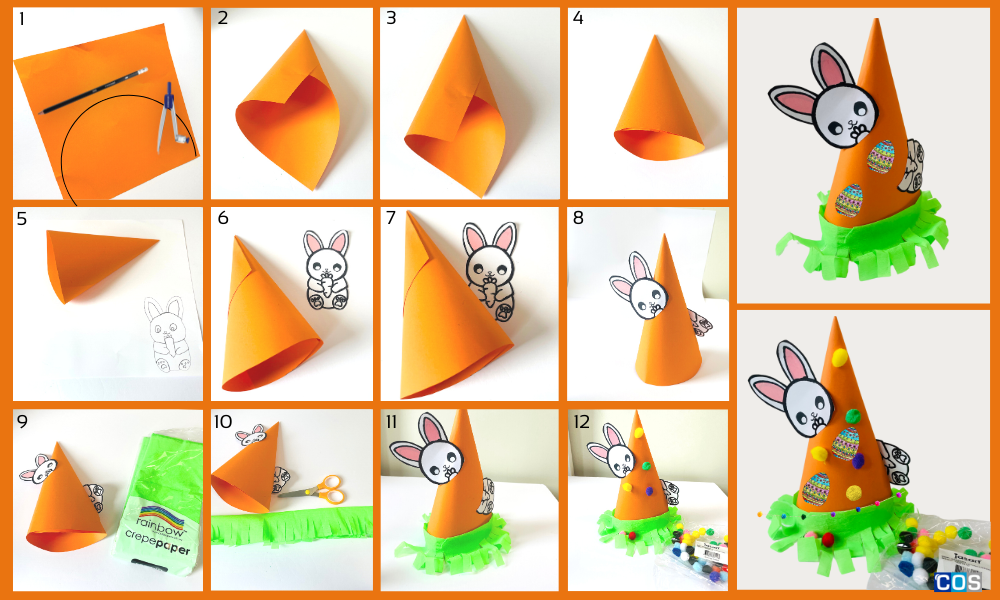
Easter Bunny Cone Hat
Things you’ll need:
Instructions:
1. Begin by choosing vibrant orange copy paper. Use a compass to draw a half-circle of radius between 9 to 10 inches on copy paper.
2. Cut out the half circle and seamlessly bring its two ends together, creating a cone shape. Adjust the size to fit your head snugly, widening the base if you plan to add embellishments like brims or frills.
3. Seal the seams from the inside of the cone by pressing and sticking them securely in place.
4. Now, take a piece of white copy paper and draw a bunny figure. Ensure the bunny is large enough to cover the surface of the hat.
5. Cut out the bunny shape and stick the head on one side of the hat, and the other cut out on the opposite side. This arrangement gives the delightful illusion that the bunny is peeking from behind the cone.
6. Moving on, take crepe paper and cut strips approximately 4cm wide. Carefully create frills by cutting the crepe paper, adding a charming touch to the bottom of the cone.
7. Attach the frills to the base of the cone, covering it completely and giving your hat a playful and decorative edge.
8. You can adorn the hat with pom-poms, rhinestones, or buttons.
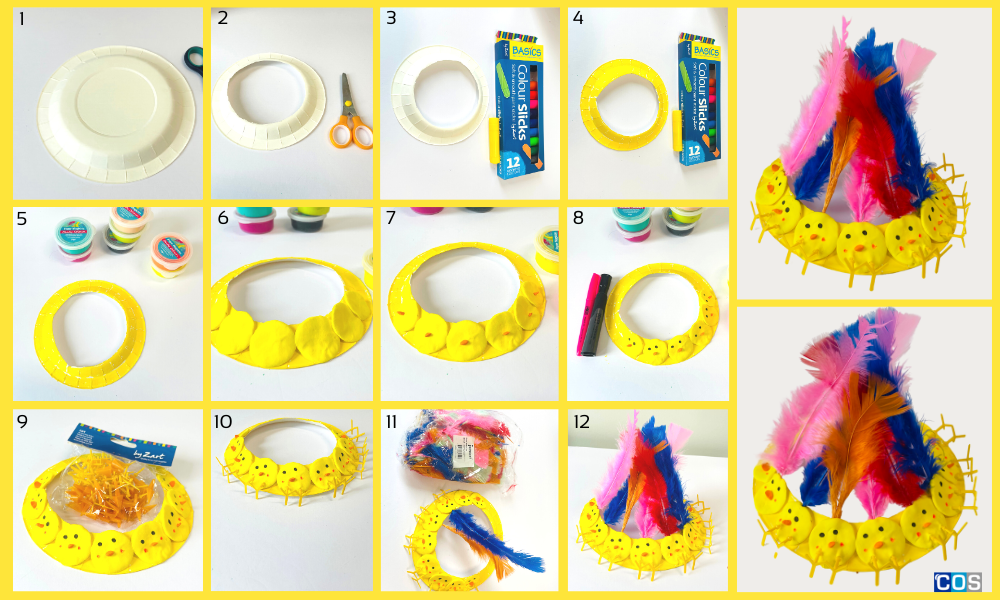
Cute Paper Plate Chicken Hat
Things you’ll need:
Instructions:
- Take a paper plate and cut it from the centre using scissors or snap cutter.
- Make sure that the plate’s edges are left intact for decorative purposes.
- For colouring the paper plate, take slick paint sticks, crayons, or watercolour. Cover the entire plate cut-out using the colouring tool of your choice.
- Once it’s fully dry, take modelling clay to make small circles. Once the circles are done, press them onto the edge firmly covering the entire plate with it.
- Now take a marker, to draw eyes on the chicken figures and create a nose using clay.
- To fashion legs for your paper plate chickens, you have the option of using either clay or plastic chicken feet. Insert the chosen material into the clay base and secure it.
- You can decorate the paper plate with craft features, to make it look more colourful and attractive.