Mother’s Day is the perfect opportunity to help kids create something heartfelt, personal, and full of love. While store-bought gifts are always appreciated, there’s something truly special about a handmade creation that comes straight from the heart.
Crafting also gives children a chance to slow down, get creative, and think about what makes Mum so important to them, turning simple materials into meaningful keepsakes she’ll treasure for years to come.
Whether you’re planning a classroom activity, a weekend project at home, or a last-minute surprise, these fun and easy craft ideas are designed to suit a range of ages and skill levels.
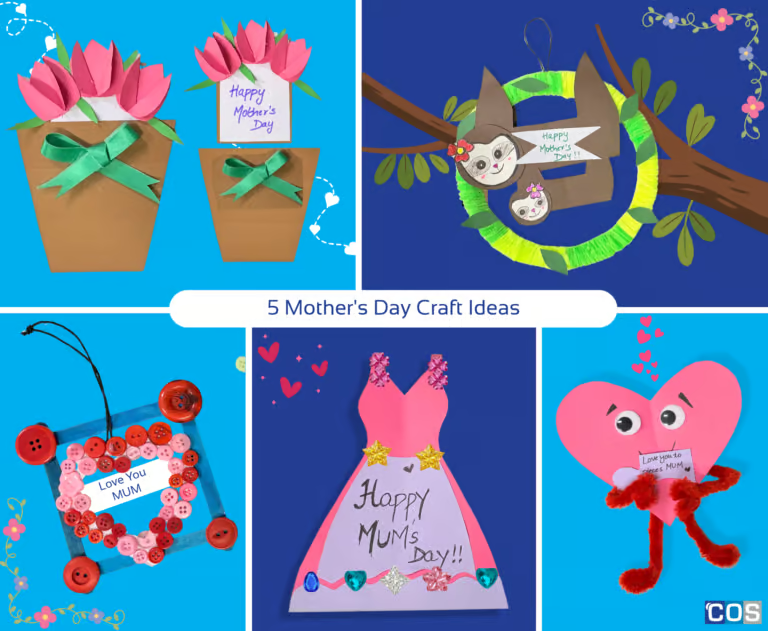
We’ve created 5 Mother’s Day crafts from a Handmade Paper Dress Gift Box that doubles as a beautiful way to present a small gift, to a Pull-Up Flower Card that reveals a blooming surprise, each idea brings its own unique charm.
There’s also an Adorable Sloth Paper Plate Craft for a playful twist, a Popstick Frame with a Hanging Heart perfect for displaying a favourite photo, and a “Love You to Pieces” Heart Craft that delivers a sweet and simple message. These crafts are all about celebrating love, creativity, and the joy of giving.
1. Handmade Paper Dress Gift Box
Materials Required:
- Coloured copy paper
- Scissors
- Glue
- Ruler
- Pencil
- Markers, crayons, or pencil colours
- Rhinestones, jewels, or buttons
- Lollies, candies, or jewellery for filling up the box

Step-by-Step Instructions:
Step 1: Create the Dress Base
- Take a coloured paper measuring 36 cm x 14 cm.
- Fold it in half at the 18 cm mark.
- On the folded side, draw the outline of a dress.
- Carefully cut along the outline using scissors.
- Open the paper to reveal a symmetrical dress shape on both sides.
Step 2: Make the Inner Gift Box
- Take another coloured paper (or copy paper) sized 12 cm x 10 cm.
- Measure and mark 2 cm from all four edges.
- Fold along these lines to form creases.
- Cut small slits along the corners so the sides can fold easily.
- Fold and glue the sides to create a neat open box.
Step 3: Decorate the Dress
- Cut out frill designs from coloured or patterned paper.
- Stick the frills along the edges of the dress (on both sides) for a stylish look.
- Cut a contrasting piece of paper to fit the middle section of the dress and glue it in place for added detail.
Step 4: Add Your Message
- Write a heartfelt Mother’s Day message on a small card or directly onto the dress.
Step 5: Assemble the Gift Box
- Apply glue to the back of the box you created.
- Carefully stick it inside the dress so it sits securely between both sides.
Step 6: Embellish Your Design
- Decorate the dress with embellishments like jewels, rhinestones, buttons, bows, or glitter to make it extra special.
Step 7: Fill & Gift
- Add small treats like candies, chocolates, or little surprises into the box.
- Close the dress and present your beautiful handmade gift to your mum ❤️
2. Pull Up Flower Card
Materials Required:
- Coloured copy paper
- Scissors
- Glue
- Markers, crayons, or pencil colours
- Ruler
- Ribbon
- Rhinestones, jewels, or buttons

Step-by-Step Instructions:
Step 1: Create the Pot Base
- Take the brown copy paper (15 cm x 7 cm).
- Fold it in half lengthwise, leaving about 3 cm on one side.
- Fold the remaining 3 cm from the top edge toward the opposite side.
Step 2: Shape the Pot
- Using a pencil and ruler, draw a curved outline on the sides to resemble a flower pot shape.
- Cut along the outline if needed.
Step 3: Assemble the Pot
- Apply glue on the side edges and stick them together to form a pocket.
- Do not glue the top opening.
- Fold the top flap backward and glue it neatly to secure the pot shape.
Step 4: Make the Message Card
- Take another piece of paper (5 cm x 5 cm).
- Write your Mother’s Day message on it.
Step 5: Create Tulip Flowers
- Use coloured paper to draw and cut petal and leaf shapes.
- Assemble them to form tulip flowers by sticking the petals together.
Step 6: Attach the Flowers
- Stick the message card inside the pot pocket.
- Glue one tulip on top of the card, then add 2 more flowers.
- Create and attach leaves around the flowers for a fuller look.
Step 7: Decorate
- Decorate the outside of the pot.
- Write “Happy Mother’s Day” on the pot.
- Add jewels, bows, or other decorations to make it special.
3. Adorable Sloth - Paper Plate Craft
Materials Required:
- Paper plate
- Pipe cleaners
- Coloured copy paper
- Scissors
- Snap cutter
- Ribbon or cord
- Glue
- Pencil
- Coloured marker, pencil colours, crayons

Step-by-Step Instructions:
Step 1: Prepare the Paper Plate
Take a round paper plate and carefully cut out the middle section, leaving a sturdy outer ring. This will form the base of your sloth craft.
Step 2: Decorate the Plate with Pipe Cleaners
Choose green pipe cleaners (or any colour you like). Start wrapping them around the outer rim of the paper plate. Twist and secure them as you go, making sure they are wrapped neatly and cover the entire ring.
Step 3: Create the Sloth Shape
On a separate piece of copy paper, draw a cute sloth (a mum and a baby).
Step 4: Cut Out the Sloth Shapes
Carefully cut out your sloth drawing. If your design has separate parts, cut those out individually for easier assembly.
Step 5: Attach the sloth to the plate
Place your sloth cut-out in the centre of the paper plate ring and glue it securely so it looks like the sloth is hanging.
Step 6: Draw the Sloth’s Face
Cut out two small circles from paper to create the face details and glue them onto the head.
Step 7: Add Facial Features
Use markers or pens to draw the eyes, nose, and mouth. Add any extra details like flowers or anything you like.
Step 8: Final Touches
Check that all pieces are firmly glued and add any extra decorations like leaves.
Step 9: Add a hanging ribbon
Punch a small hole at the top or loop a ribbon around the plate. Tie a knot to create a hanger so your mum can hang your craft.
Step 10: Add Your ‘Mother’s Day’ Message
Take a piece of paper and write a message for you mum and stick it on Sloth.
4. Popstick Frame with Hanging Heart
Materials Required:
- Coloured copy paper
- Scissors
- Popsticks
- Glue
- Markers, crayons, or pencil colours
- Ribbon or cord
- Rhinestones, jewels, or buttons

Step-by-Step Instructions:
Step 1: Create the Frame Base
Arrange 4 popsticks (craft sticks) in a square shape. Glue the corners where the sticks overlap and let it dry completely.
Step 2: Make the heart cut-out
Draw a heart shape on cardboard or cardstock and carefully cut it out. You can make it any size that fits nicely inside the frame.
Step 3: Cut the Inner Heart Section
Inside the heart, draw a smaller heart about 1 cm in from the edge. Carefully cut out this inner section to create a hollow heart frame.
Step 4: Decorate the Heart
Stick small buttons onto the heart frame using glue. Arrange them in a pattern or randomly to create a fun, textured look. Let it dry.
Step 5: Add a Message
Write a sweet message like “Happy Mother’s Day” or “Love You Mum” on the heart or frame.
Step 6: Attach the Hanging String
Cut a small piece of string or ribbon. Tape or glue one end to the top back of the frame.
Step 7: Hang the Heart Inside the Frame
Attach the other end of the string to the top of the heart so it hangs freely in the centre of the frame.
Step 8: Add a Hanger
Tie a ribbon or string to the top of the frame so it can be hung up.
Step 9: Final Touches
Check everything is secure and dry. Your beautiful handmade Mother’s Day frame is ready to gift!
5. Love You to Pieces - Heart Craft
Materials Required:

Step-by-Step Instructions:
Step 1: Prepare the Paper
Take a coloured copy paper for the heart and another sheet of copy paper for the puzzle piece.
Step 2: Draw the Heart Shape
On the coloured paper, draw a large heart shape using a pencil.
Step 3: Cut out the Heart Shape
Carefully cut out the heart shape using scissors.
Step 4: Add Joggle Eyes
Stick joggle eyes onto the heart to give it a fun character.
Step 5: Draw Facial Features
Use markers or pens to draw a smile, nose, and any other facial details on the heart.
Step 6: Create the Puzzle Piece
On the second sheet of paper, draw a puzzle piece shape and cut it out neatly.
Step 7: Write Your Message
Write a sweet message like “Love You to Pieces” on the puzzle piece.
Step 8: Make Hands and Legs
Take pipe cleaners and bend them to create arms and legs for the heart.
Step 9: Attach the Pieces
Stick or tape the pipe cleaner arms and legs to the back of the heart.
Step 10: Add the Puzzle Piece
Place the puzzle piece between the heart’s hands and glue it in position so it looks like the heart is holding it.
Step 11: Final Touches
Check everything is secure and let it dry. Your cute “Love You to Pieces” craft is ready!
Looking for even more inspiration? Try simple yet meaningful ideas like paper flower bouquets, cute coffee cup cards, or colourful handmade baskets filled with love. These 5 DIY Mother’s Day Crafts for Kids are perfect for little hands and turn everyday materials into thoughtful Mother’s Day keepsakes.
Explore 4 Cute Craft Projects for Mother’s Day, where kids can create personalised tote bags using paint or clay flowers, or decorate popstick frames with buttons, colours, and creative designs for a personal touch.
Popsticks are also perfect for quick and creative crafts such as recipe holders, earring holders, flower pots, and decorative flower designs. These simple projects are fun to make and result in both practical and heartfelt gifts Mum will love.
A popstick picture frame is another easy and meaningful idea where kids decorate and assemble wooden sticks into a frame for a favourite photo or message. It’s a beautiful way to turn a special memory into a handmade keepsake Mum can treasure forever.