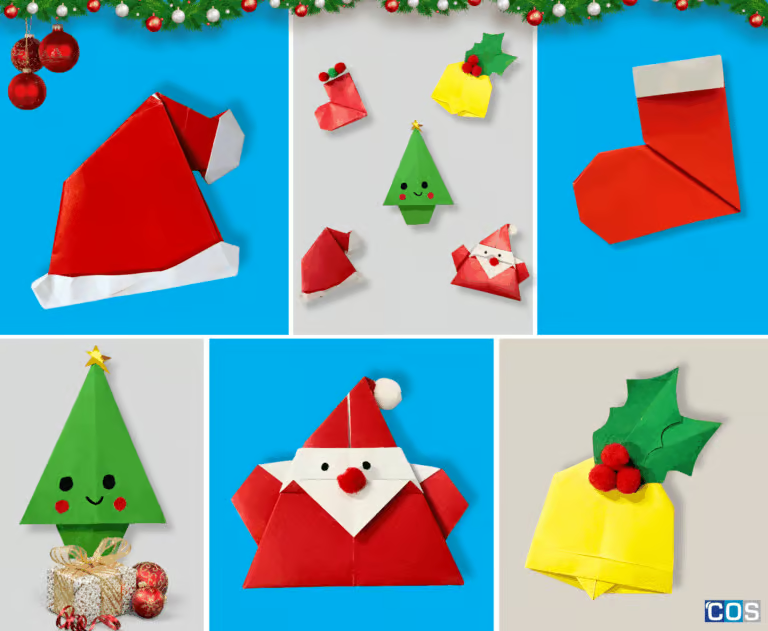
Bring the joy of the season to life with these delightful Origami Christmas Crafts. Whether you’re looking for a fun holiday activity for kids, a creative classroom project, or simply a way to add a handmade touch to your Christmas décor, origami is the perfect choice.
We’ve created 5 festive origami crafts to make this season extra special, a jolly Origami Santa; a playful Santa Hat, adorable Christmas Bells, cute Santa Boots, and a festive Origami Christmas Tree. Each craft is easy-to-make, using just a few materials and easy-to-follow steps, making them ideal for all ages and skill levels.
Display your origami creations on the Christmas tree, string them into cheerful garlands, or use them to decorate greeting cards and gift packages.
1. Jolly Origami Santa
Materials Required:
- Copy paper (15cm x 15cm)
- Coloured markers
- Copy paper (15cm x 15cm)
- Ruler
- For decoration (Pom-poms, rhinestones, sequins, or buttons)

Step-by-Step Instructions:
Step 1: Start Position
Place the paper coloured side up in a diamond shape. Position it so one corner points directly toward you. This orientation will make the folds easier to follow.
Step 2: Make Centre Creases
Fold the paper diagonally from one corner to the opposite corner. Press firmly to make a crease, then unfold.
Next, fold the paper horizontally from side to side and crease well. Unfold.
These folds create the central lines that will guide all the next folds.
Step 3: Open the Flaps
Gently lift and open the paper along the folds you just made. This allows the paper to move easily into the next shape.
Step 4: Form a Kite Shape
Fold the left and right corners up to meet the top corner. Press the folds firmly.
Then fold the bottom left and right edges inward to meet the central vertical crease.
This forms a kite-like shape, which will become Santa’s hat and face base.
Step 5: Fold the Bottom Triangle
Fold the bottom triangle upward so that the edges meet neatly at the centre. This starts forming the lower part of Santa’s face.
Step 6: Flip the Paper
Turn the paper over. You should now see a diamond with a vertical centre seam. Press all edges firmly to keep the shape stable.
Step 7: Fold the Hat Tip
Fold the top corner down about one-third of the way. This creates the white tip of Santa’s hat. Make a sharp crease to keep it neat.
Step 8: Shape the Sides
Fold the left and right side flaps toward the centre along the existing creases. This forms the sides of Santa’s hat and the triangular face beneath it.
Step 9: Refine the Flaps
Fold the side flaps back along the dotted lines (or crease lines) to tidy the edges and keep the shape crisp.
Step 10: Flip to Front
Turn the paper over again. You should now see a triangular red hat on top and a white triangular face below it.
Step 11: Shape the Beard
Fold a small horizontal strip (0.5–1 cm) of the bottom edge upward behind the face. This forms the straight base of Santa’s beard.
Step 12: Fold the Beard Triangle
Fold the bottom white triangle up about 1 cm, then fold it back down again. This creates the triangular shape of the beard, giving Santa a neat, defined look.
Step 13: Finish the Hat
Fold the top corner down along the dotted line to finalize the shape of the hat tip. Adjust the folds so the hat tip points neatly.
Step 14: Decoration
Draw two small eyes with a black pen.
Add a nose by drawing a small circle or gluing a tiny paper circle.
Adjust the creases so the hat tip stands upright and the beard sits evenly over the face.
Flatten or round edges lightly with your fingernail to give a crisp, finished look.
2. Fold Up a Festive Hat
Materials Required:
- Copy paper (15cm x 15cm)
- Coloured markers
- Copy paper (15cm x 15cm)
- Ruler
- For decoration (Pom-poms, rhinestones, sequins, or buttons)

Step-by-Step Instructions:
Step 1: Grab a Coloured Paper
Place the paper with the red side facing down. Position it in front of you like a diamond, so one corner points toward you.
Step 2: Make Diagonal Creases
Fold the bottom right corner to meet the top left corner. Press firmly to make a crease, then unfold.
Next, fold the bottom left corner to meet the top right corner. Press firmly and unfold.
These two folds create the diagonal reference lines for later steps.
Step 3: Form a Triangle
Fold the left corner to the right side along one of the diagonal creases. Make sure the point aligns with the crease intersection. This starts forming the cone shape of the hat.
Step 4: Form the Cone Shape
Fold the right corner to the left side along the crease, slightly overlapping the left fold. Press firmly to maintain the triangular cone shape.
Step 5: Fold the Bottom Edge
Fold the bottom layer up about 1–2 cm. This creates the base edge of the hat and stabilizes the structure for later folds.
Step 6: Fold the Top Down
Turn the paper over. Fold the top corner down along the line connecting the intersection points created by previous folds. Press firmly, then unfold. This will guide the hat tip and trim.
Step 7: Create a Triangle
Fold the top point down to the centre intersection point to form a smaller triangle on top. This shapes the upper part of the hat.
Step 8: Fold Bottom and Sides
Fold the bottom 1 cm upward over the triangle.
Fold the left and right sides diagonally toward the centre, forming the basic cone shape.
Fold the top edge along the crease and slightly lift the bottom tip to give structure.
Step 9: Shape the Top Triangle
Fold the top along the creases to form a well-defined triangular tip for the hat. This will become the visible point of the Santa hat.
Step 10: Make a Smaller Triangle on Top
Unfold the top triangle slightly, then fold a smaller triangle on top of it. This adds layers and structure to the hat tip.
Step 11: Fold Half Triangle
Fold the left edge toward the right along the crease, creating a symmetrical shape and stabilizing the cone.
Step 12: Open Top Left Corner
Lift the top left corner and flatten it toward the left along the dotted line connecting the two white spots. This forms part of the hat’s trim.
Step 13: Repeat on Right Side
Repeat the same process with the right corner, folding and flattening it toward the left to complete the symmetry of the trim.
Step 14: Create the Hat Trim
Open the bottom left corner, push it slightly upward, and flatten along the existing crease. This creates the base trim of the hat.
Step 15: Adjust Top Corners
Open and flatten the top left corner again to refine the hat tip.
Open and flatten the top right corner in the same way.
Slightly fold the bottom point of the top layer backward for stability and clean edges.
Step 16: Final Fold
Fold the top part down slightly to perfect the triangular tip of the Santa hat.
Finishing Touches
Turn the paper over. Tuck the bottom edge of the top layer into the layers beneath to secure it. Your origami Santa hat is now complete! 🎅
3. Fold, Hang, and Celebrate: Christmas Bells

Materials Required:
- Copy paper (15cm x 15cm)
- Coloured markers
- Ruler
- For decoration (Pom-poms, rhinestones, sequins, or buttons)
- Pencil
- Scissors
- Glue stick
Step-by-Step Instructions:
Step 1: Prepare Your Paper
Start with a square piece of colored copy paper, ideally 15 cm x 15 cm. Place it flat on a clean, even surface with the colored side facing down. This will be the main body of your bell.
Step 2: Create a Vertical Fold
Fold the paper in half vertically to form a rectangle. Press firmly along the fold to create a sharp crease, then unfold the paper. This vertical crease will serve as a guide for the next folds.
Step 3: Create a Horizontal Fold
Next, fold the paper in half horizontally, forming a rectangle again. Unfold it. You should now see two intersecting creases at the center, forming a cross that will help with alignment in the following steps.
Step 4: Fold the Edge Slightly
Take one side of the square and fold about 1–1.5 cm inward. This small fold will later help define the shape of the bell and give it more dimension.
Step 5: Collapse the Paper into a Triangle
Flip the paper over. Gently push the side creases inward while bringing the top and bottom corners together. Flatten the paper into a triangle shape. Fold the top corner inward so that it meets the center of the square, which will help form the bell’s top.
Step 6: Fold the Opposite Corner
Repeat the same fold with the other top corner, folding it inward to the center. Both corners should now meet neatly, giving the bell a symmetrical shape.
Step 7: Position the Point
Fold the paper in half vertically again, keeping the pointed corner slightly exposed in the middle. This will create the iconic bell shape with a slight curve at the bottom.
Step 8: Fold the Right Side Diagonally
Fold the right side of the bell slightly inward along the middle line. This diagonal fold helps give the bell a three-dimensional look.
Step 9: Fold the Left Side
Repeat the same diagonal fold on the left side so that both sides angle inward evenly, completing the bell’s tapered shape.
Step 10: Adjust the Sides
Check both folded sides to ensure they are symmetrical and well-creased. Press along the folds firmly to maintain the shape.
Step 11: Fold the Top Left Corner
Take about 1 cm of the top left corner and fold it inward. This small adjustment helps tidy the top of the bell.
Step 12: Fold the Top Right Corner
Do the same with the top right corner, folding 1 cm inward to match the left side. This gives the top of the bell a neat, finished appearance.
Step 13: Shape the Bell
Flip the paper over. Gently open the flaps and puff out the middle section to form a natural bell curve. Press lightly to secure the shape without flattening it.
Step 14: Create Leaves
Take green colored copy paper and draw two leaf shapes. Carefully cut them out, ensuring they are proportional to your bell.
Step 15: Attach the Leaves
Use a glue stick to attach the leaves to the top of the bell. Position them so they fan out naturally, giving your bell a realistic look.
Step 16: Add Cherries
Finally, glue small red pom-poms under the leaves to resemble cherries. Press lightly and let the glue dry completely.
4. Cute Santa Boots
Materials Required:
- Copy paper (15cm x 15cm)
- Coloured markers
- Ruler
- For decoration (Pom-poms, rhinestones, sequins, or buttons)

Step-by-Step Instructions:
Step 1: Prepare Your Paper
Start with a square piece of copy paper, with the coloured side facing up. Place it on a flat, clean surface. Ensure the paper is smooth and free of wrinkles, as this will be the main body of Santa’s boot.
Step 2: Fold in Half Vertically
Fold the paper in half vertically (left to right). Press firmly along the crease to make it sharp, then unfold. You should now see a clear centre crease, which will act as a guide for the next folds.
Step 3: Create the Top Trim Fold
Fold the top edge downward slightly (about 1 cm). This small fold forms the white trim of Santa’s boot, adding a festive finishing touch to the top of your creation.
Step 4: Fold the Sides Toward the Centre
Fold both the left and right edges inward so that they meet at the center crease. This creates two symmetrical flaps, similar to closing a double door. Ensure the folds are neat and even for a clean boot shape.
Step 5: Fold the Bottom Up to Form the Sole
Fold the bottom edge upward about one-third of the paper’s height. Press firmly along the fold. This forms the sole of the boot, giving it structure and stability.
Step 6: Fold the Paper in Half Side-to-Side
Fold the entire paper from left to right, enclosing the side flaps inside. The open side should now face right, and you’ll have a smaller rectangle. This makes it easier to shape the boot in the next steps.
Step 7: Shape the Toe of the Boot
Take the bottom right corner and fold it diagonally upward toward the left edge to form the boot’s pointed toe. Adjust the angle so the toe looks natural. Press the fold firmly to define the shape.
Step 8: Shape the Heel
Fold a small portion of the bottom left corner upward to form the heel. Fine-tune the fold if needed so the boot’s sole, heel, and toe all look proportionate.
Step 9: Add Festive Decorations (Optional)
Decorate the 1 cm top trim with pom-poms, rhinestones, stickers, or glitter. These fun embellishments give your boot a festive flair and make it stand out as a holiday decoration.
5. Origami Christmas Tree Magic
Materials Required:
- Copy paper (15cm x 15cm)
- Coloured markers
- Ruler
- For decoration (Pom-poms, rhinestones, sequins, or buttons)

Step-by-Step Instructions:
Step 1: Prepare Your Paper
Start with a square piece of paper (15cm x 15cm). Place it on a flat surface to ensure clean, precise folds.
Step 2: Create Diagonal Folds
Fold the paper diagonally from one corner to the opposite corner to form a triangle. Press firmly along the fold to create a crisp crease, then unfold. Repeat the fold along the other diagonal and unfold again. You should now have an “X” crease pattern across the paper.
Step 3: Create Horizontal and Vertical Folds
Next, fold the paper in half horizontally (edge to edge), crease well, and unfold. Then fold it vertically, crease, and unfold.
Step 4: Collapse into a Triangle Base
Bring the left and right edges together toward the centre. Push the paper gently so that it collapses along the creases, forming a triangular base. Flatten the folds carefully to maintain sharp edges.
Step 5: Flip the Paper and Align Edges
Flip the paper over. Take the top edges of the triangle (the sides of the tree) and fold them toward the centre line, forming a more defined triangular tree shape. Make sure both edges align neatly to create symmetry.
Step 6: Fold the Triangle from the Bottom
Bring the bottom tip of the triangle upward, folding it roughly one-third of the triangle’s height from the bottom. Flip the triangle over so that the side with flaps faces you. These flaps will later form the tree branches.
Step 7: Form the Tree Trunk
Hold the triangle with the point facing up. Fold the bottom tip upward slightly to create the effect of a trunk.
Step 8: Shape the Tree Trunk (Optional)
If you want your tree to stand upright, gently fold or trim the bottom of the triangle to create a flat base. This helps the tree remain stable when displayed.
Step 9: Add a Face (Optional)
Use a black marker to draw eyes and a smiling mouth on the tree. Add blush using a red or pink marker to make it look cheerful and festive.
Step 10: Decorate Your Tree
Top your tree with a small paper star. You can also add tiny dots, stickers, or sequins to represent ornaments and give your tree a festive appearance.
Step 11: Your Christmas Tree is Complete
All done! You now have a fully folded origami Christmas tree, decorated and ready for display.
Looking for festive inspiration? Check out our COSpedia article for creative Christmas craft ideas.
Decorating with wreaths is a cherished tradition, symbolising warmth and welcome, and making them can be a fun, hands-on activity for children, encouraging creativity, teamwork, and family bonding.
From vibrant 3D paper trees that brighten any room to charming clay ornaments perfect for the tree, these easy 6 Easy DIY Christmas Craft Projects are designed to delight kids of all ages and bring the joy of crafting to your holiday celebrations.