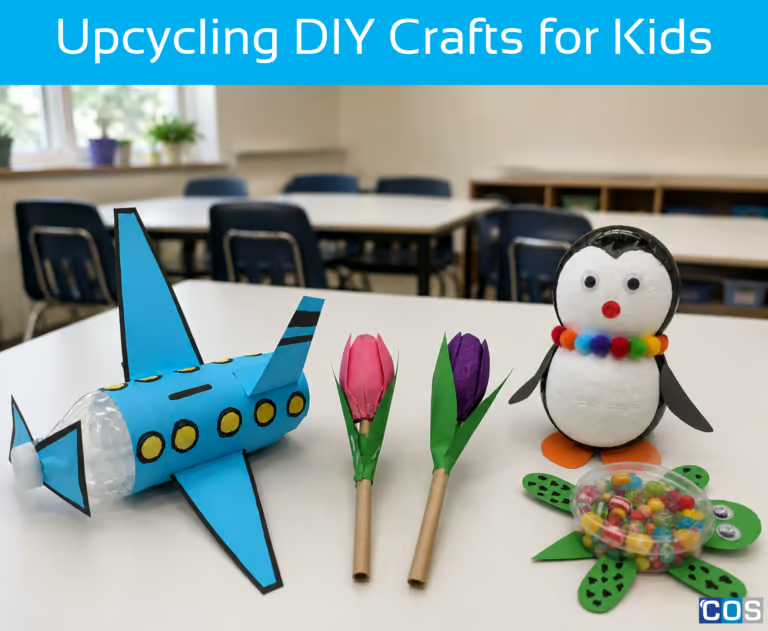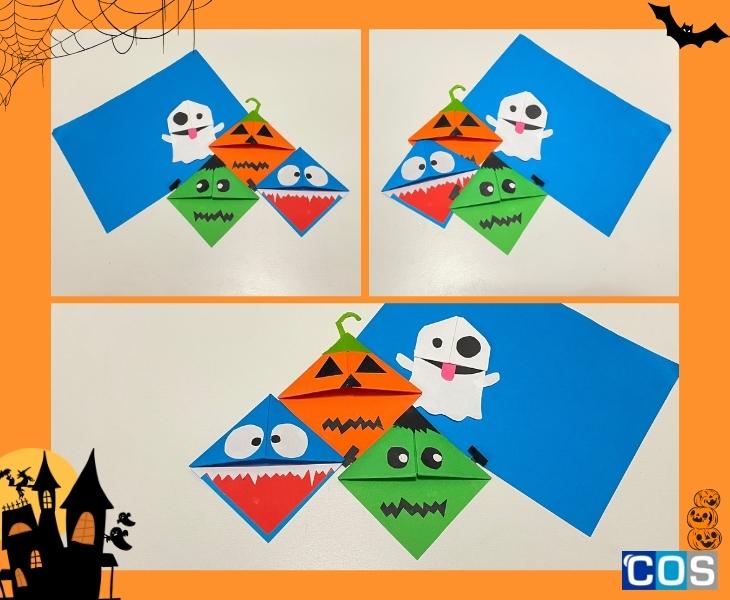
Halloween is just around the corner, and what better way to get into the spooky spirit than by crafting some not-so-spooky bookmarks with the kids? Whether you’re a teacher looking for a fun classroom activity, a parent seeking an engaging craft project, or a fan of Halloween eager to make something special, creating Halloween-themed bookmarks is a fun and creative project idea. Not only are they practical for avid readers, but they also add a touch of spooky charm to your reading materials, while encouraging young readers to dive into their favourite stories.
So, grab your crafting supplies, get into the Halloween spirit, and let your imagination run wild as you create these spooky bookmarks!
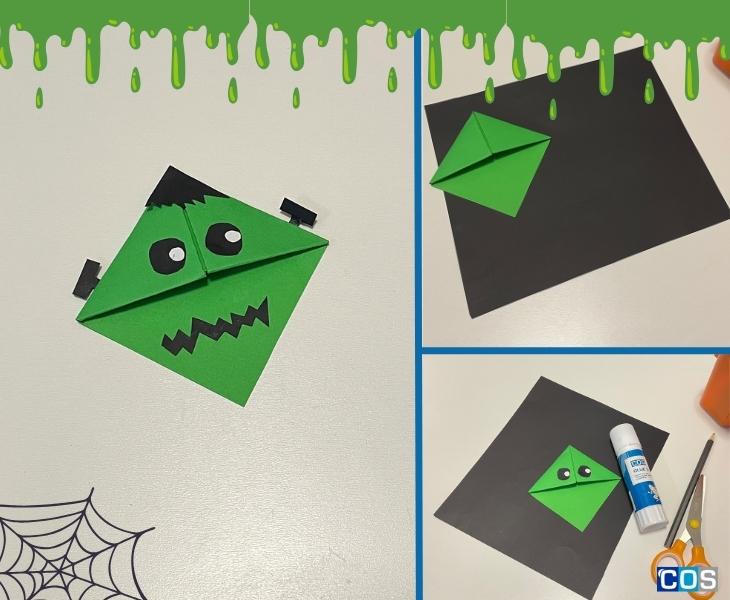
Frankenstein Bookmark
Things you’ll need:
Step-by-Step Instructions:
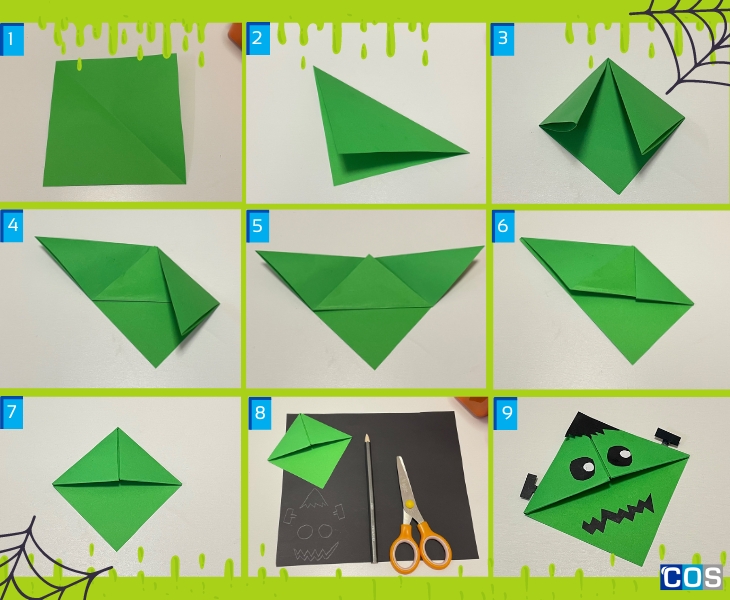
- Cut a 15 × 15 cm sheet of green copy paper and fold it diagonally to make a triangle (give it a fold both ways so you have a nice strong crease).
- Fold back corner on one side – point should meet edge of paper.
- Take each corner at the base of the triangle & fold each up to the centre point, now you will have a square.
- Your square will be left with two loose pieces, fold each of the flaps and tuck them inside.
- To create a Frankenstein-themed bookmark, take a black copy paper. Draw two eyes, a mouth, hair, and bolts on the paper, and then carefully cut-out these shapes using scissors.
- Stick the eyes using glue stick close together near the centre of the triangle, ensuring they are positioned to the right of each other. Place the mouth at the bottom of the triangle, making sure it is centred. Next, stick the bolts on both sides of the triangle.
Now, take the hair cut-out and stick it to the top of the triangle, ensuring it covers the upper portion. Your bookmark is ready!
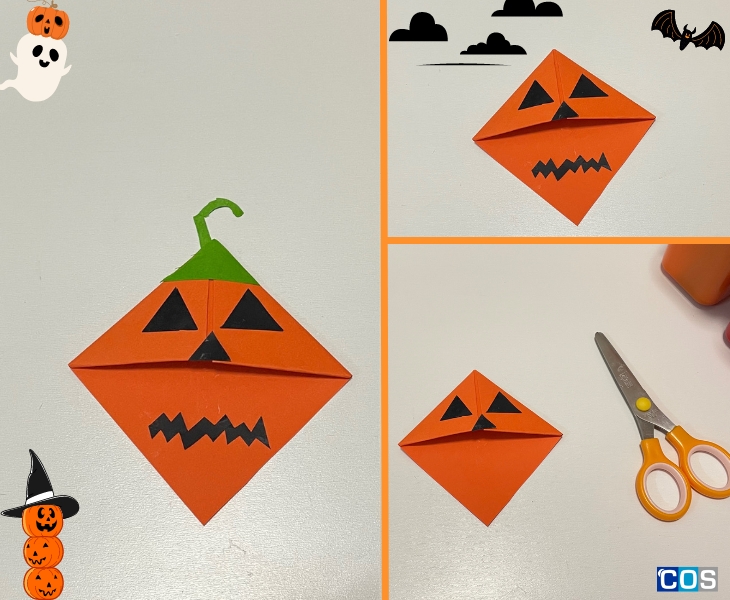
Pumpkin Bookmark
Things you’ll need:
- Coloured copy paper or traditional origami paper (if you have it)
- Scissors
- Pencil
- PVA glue
- Ruler
Step-by-Step Instructions:
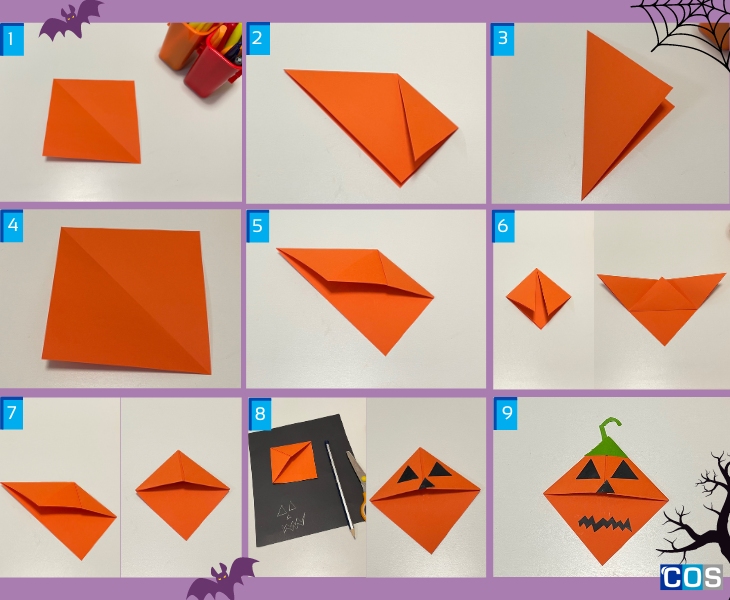
- Start with a 15 × 15 cm sheet of green copy paper. Fold it diagonally to create a triangle, ensuring you make firm creases in both directions to hold the fold.
- Now, on one side, fold back a corner so that its point aligns with the edge of the paper. This will give you a starting point.
- Proceed by taking each corner located at the base of the triangle and folding them upward toward the center point. This folding action will transform your paper into a square shape.
- At this stage, you’ll notice that there are two loose pieces remaining. Fold each of these flaps and neatly tuck them inside.
- To craft a pumpkin-themed bookmark, begin with a sheet of black copy paper.
- Draw two triangular eyes, a triangular nose, and a mouth onto the paper, then carefully cut out these shapes using scissors.
- Next, grab a sheet of green copy paper to create the pumpkin’s stem. Carefully sketch the stem shape, ensuring it will cover the top centre point of the triangle.
- Using a glue stick, stick the eyes in close proximity near the centre of the triangle, ensuring they are aligned to the right of each other. Place the nose at the bottom of the eyes, making sure it is centred. Finally, place the mouth at the bottom of the triangle centre.
- Now take the stem cut-out and glue it on the top of the bookmark in the centre.
- Hooray, your pumpkin-themed bookmark is done!
Ghost Emoji Bookmark
Things you’ll need:
- Coloured copy paper or traditional origami paper (if you have it)
- Scissors
- Pencil
- Coloured marker
- Any round object to help make a circle
- PVA glue
- Pom poms
- Joggle eyes
- Glitter Paper
Step-by-Step Instructions:
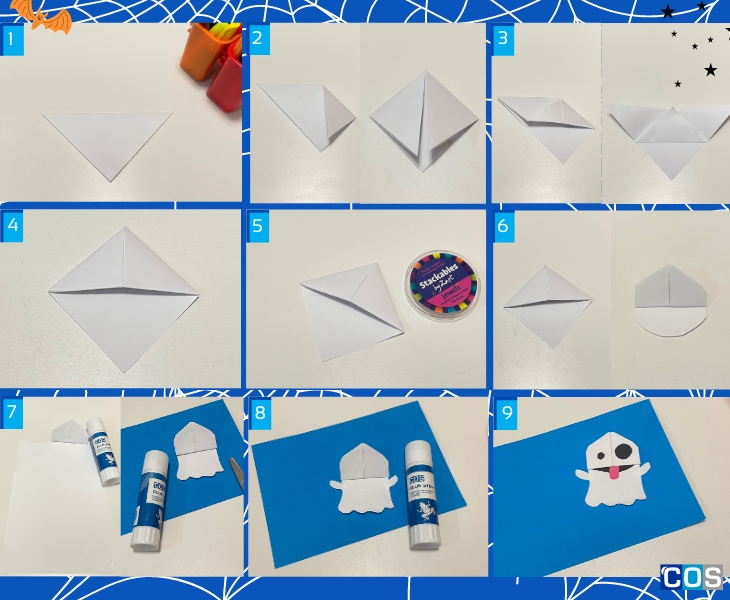
- Take a white 15 × 15 cm sheet of copy paper and fold it diagonally to make a triangle (give it a fold both ways so you have a nice strong crease).
- Fold back corner on one side – point should meet edge of paper. Take each corner at the base of the triangle & fold each up to the centre point, now you will have a square
- Your square will be left with two loose pieces. Fold each of the flaps and tuck them inside.
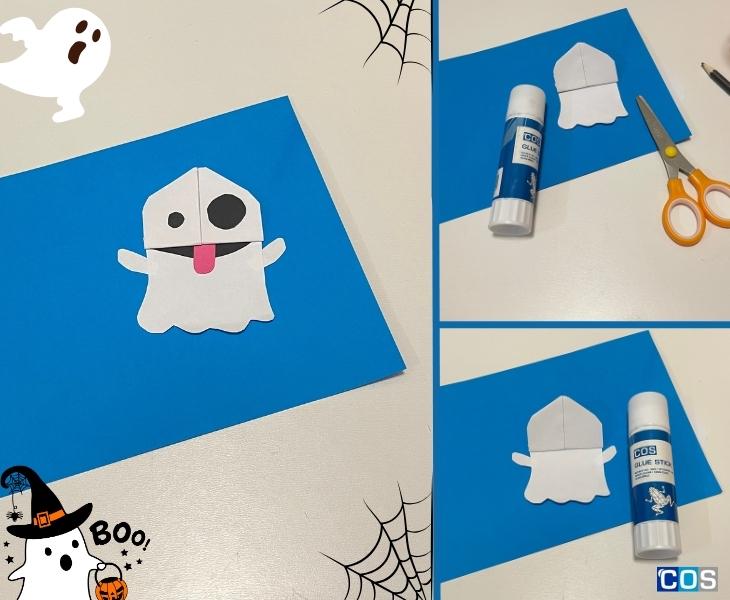
- Take the bookmark and draw a circle, you can use a bottle or any circular object.
- Cut the circle out carefully, making sure it has two straight edges on the folded sides. If you like, you can glue the bookmark together, but it isn’t necessary.
- After making the ghost face, take another white copy paper and place it beneath the ghost face and draw the lower body of the ghost, making sure to match the size of the face.
- Cut out the lower body part of the ghost and attach it to the ghost face using a glue stick.
- To create the ghost’s facial features and hands, use black and white copy paper. Draw two distinct round eyes, with one eye slightly bigger than the other. Position them close together on the ghost’s face.
- For the ghost’s hands, use a white sheet of paper. Draw the hand shapes and attach them on both sides of the ghost’s body, just below the face on the ghost lower body.
- Craft the ghost’s mouth by using black paper. Create an oval-shaped mouth and make a tongue from pink or red copy paper. Cut these shapes neatly and stick them beneath the eyes, towards the centre of the ghost’s face.
- Your ghost-themed bookmark is now ready to be placed in spooky story books.
Shark Bookmark
Things you’ll need:
- Coloured copy paper or traditional origami paper (if you have it)
- Scissors
- Pencil
- Coloured marker
- PVA glue
- Ruler
Step-by-Step Instructions:
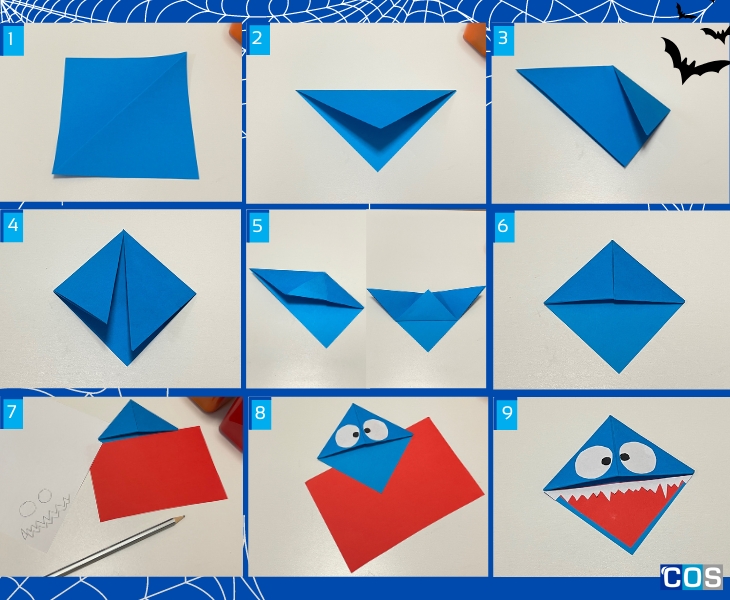
- Take a 15 × 15 cm sheet of copy paper and fold it diagonally to make a triangle (give it a fold both ways so you have a nice strong crease).
- Fold back corner on one side – point should meet edge of paper.
- Take each corner at the base of the triangle & fold each up to the centre point, now you will have a square.
- Your square will be left with two loose pieces and now fold each of the flaps and tuck them inside.
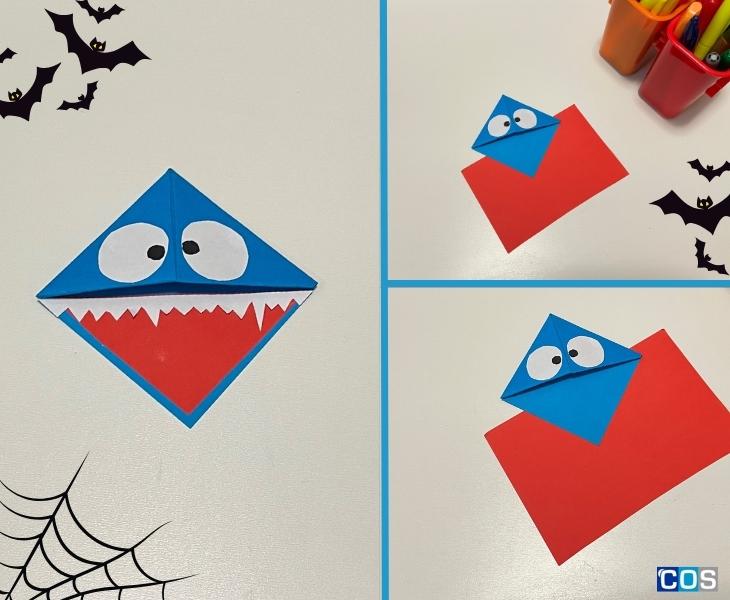
- To create a shark face, start with a sheet of white copy paper. Begin by crafting the eyes: draw two identical circles and carefully cut them out using scissors. Use a black marker to add smaller circle details in the centre corners of the eyes to make it look more spooky. Stick these eye cut-outs towards the centre of the bookmark using a glue stick.
- Next, take a sheet of red copy paper to make the mouth. Place it on top of the bottom triangular and cut it 0.5cm shorter from the sides. Ensure that it covers the bottom portion of the triangular shape while leaving a 0.5cm gap around the edges.
- Now, grab another sheet of white copy paper and draw teeth. Stick the teeth cut-out onto the red paper, positioning it at the centre of both triangles.