As the holiday season approaches, the joy of gift giving comes to the forefront of our minds. While store-bought presents certainly have their charm, there’s something undeniably special about creating your own gift boxes from scratch. Our cute DIY Christmas boxes offer a delightful way to add a personal touch to your holiday gifting, showcasing your creativity and thoughtfulness in every aspect.
As Christmas approaches, educators seek engaging and creative ways to bring the spirit of the season into their classrooms. One delightful and hands-on approach is crafting DIY Christmas boxes for kids. These personalised boxes not only serve as festive decorations but also offer an opportunity for children to express their creativity and learn valuable skills. In this article, we will explore the benefits of creating DIY Christmas boxes in the classroom and provide step-by-step instructions to get you started in creating stunning and meaningful gifts that will be cherished by your loved ones.
DIY Pyramid Gift Box

Materials you’ll need:
- Coloured copy paper
- Ruler
- Pencil
- Scissors
- PVA glue or glue stick
- Ribbon
Instructions:
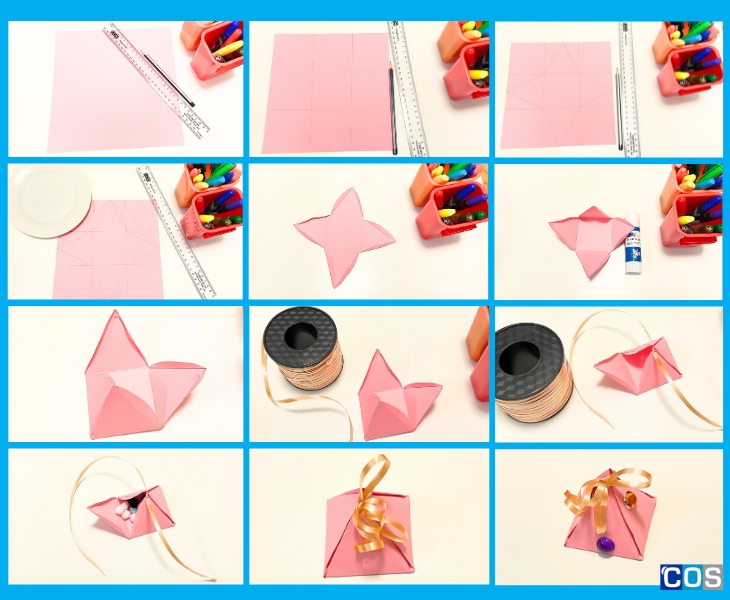
1. Start with a square sheet of paper. Use coloured copy paper, coloured cardstock, or any decorative paper of your choice. Draw 9 Squares on the copy paper (7 cm each square).
2. Use a ruler and pencil to measure and mark the center of each side of the square. These marks will be your folding guidelines.
3. Draw diagonal lines from one corner of the square to the opposite corner, forming an “X” shape. This will create four smaller triangles within the square.
4. Fold each corner of the square towards the center, aligning the corner with the center mark you made earlier. Crease the folds well.
5. Take one of the folded corners and fold the adjacent edge towards the center, aligning it with the center mark. Repeat this step for the remaining three corners. You’ll end up with a smaller square shape with flaps sticking out.
6. For each flap, fold it over the adjacent side and tuck it under the flap on the opposite side, creating a triangular shape. Crease the folds well. These flaps will form the sides of your pyramid box.
7. Make a Small Hole on 2 of the 4 Tips.
8. You can use glue or double-sided tape to secure the flaps in place. Apply a small amount of glue or tape to the inside of the flaps and press them down to create a more stable structure.
9. With the flaps secured, gently press on the sides of the pyramid to shape it. The flaps will hold the sides of the pyramid together.
10. You can decorate your pyramid box with additional paper cutouts, stickers, or drawings to personalise it.
11. Your paper pyramid box is now complete! You can use it to store small items, give it as a gift box, or use it as a decorative piece.
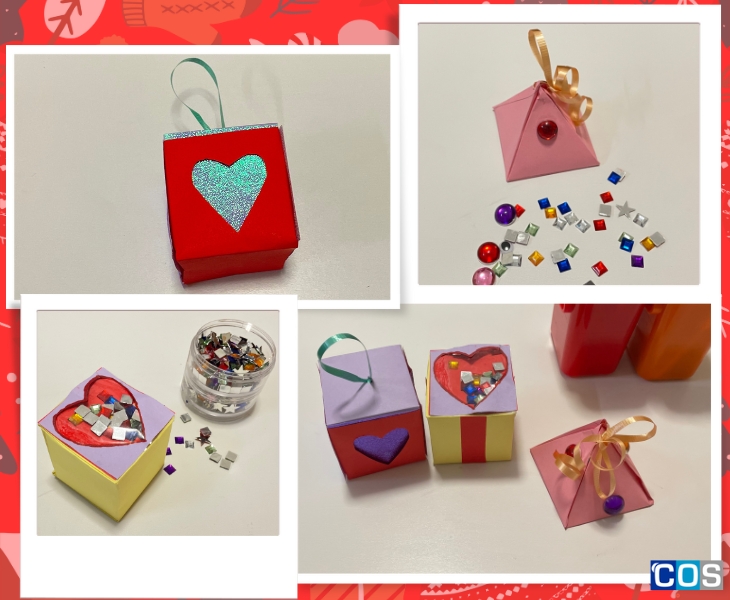
DIY Party Favours
Materials you’ll need:
- Coloured Copy Paper
- Scissors
- Pencil
- Ruler
- Glue stick
- Ribbon
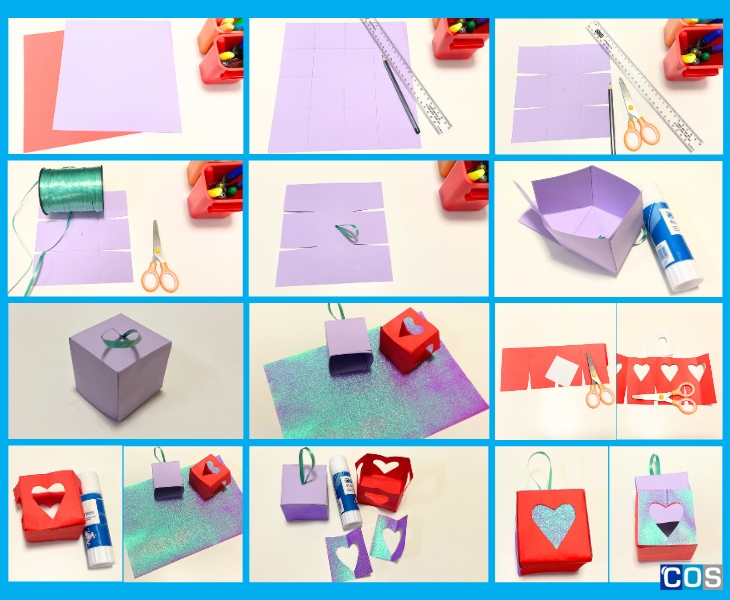
- To begin with, grab two coloured A4 copy paper and mark points (6cm, 12cm, and 18cm) from the top.
- Draw straight lines connecting these points from top to bottom. Repeat this process on the other coloured copy paper.
- Cut out the two middle sections from both the top and bottom of the page, removing the extra parts. This will give you nine squares that can be folded into a box.
- Fold the squares properly. Using a ruler, draw two lines on the edges of the small middle circle and mark a point in its centre.
- Create a small hole at this point using a sharp object. Take a ribbon, fold it neatly, and thread it through the hole from the backside of the paper. Tie the ribbon securely on the other side.
Use glue stick to adhere the squares together, forming a small box. - Now, for making the lid (top cover) of the gift box, take another colour A4 copy paper and mark points at intervals of 6.2cm, 12.4cm, 18.6cm, 24.8cm, and 25.5cm.from the top.
- Draw straight lines connecting these points from top to bottom. On the right side, mark points at 6cm and 10cm and draw lines from right to left.
- Cut out the two middle sections from both the top and bottom, removing the extra parts. This will create eight squares.
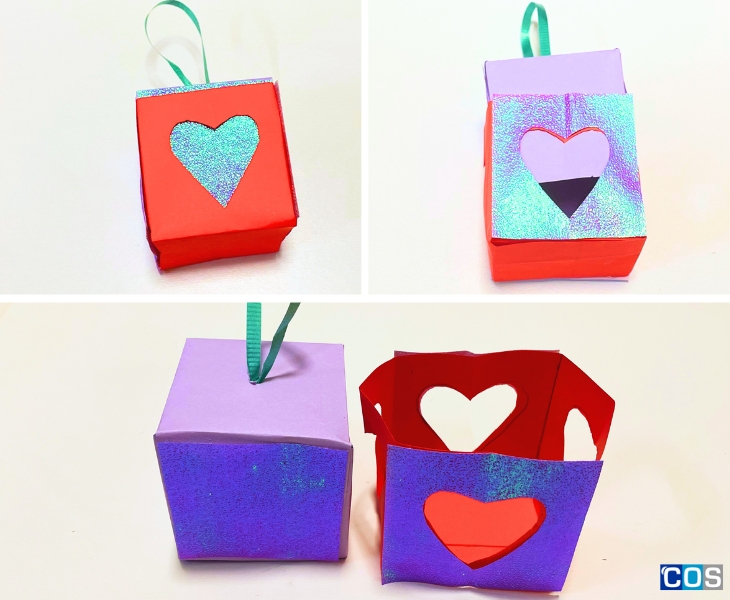
- Take a 6x6cm copy paper, fold it in half to form a rectangular shape, and draw a half-heart shape on it with a pencil. Cut along the heart shape to create a hole in the middle.
- Place this page over the squares you created earlier and trace heart shapes onto each square. Cut out the heart shapes to create heart-shaped holes in the squares.
- Fold the squares properly and use glue to attach both sides. Attach the bottom side of the box with glue securely.
- Take two glitter papers of the same size as the box, create heart-shaped holes in them, and attach them with glue to any two sides of the box.
- Finally, take two glitter pages the size of the square you made earlier, and attach them with glue to any other two sides of the box.
- You can now place your goodies, lollies, or candies inside the box and place it on top of the other box.
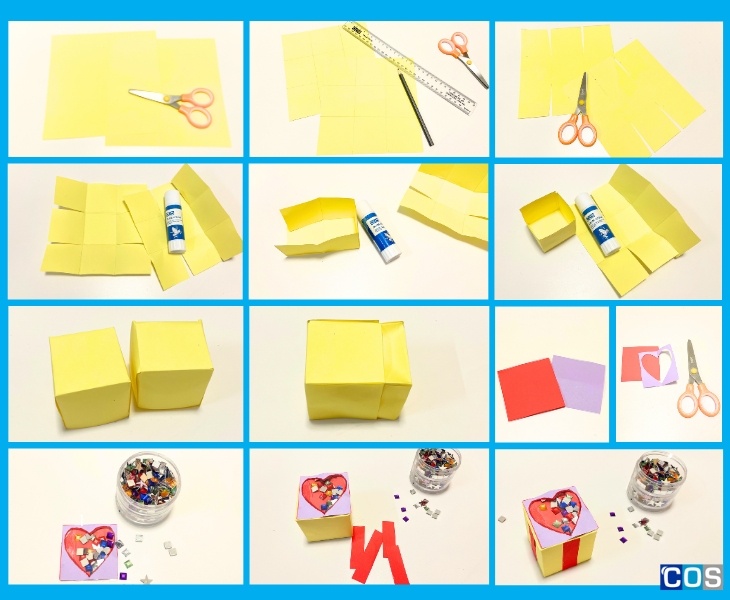
Shaker Gift Box
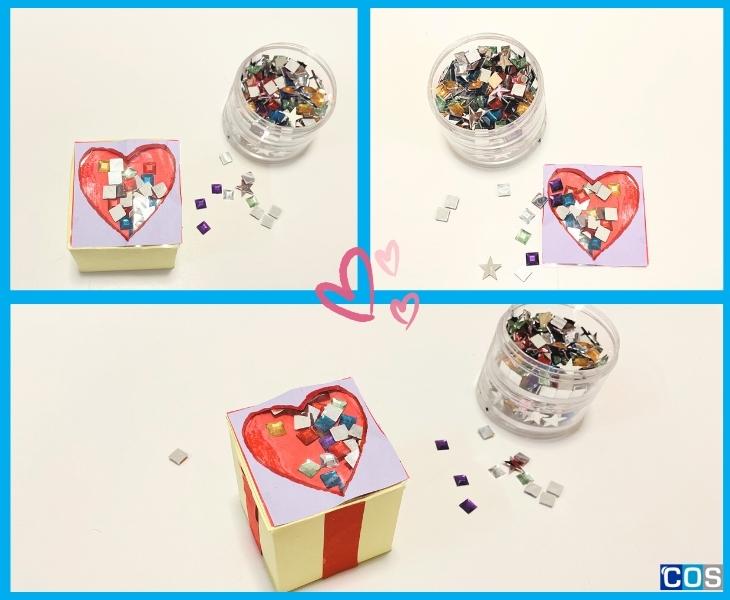
Things you’ll need:
- Square coloured copy paper
- Scissors
- Ruler
- Pencil
- PVA glue or glue stick
Instructions:
1. Begin by taking a 12cm x 12cm sheet of coloured copy paper. This shaker gift box will have two parts: the base and the lid. You can make the lid either slightly larger or smaller than the base, adjusting by about 1/2″.
2. Fold the paper from all four sides to meet at the centre point, creating a diamond shape. Unfold the folds at the top and bottom, then fold in the left and right sides.
3. Make four diagonal cuts, starting from any corners, as long as they are opposite to each other. Glue the cut parts inside to form a square. Repeat the same process to create the lid.
4. Take a piece of coloured copy paper and cut it to match the size of the lid. Draw a heart shape on it and use a snap cutter to cut it out carefully.
5. Cut two pieces of plastic the same size as the lid and adhere one of them to the box.
6. Fill the window with sequins, confetti, glitter, or other decorative items, then attach the second piece of plastic.
7. To cover the box lid, cut out a heart shape and place it over the window created in the previous steps.
8. Trim the edges and corners so that you can fold and glue four flaps inward to cover the edges.
9. You can further decorate the box with cotton tape, badges, stickers, buttons, or any other embellishments of your choice. Paste them onto the box for a personalised touch.