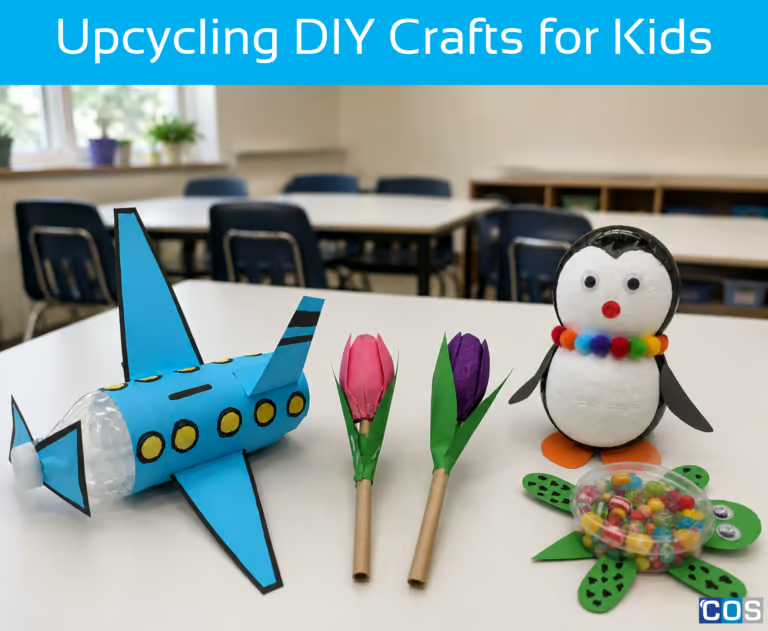
Plastic Free July is the perfect opportunity to engage kids in sustainability through creativity, curiosity, and play. One of the most effective ways to nurture eco-friendly habits from a young age is by transforming everyday household items into fun, hands-on DIY projects.
By upcycling common waste like empty bottles, tissue boxes, disposable cups, and more, kids will learn the importance of reusing materials and begin to understand how small actions can lead to big changes in protecting our planet.
We’ve created 5 DIY upcycling projects, from transforming a plastic bottle into a cheerful bunny container to giving a tissue box new life as a toy car, each activity is designed to spark imagination while reducing waste. Perfect for classrooms or an afternoon at home, these projects make sustainability easy, educational, and exciting.
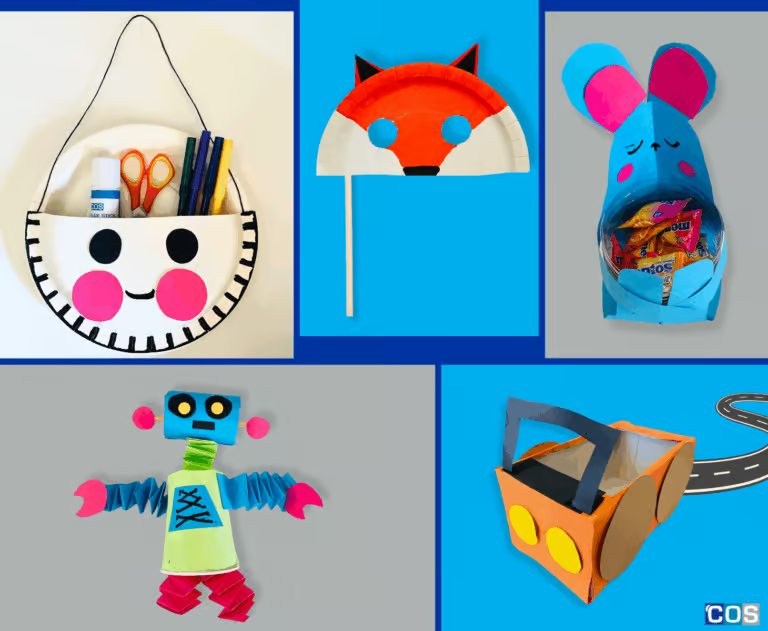
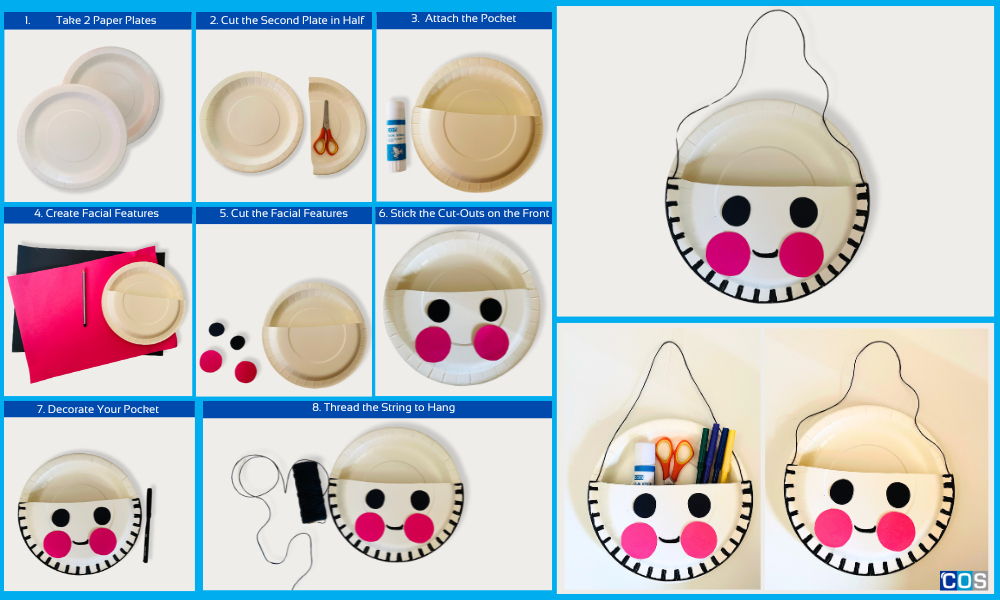
1. Disposable Plate - Hanging Pocket
Materials Needed:
- 2 disposable paper plates
- Coloured copy paper
- Scissors
- Glue stick
- Hole punch
- String/ twine, or ribbon (about 30cm)
- Markers, crayons, or paints
Step-by-Step Instructions:
1. Prepare Your Paper Plates
Take 2 paper plates. Set one aside as the base.
Cut the second plate in half, you’ll only need one half for the pocket front.
2. Attach the Pocket
- Glue the half plate onto the full plate, aligning the curved edges to create a pocket.
3. Create Facial Features
On two different coloured sheets of copy paper, draw and cut out:
Two large circles for eyes
Two smaller circles for cheeks
4. Glue on the Features
Use a glue stick to attach the eyes and cheeks to the front of the pocket.
5. Add a Smile
- Draw a cheerful smile with a black marker to bring your pocket to life!
6. Punch Holes for Hanging
Use a hole punch to make two holes near the top corners of the pocket (along the curved edge).
7. Thread the String
Cut a 30cm piece of string or ribbon. Thread it through both holes and tie a knot on each end to secure it. This will allow your pocket to hang.
8. Decorate Your Pocket (Optional)
Use markers, crayons, or coloured pencil to add your own creative flair. Try drawing stitching along the edges for a fun 3D effect!
9. Hang and Use
Hang your paper plate pocket on a hook, wall, or pegboard. It’s perfect for holding stationery, candies, or little keepsakes.
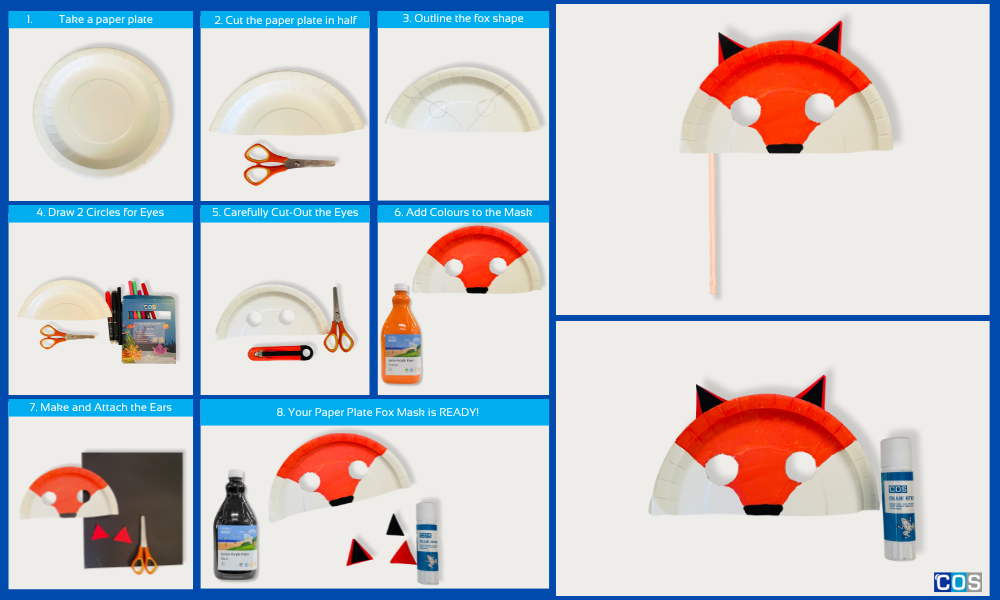
Instructions:
1. Cut the Mask Shape
Lightly fold the paper plate in half.
Using scissors, carefully cut the plate along the fold to create two halves.
2. Cut Out the Eyes
Draw two circles near the centre of the plate for the eyes.
Use a snap cutter or scissors to carefully cut out the circles.
3. Outline the Fox Shape
With a pencil, lightly sketch the fox face shape on the plate.
This outline will guide you when colouring.
4. Add Colour
Paint or colour the outer edge of the plate orange to represent the fox’s fur. Leave the inside white.
Use black paint or a marker to draw the nose at the bottom centre.
5. Make and Attach the Ears
Cut out two large orange triangles for the ears.
Cut two smaller black triangles to fit inside the orange ones (for the inner ears).
Glue the black triangles onto the orange triangles.
Attach the ears to the top edges of the plate using glue or tape.
6. Attach the Straw
Take a straw and attach it securely to the back of the mask.
This will act as a handle so you can easily hold the mask up to your face.
3. Plastic Bottle - Bunny Container
Materials Needed:
- 1 plastic bottle (500ml or 600ml works well)
- Coloured copy paper
- Pencil
- Marker
- Snap cutter
- Scissors
- Glue stick or craft glue
Candies, lollies, or small stationery items
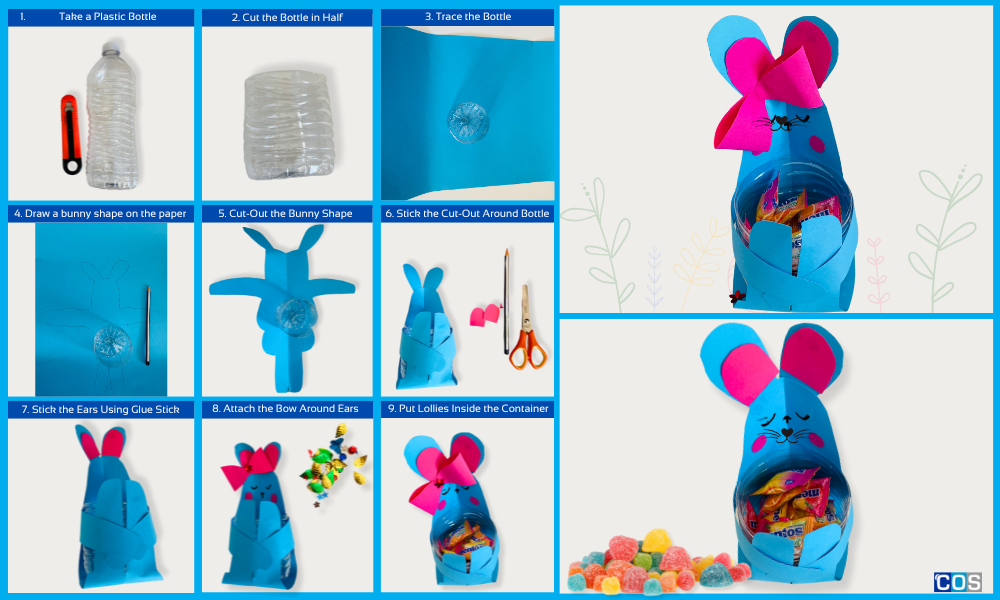
Step-by-Step Instructions
1. Cut the Bottle
Cut the plastic bottle in half (around the middle).
Use the bottom half of the bottle for your container.
Trim the edge neatly so it’s smooth and safe.
2. Trace & Draw the Bunny Shape
Place the bottle upside down on a copy paper and trace around the base lightly with a pencil.
Around this circle, draw your bunny:
Add a head, long ears, arms, and legs (curving as if to hug the bottle).
Carefully cut out the bunny shape.
3. Add Bunny Details
Use a black marker to draw on eyes, a nose, mouth, and whiskers.
Cut out small pink pieces for the inner ears and glue them on.
- Cut 2 small circles out of pink paper to create the cheeks.
4. Attach the Bottle
Align the traced circle on the bunny with the plastic bottle base.
Fold the legs upward slightly so they curve in front of the bottle.
Glue the back of the bunny to the back of the bottle so the arms wrap around the front like it’s hugging it.
Use glue or tape as needed to secure everything in place.
5. Add Finishing Touches
Draw and cut out a paper bow, and stick it between or near the ears for extra charm.
Optional: Add pom-poms, googly eyes, or glitter for fun details.
6. Fill It Up!
Your bunny container is now ready to be filled with treats, lollies, or even small stationery items.
Perfect as a gift or festive desk buddy!
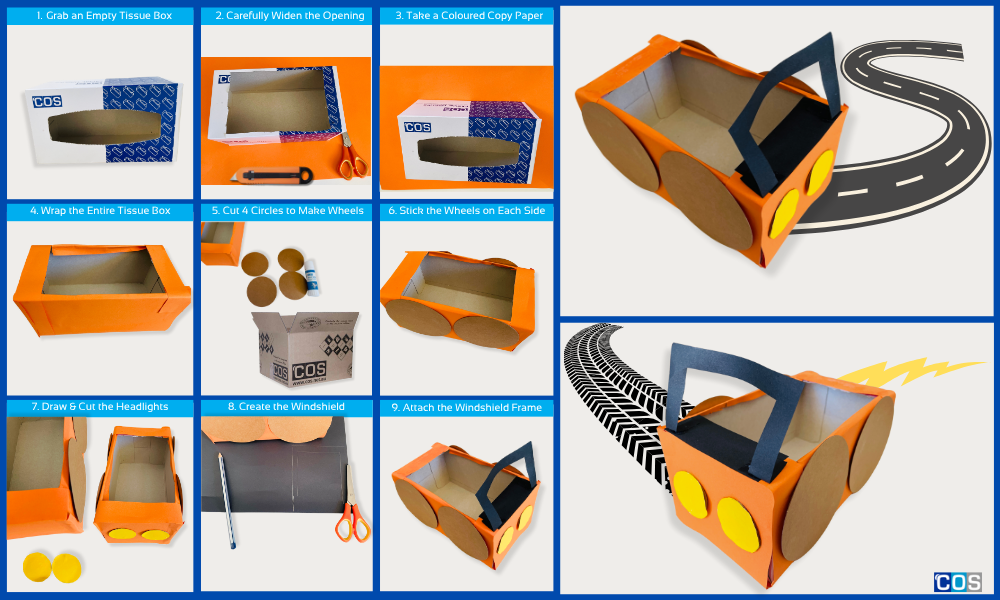
4. Tissue Box - Toy Car
Materials Needed:
- 1 empty tissue box (rectangular works best)
- Cardboard for wheels
- Paint or copy paper
- Scissors or snap cutter
- Craft glue/PVA glue
Step-by-Step Instructions:
1. Prepare the Tissue Box
Remove any lining from the opening of the tissue box.
Use a snap cutter to carefully widen the opening if needed, making space inside the box.
2. Cover and Decorate the Box
Wrap the entire tissue box with a sheet of coloured copy paper.
Make sure to fully cover any logos or printed designs on the box.
3. Make the Wheels
Take a piece of cardboard and draw 4 circles, sized to match the width of your tissue box. Avoid making them too large.
Cut out the wheel shapes.
Attach two wheels to each side of the tissue box using glue.
Allow the glue to dry completely.
4. Add Headlights
On another piece of copy paper, draw and cut out two circles for the headlights.
Glue the headlights onto the front of the tissue box car.
5. Create the Windshield
Draw a square on a sheet of paper (approximately 10 x 10 cm, depending on your tissue box size).
Leave a 2 cm border around the square and cut out the inner section, creating a window frame.
Attach this windshield frame to the front top section of the tissue box.
6. Add Final Touches
Use markers to draw a license plate and other car details.
Add mini passengers using small toys or figurines (optional).
Let kids personalise their car with names, favourite colours, stickers, or themed decorations.
5. Paper Cup & Cardboard Roll - Robot
Materials required:
- 1 cardboard roll
- 1 disposable cup
- Copy paper
- Straw
- Scissors
- Glue
- Pencil
- For decoration (pom-poms, rhinestones, or buttons)

Step-by-Step Instructions:
1. Cut the Cardboard Roll
- Start by cutting a cardboard paper roll using scissors. Make sure it’s slightly shorter than your disposable cup so it fits nicely as the head.
2. Wrap the Cup and Roll
- Choose two different coloured copy papers.
- Wrap one around the cardboard roll (head) and the other around the disposable cup (body).
- Secure with glue to fully cover both.
3. Create Arms, Legs & Neck
Using pink copy paper, cut 4 strips measuring 15 cm long x 2 cm wide. These will be used for the legs.
Take blue copy paper, cut 4 strips measuring 15 cm long x 2 cm wide. These will be used for the arms.
Glue the ends of two strips together, then fold them over each other at a 90° angle in a criss-cross (accordion) pattern. Repeat to make the arms.
For the neck, cut two smaller strips from green copy paper (8 cm long x 2 cm wide) and fold them the same way. This smaller criss-cross will be the neck.
4. Build the Body
- Place the open end of the cup on a piece of craft paper and trace a circle around it.
- Cut out the circle and glue it over the cup’s opening to seal it.
5. Make the Face and Body Details
Eyes: Cut two small black circles from copy paper. Then cut two smaller circles in a different colour for the inner eyes and glue them on the cardboard roll.
Mouth: Cut a 2 cm x 2 cm rectangle to create a mouth shape and stick it.
Body Plate: Cut a piece of copy paper 4 cm long x 5 cm wide. Shape it like a rectangle or triangle and decorate it with a marker.
6. Attach the Neck
- Stick the smaller green crisscross strip (neck) onto the centre of the cup’s closed end using glue. Press firmly.
7. Attach the Head
- Place the cardboard roll (head) on top of the criss-cross neck and glue it in place securely.
8. Attach Arms & Legs
Glue the crisscross arms to the sides of the cup.
For claws, draw claw shapes on paper, cut them out, and glue them to the ends of the arms.
Stick the crisscross legs to the bottom of the cup.
9. Make the Ears or Antennae
- Take a straw and insert it into the top of the cardboard roll. Secure with tape.
- To finish the antennae, add pom-poms or glue paper circles to the straw ends.
10. Final Touches
- Let everything dry completely. Once all pieces are secure, your fun and colourful Robot creature is ready!
Looking for more upcycling inspiration? Check out our 4 DIY Upcycling Craft Projects for Kids, where you’ll find fun ideas like creating a playful piñata garland from cardboard rolls and crafting a colourful wind chime using paper cups, perfect for sparking creativity while teaching sustainability.
You can also explore 4 Fun and Creative Upcycled Plastic Waste Projects for Kids, with easy ways to turn plastic waste into practical and playful items like piggy banks, planters, and cute bracelets.
And if you’ve got extra cardboard boxes lying around, don’t throw them out, transform them into a stylish and functional bookcase to neatly store your books, files, and magazines.