The holiday season is a wonderful time to express gratitude and spread joy to those who have played significant roles in our lives. One of the most cherished traditions during this time is exchanging heartfelt Christmas cards with loved ones. What better way to spread some holiday cheer than by involving kids in crafting special DIY Christmas cards. These creative and easy-to-make cards will not only keep the little ones engaged but also help them create meaningful tokens of appreciation that will warm the hearts of their recipients. Handmade cards hold a unique charm and show the effort and care you’ve put into creating something meaningful.
With these easy-to-follow instructions you can create beautiful DIY Christmas cards that will bring smiles to the faces of your friends, co-workers, and loved ones.
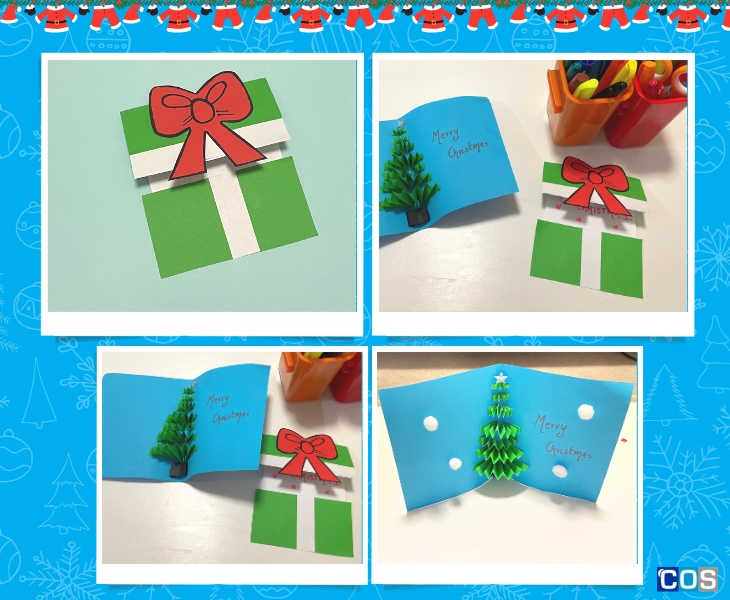
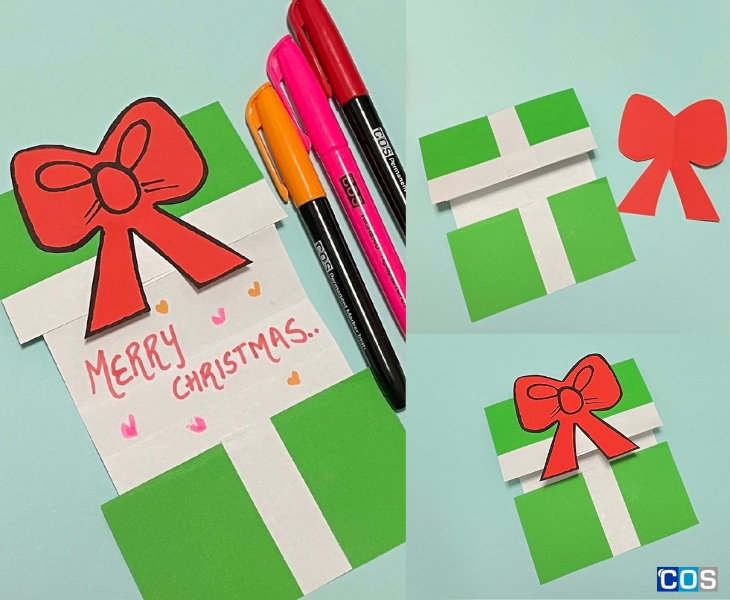
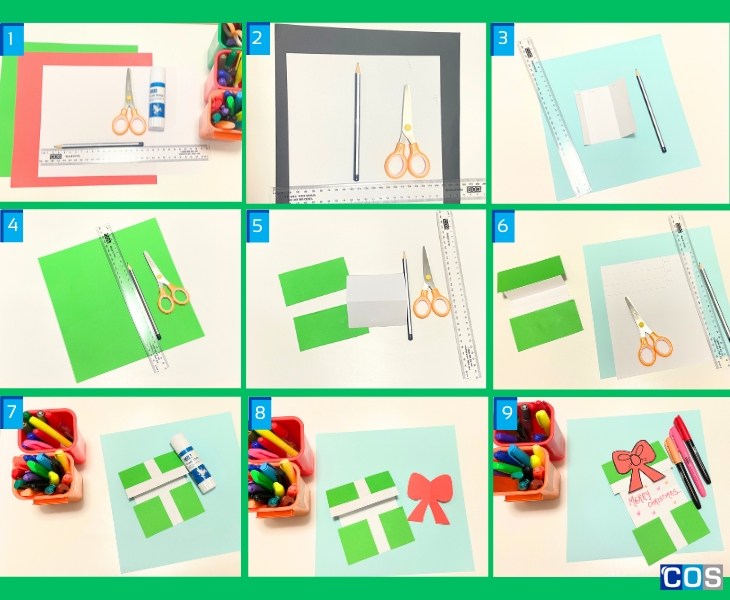
DIY Paper Gift Box Card
Things you’ll need:
- Coloured copy paper
- Glue stick
- Pencil
- Scissors
- Ruler
- Coloured marker
- Rhinestones/jewels (if needed)
Step-by-step Instructions:
- Begin with a sheet of white copy paper or choose your preferred colour. Use scissors to carefully cut it into a size of 10cm in length and 12cm in width.
- Next, mark 3 points on the paper at distances of 2cm, 7cm, and 13cm from one end. Using a ruler, draw straight lines running parallel to the longer side of the paper, passing through the marked points.
- Gently fold the paper along the drawn lines, ensuring neat creases.
- Now take a green copy paper, or any colour, and cut two pieces both measuring 6cm by 12cm in size.
- Using a glue stick, adhere the two (6cm x 12cm) pieces to the top and bottom of the white-coloured cut-out, as shown below. Make sure the pieces are equal on both ends, leaving a blank space in the middle for writing your message.
- Take a coloured sheet of copy paper and cut two pieces measuring 6cm by 2cm and the other 12cm by 2cm, then glue them together to make it look like a gift box.
- To create a decorative bow, select a coloured copy paper, measuring 10cm x 6cm. Carefully draw the shape of a bow and decorate is using a marker or some rhinestones/jewels, and cut it out. Apply glue to the back of the bow and stick it neatly to the centre of the top section of the paper gift box.
- Your personalised paper gift box is now ready for a quick delivery.
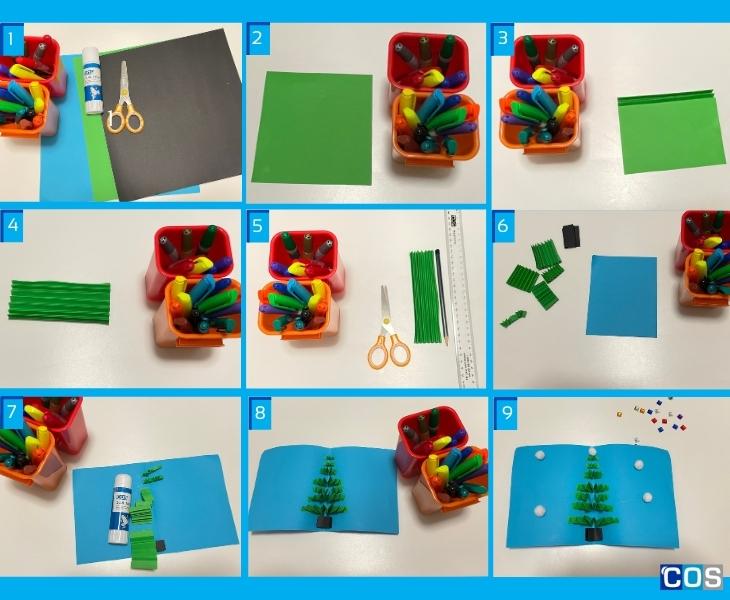
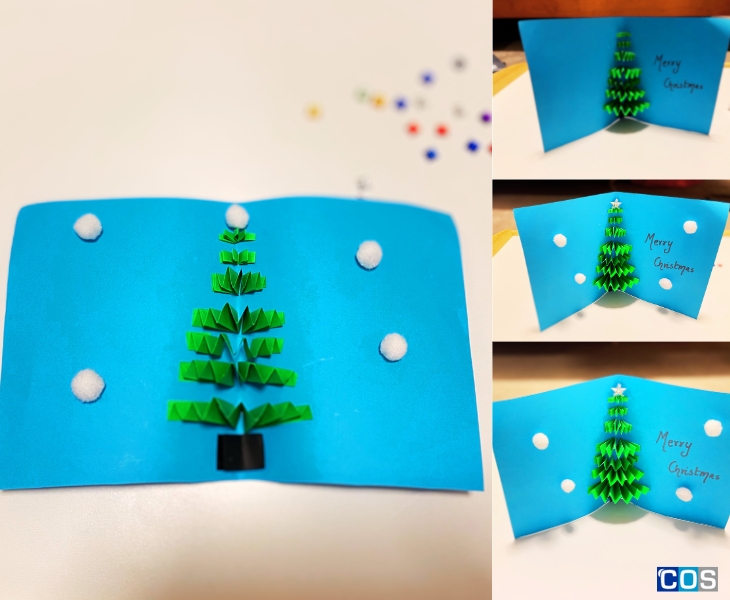
3D Pop-up Christmas Card
Things you’ll need:
- Coloured copy paper
- Glue stick
- Pencil
- Scissors
- Ruler
- Rhinestones/jewels/pom-poms
Step-by-step instructions:
- Choose a piece of paper, preferably green, with dimensions around 10cm x 15cm.
- Gently and evenly fold the paper along the longer 15cm edge to create a paper fan with 0.5cm-wide folds.
- Use scissors to cut out the 15cm strip into segments, measuring 5cm, 4cm, 3cm, 2cm, and 1cm.
- Now, choose another sheet of paper, perhaps blue, to serve as the base for your card.
- Start with creating the base, a tree stem. Cut a piece of coloured copy paper to the size of 3cm x 3cm.
- Fold this piece in half, and then fold the edges inward by 0.5cm each. This will give you folds of 0.5mm, 1cm, 1cm, and 0.5cm. Stick the 0.5cm folded strips to the card using a glue stick; this will create a “Pop up” stem.
- Now for the Christmas tree, take the longest strip from the previous cut-outs and stick it just above the tree stem.
- Repeat the previous step for the remaining 4 strips, ensuring they are evenly layered while leaving space on top for a star.
- Carefully apply glue to the upward-facing surface of each strip. This step can be a bit tricky, as the fan folds might be a little unstable.
- Press the glued strips together. Then, fold the right side of the card over the glued strips and secure them in place.
- Your 3D Pop-up card is ready. You can adorn the remaining part of the card with rhinestones, jewels, or pom-poms.