

Emojis have become a fun and creative way to express our feelings, moods, and personalities. From happy smiles to silly faces, each emoji tells a story and adds a little extra colour to our everyday conversations. Now, you can bring these cheerful characters into the real world with these exciting DIY emoji craft ideas!
Get creative with simple craft materials and transform them into colourful emoji-inspired creations that are perfect for classrooms, playtime, or a fun activity at home. These crafts encourage imagination, creativity, and self-expression while allowing you to design something unique with your own personal touch.
We’ve create 3 fun emoji-themed projects that are easy to make and full of personality. Whether you’re crafting with friends, creating a classroom project, or simply looking for a fun weekend activity, these DIY emoji crafts are sure to bring smiles and creativity to your space. So gather your supplies, choose your favourite emojis, and start crafting your own emoji-inspired creations!
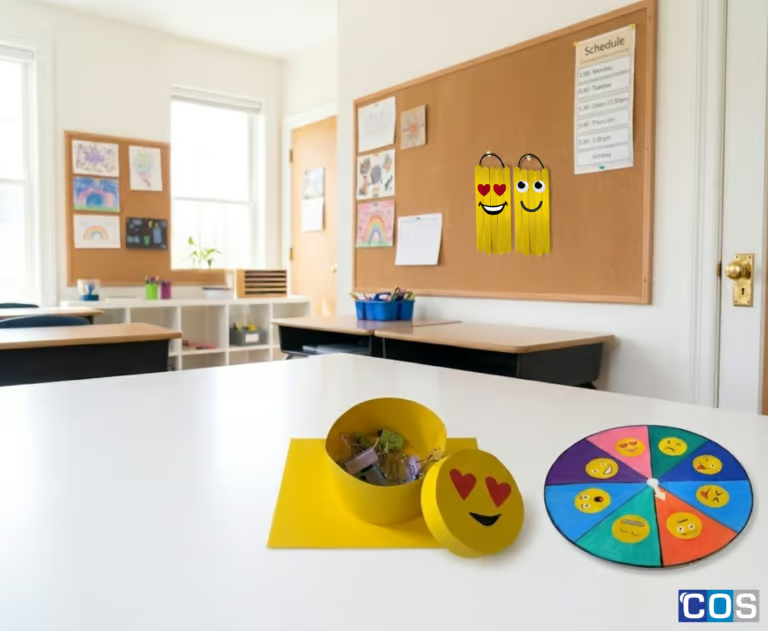
1. Popstick Emoji Activity
Create a playful emoji display using popsticks and colourful emoji faces. A great way to explore different emotions and expressions while making a bright and decorative craft that can be displayed anywhere.
Materials Required:
- Popsicle sticks (popsticks)
- Paint or coloured marker
- Joggle eyes (optional)
- Glue gun
- Coloured copy paper
- Scissors
- Pencil

Step-by-Step Instructions:
Step 1: Build the Base
Arrange 5–8 popsticks side by side and glue 2 popsticks horizontally across the back to hold them together.
Step 2: Add Colour
Paint or colour the front of the popsticks yellow and allow it to dry completely.
Step 3: Draw Your Emoji
Decide which emoji you would like to create, such as a smiley, heart eyes, laughing, cool, wink, or kiss emoji.
Step 4: Create the Face
Draw the emoji facial features on a copy paper and cut them out. For the eyes, you can draw them using a black marker or use joggle eyes for a 3D effect.
Step 5: Add the Expression
Draw or cut out the mouth and add details such as a tongue, teeth, or a smile to match your chosen emoji.
Step 6: Decorate
Add fun features like hearts, tears, sunglasses, rosy cheeks, or other facial expressions using coloured paper or coloured markers.
Step 7: Let It Dry
Allow the glue and decorations to dry completely before handling the craft.
Step 8: Add the Hanger
Attach a cord or ribbon to the back of the popsicle stick to create a hanger.
Step 9: Display Your Craft
Showcase your finished emoji craft by hanging it on a corkboard, door handle, or displaying it in the classroom.
2. Emoji Treasure Box
Turn simple paper materials into a cute emoji-inspired treasure box! Perfect for storing small keepsakes, notes, or little surprises, this craft combines creativity with a practical purpose.
Materials Required:
- Coloured copy paper
- Pencil
- Ruler
- Scissors
- PVA glue or glue stick
- Markers, crayons, or pencil colours
- Cord or ribbon
- Small gifts, lollies, or notes to place inside the box (optional)

Step-by-Step Instructions:
Step 1: Make the Box Base Ring
Take a copy paper strip measuring 21 cm long x 4.5 cm wide. Apply glue to one end and stick the two ends together to form a circle shape.
Step 2: Attach the Base
Take another copy paper sheet measuring 15 cm × 15 cm. Place the circular paper shape on top of it and glue it securely to create the base of the gift box.
Step 3: Create the Box Lid
Take another copy paper strip measuring 21 cm long and 2.5 cm wide. Wrap it around the circular base to measure the correct size, then glue the ends together to make another circle shape.
Step 4: Make the Bottom Edges
Using scissors, make small cuts along the bottom edge of the circle strip. Fold the cut pieces inward and glue them down to strengthen the box shape.
Step 5: Make the Lid
Trace the circular shape onto a copy paper sheet and cut out the circle. Glue this circle on top of the smaller circular strip to create the lid of the gift box.
Step 6: Decorate with Emojis
Decorate your gift box with emoji faces using coloured paper, markers, or stickers. Add your favourite designs and fill the box with small gifts or treats!
3. Emoji Mood Spinner
Make a fun mood spinner featuring different emoji expressions to show how you feel. This interactive craft is a great way to recognise and share emotions while adding a playful element to your day.
Materials Required:
- Paper plate or thick cardboard (for the spinner base)
- Pencil
- Ruler
- Scissors
- Markers, crayons, or pencil colours
- Coloured copy paper
- PVA glue or glue stick
- Split pin / paper binder (to attach the spinner arrow)
- For decoration (pom-poms, buttons, beads, rhinestones, or jewels)

Step-by-Step Instructions:
Step 1: Prepare the Spinner Base
Take a paper plate or a thick piece of cardboard and draw a large circle shape. Cut it out carefully using scissors.
Step 2: Divide the Circle
Use a ruler and pencil to divide the circle into equal sections like a pizza. Make 6-8 sections for different moods.
Step 3: Decorate the Spinner
Colour the sections using markers, crayons, or paint make it bright and creative.
Step 4: Create Emoji Faces
Draw 8 small circles that fit within the sections. Cut them out and create different emoji faces to represent various moods, such as:
- 😊 Happy
- 😢 Sad
- 😡 Angry
- 😴 Sleepy
- 😍 Excited
- 😎 Cool
- 😟 Worried
- 🤗 Loved
Step 5: Stick the Emoji Cut-Outs
Carefully glue the emoji cut-outs into each section, ensuring they are neatly placed.
Step 6: Make the Spinner Arrow
Cut out an arrow shape from cardboard or thick paper. Make a small hole in the centre of the arrow.
Step 6: Attach the Arrow
Place the arrow in the centre of the circle and attach it using a split pin (paper fastener) so the arrow can spin freely.
Step 7: Play and Share Your Mood
Spin the arrow and see which emoji it lands on. Use it to share how you feel each day! 😊
For more Emoji-inspired DIY crafts, explore our Easy-to-Make Emoji Origami Bookmarks. Origami is a mindful activity that can help reduce stress, anxiety, and support overall mental wellbeing.
You can also try our DIY Emoji Bookmark and Gift Box Worksheets for creating personalised bookmarks and the other for crafting beautiful gift boxes featuring favourite digital icons.