

There’s a little Christmas magic in turning a simple sheet of paper into something special! With a few clever folds, colourful decorations and a sprinkle of imagination, kids can create their very own festive origami ornaments.
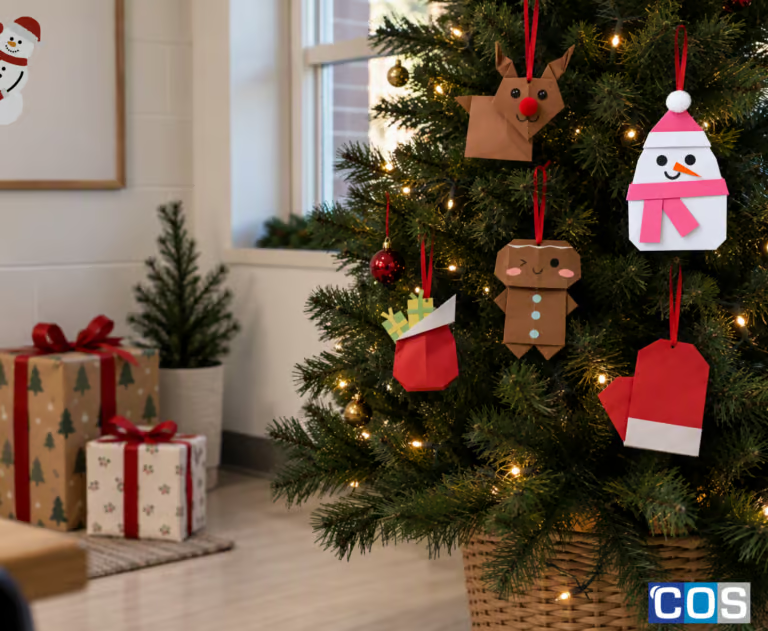
Ready for some Christmas crafting fun? We’ve rounded up 5 fun Christmas origami ornaments for kids that are sure to bring smiles and festive cheer! Fold a jolly reindeer, create a cosy Christmas mitten, make an adorable snowman, bring a cheerful gingerbread person to life, or craft a festive Christmas gift sack filled with colourful paper presents.
Each craft comes with easy-to-follow, step-by-step instructions, making it simple for little crafters to follow along and enjoy the magic of paper folding. Once the folding is complete, it’s time to decorate! Add colourful markers, glitter, pom-poms, jewels and other fun embellishments to give each ornament its own personality and festive sparkle.
Perfect for decorating the Christmas tree, adding a handmade touch to your festive displays, classroom activities or enjoying a cosy afternoon of crafting at home, these origami ornaments are a wonderful way to spark creativity, develop fine motor skills and make lasting Christmas memories.
So, grab your paper, gather your craft supplies and let little imaginations run wild. Let’s fold, decorate and create beautiful handmade Christmas ornaments!
Materials required:
- 1 square sheet of brown copy paper, (approximately 15 × 15 cm)
- Joggle eyes
- Pencil
- Ribbon or hemp cord
- Scissors
- Glue stick
- Tape
- Coloured markers
- Optional: glitter, rhinestones, jewels, or pom-poms

Step-by-Step Instructions:
Step 1: Get your paper ready
Start with a square piece of paper (18 ×18cm). Place it on a flat surface with the coloured side facing upwards.
Step 2: Fold the Triangle
Place the triangle with the point facing upwards. Fold the bottom section upwards, following the picture, and press the fold firmly.
Step 3: Make the Side Folds
Fold the left and right sides upwards. These folds will start creating the reindeer’s long ears or antlers.
Step 4: Shape the Sides
Fold the long side sections down and inward, following the picture. Press along each fold to make a neat crease.
Step 5: Create the Antlers
Fold the two long points up and outwards. Adjust the folds so both antlers sit above the reindeer’s head.
Step 6: Shape the Head
Fold the bottom point upwards to shorten the face and create the reindeer’s head shape. Your reindeer head is now ready!
Step 7: Make the Body
Take another square piece of brown paper and fold it diagonally into a triangle. Fold the triangle again as shown to begin forming the body.
Step 8: Shape the Body
Fold the side and bottom sections inward to create a compact body shape. Press each crease firmly so the shape stays in place.
Step 9: Put Your Reindeer Together
Position the finished head over the body and secure both pieces together with a glue stick. Add a folded paper piece at the back for the tail.
2. Fold Your Own Merry Mitten
Materials required:
- 1 square sheet of brown copy paper, (approximately 15 × 15 cm)
- Scissors
- Glue stick
- Coloured markers
- Optional: glitter, rhinestones, jewels, or pom-poms

Step-by-Step Instructions:
Step 1: Fold in Half
Fold the square paper in half vertically. Press firmly to make a clear crease.
Step 2: Fold to the Centre
Fold one side of the paper towards the centre crease and flatten the fold.
Step 3: Make the Thumb
Fold the lower corner diagonally outwards to start forming the mitten’s thumb.
Step 4: Shape the Thumb
Open and flatten the diagonal fold. Press firmly to create the thumb shape.
Step 5: Make the Cuff
Fold the top edge down to create a neat cuff at the top of the glove.
Step 6: Shape the Thumb Tip
Fold the pointed end of the thumb slightly inward to give it a softer shape.
Step 7: Neaten the Mitten
Adjust the folds and press everything firmly so the glove holds its shape.
Step 8: Round the Top
Fold the two top corners slightly inward to create a rounded glove shape.
Step 9: Finish Your Mitten
Turn the mitten over and press it flat. Decorate your Christmas mitten with festive colours, patterns or stickers!
Step 10: Add a Hanging Ribbon
Make a small loop with ribbon or string and glue it securely to the top of the glove. Once dry, hang the finished ornament on your Christmas tree!
3. Build a Snowman… with Paper
Materials required:
- 1 square sheet of brown copy paper, (approximately 15 × 15 cm)
- Scissors
- Glue stick
- Coloured markers
- Optional: glitter, rhinestones, jewels, or pom-poms

Step-by-Step Instructions:
Start with a square piece of white paper. Fold it diagonally in half, matching the corners carefully, then press along the fold to make a firm crease.
Step 2: Fold the Top Corners
Take the two top corners and fold them down towards the centre. Try to keep both sides even.
Step 3: Make the Top Flap
Fold the top point down slightly to create a small flap. Press the fold firmly so it stays in place.
Step 4: Fold the Right Side
Bring the right side of the paper towards the centre. Line up the edge neatly and press down to make a sharp crease.
Step 5: Fold the Left Side
Fold the left side towards the centre in the same way. Tuck and flatten the fold so the shape looks neat and even.
Step 6: Fold the Bottom Up
Take the bottom point and fold it upwards. Press the crease firmly to begin forming the snowman’s body.
Step 7: Shape the Top
Fold and flatten the top section carefully to create the snowman’s head. Adjust the folds slightly to give it a neat shape.
Step 8: Shape the Body
Turn the paper over. Gently fold or adjust the corners until the snowman has a smooth, rounded head and body.
Step 9: Add the Face
Bring your snowman to life! Add two black eyes, a friendly smile and a small orange paper nose. You can draw the details or use coloured paper.
Step 10: Add the Hat and Scarf
Finish your snowman with a pink hat and matching scarf. Add a fluffy white pom-pom to the top of the hat for a fun and festive finishing touch.
4. Create Your Jolly Gingerbread Buddy
Materials Required:
- 1 square sheet of brown copy paper, (approximately 15 × 15 cm)
- Scissors
- Glue stick
- Coloured markers
- Optional: glitter, rhinestones, jewels, or pom-poms

Step-by-Step Instructions:
Step 1: Make a Triangle
Start with a square piece of brown paper. Bring one corner diagonally across to the opposite corner, press firmly, then open the paper again.
Step 2: Create Guide Creases
Bring the paper across in the opposite direction and open it again. Add horizontal and vertical creases to create clear guide lines across the paper.
Step 3: Bring the Sides In
Using the guide lines, bring the left and right edges towards the centre and press them flat.
Step 4: Shape the First Side
Open one side slightly and bring the upper section diagonally towards the centre, creating a pointed shape. Flatten it neatly.
Step 5: Shape the Other Side
Repeat the same movement on the opposite side so both sides have matching angled sections.
Step 6: Create the Upper Points
Bring the top sections upwards along the existing creases. Press each side flat to create two neat pointed shapes.
Step 7: Bring the Points In
Move the pointed sections towards the centre, keeping both sides as even as possible. Press down firmly to hold the new shape.
Step 8: Shape the Lower Section
Bring the lower part upwards and flatten the paper along the existing crease lines. Keep the centre section straight.
Step 9: Form the Head and Arms
Adjust the upper section to create the head, while allowing the two side points to extend outwards to form the arms.
Step 10: Shape the Body and Legs
Flatten the centre section to create the body. Separate the two bottom points and angle them downwards to form the legs.
Step 11: Tidy the Gingerbread Shape
Turn the paper over and tuck in the corners around the head and body. Flatten everything neatly so the gingerbread person has a clean, finished shape.
Step 12: Decorate Your Gingerbread Person
Add eyes, a smile and colourful cheeks. Decorate the body with buttons and finish the top of the head with a white icing-style line.
5. Santa’s Little Chirstmas Sack
Materials required:
- 1 square sheet of brown copy paper, (approximately 15 × 15 cm)
- Scissors
- Glue stick
- Coloured markers
- Optional: glitter, rhinestones, jewels, or pom-poms

Step-by-Step Instructions:
Step 1: Start with a Square
Place a square piece of red paper flat in front of you.
Step 2: Make a Triangle
Bring one corner across diagonally to make a triangle. Press the crease firmly.
Step 3: Shape the Centre
Bring the side corners towards the centre to create a diamond-like shape.
Step 4: Bring Up the Bottom
Lift the bottom point upwards towards the centre and press it flat.
Step 5: Shape the Sack
Bring both side sections inwards and flatten them neatly to form the sides of the sack.
Step 6: Create the Top Flap
Bring the top point down at an angle to start creating the sack’s opening.
Step 7: Finish the Sack Shape
Adjust and flatten the sides and bottom until the gift sack has a neat, even shape.
Step 8: Add the White Trim
Cut a strip of white paper and attach it across the top to create a snowy festive trim.
Step 9: Add the Presents
Make small colourful paper presents and tuck them behind the white trim to complete your Christmas gift sack.
Keep the Christmas creativity going with even more easy origami ideas!
For another festive activity, try our Christmas Origami Bookmark DIY! Create a cute Christmas tree bookmark using just a few simple materials. It’s a quick, easy and creative way to enjoy paper folding while adding a little Christmas cheer to your reading.