Get ready to bring some Halloween magic to life with fun, hands-on crafts that kids will absolutely love! Perfect for teachers, parents, and caregivers, these 4 creative projects transform everyday materials into festive, spook-tacular masterpieces.
Kids can craft their very own Paper Plate Witch, create a spooky-cute Hanging Spider Bookmark, design a quirky Frankenstein Paper Bracelet, or assemble a 3D Paper Bat to hang in their room
These simple yet imaginative craft projects are the perfect gateway to a world of Halloween fun. They inspire creativity, encourage playful learning, and offer a fantastic way to celebrate the season while bonding with family, friends, or classmates.
1. Wobbly Witch - Paper Plate Craft
Materials Needed:
- 1 paper plate
- A4-sized copy paper (for drawing the witch body and broom)
- Black paint
- Pencil
- Coloured markers
- Paintbrush
- Scissors

Step-by-Step Instructions:
1. Paint the Plate
Paint the entire paper plate black and let it dry completely. This will be the night sky background for your witch.
2. Draw the Witch Body and Broom
- On a separate sheet of paper, draw the witch’s body and her broom.
- Use bold outlines to make cutting easier.
3. Cut Out the Drawn Shapes
- Carefully cut along the outlines of your witch and broomstick.
- Take your time to ensure smooth edges so your witch looks neat when attached to the plate.
4. Colour the Cut-Outs
Bring your witch to life with bright colours! Use crayons, markers, or coloured pencils to add details to her clothes, hat, and broom.
5. Fold the Plate
- Fold the painted paper plate in half from the centre.
- This fold allows the plate to rock back and forth, making it look like your witch is flying in the night sky.
6. Attach the Witch to the Plate
- Glue the coloured cut-outs of the witch and broom onto the black-painted plate. Position her in a flying pose so it looks like she’s zooming through the sky when the plate rocks.
- You can slightly angle the broom to give a dynamic effect.
7. Add Stars and Decorations
- Using colourful markers or gel pens, draw tiny stars, moons, or sparkles around your witch on the black background.
- This will create a magical night sky effect. You can even add glitter or metallic stickers to make it shine.
2. Creepy-Crawly Spider Bookmark
Materials Needed:
- Square piece of paper (green or dark colours for a spooky effect)
- Coloured markers
- Pencil
- Black copy paper
- Scissors
- Glue stick
- Joggle eyes
Step-by-Step Instructions:
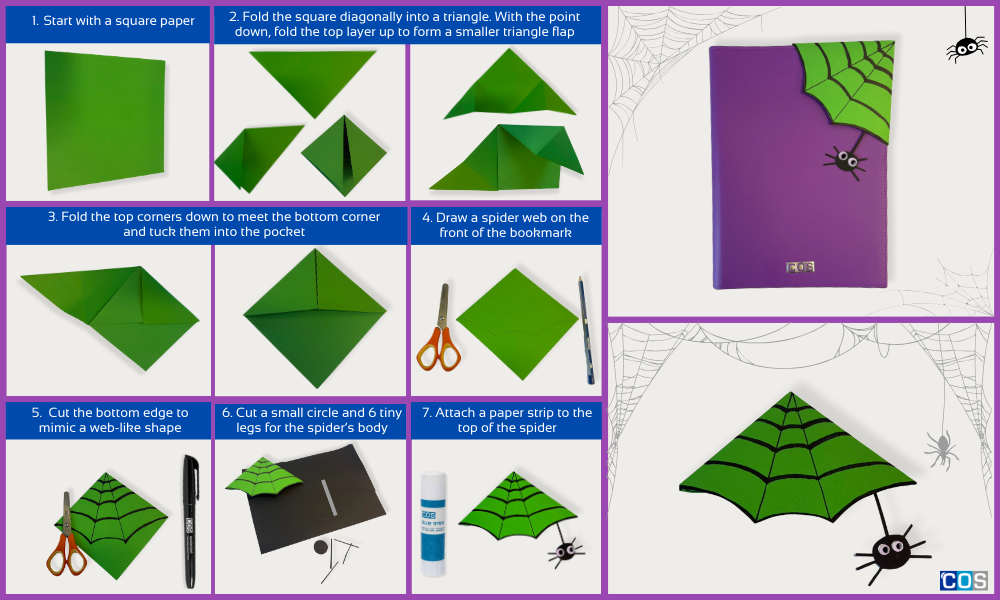
1. Make the Basic Corner Bookmark
- Start with a square piece of paper (around 6cm x 6cm).
- Fold the square diagonally in half to form a triangle.
- With the point facing down, fold the top layer of the triangle up to the top point, creating a smaller triangle flap.
- Fold the two top corners of the triangle down to meet the bottom corner, forming a diamond shape.
- Tuck these corners into the pocket.
- You’ll now have a corner bookmark pocket that can slide onto the corner of a page.
2. Draw the Spider Web
- Using a black marker, draw a spider web on the front of the bookmark.
- Begin with a small circle near the top corner and draw lines radiating outward.
- Connect the lines with curved lines to form the web pattern.
- Cut the bottom edge of the bookmark to mimic a web-like shape.
3. Make the Spider
- Draw a small circle on black copy paper and cut it out.
- Draw 6 tiny legs and cut them from thin strips of paper. Stick it on the side of the spider body.
- If you want a dangling spider, cut another strip from copy paper and stick it to the top of the spider.
- For a 3D effect, add joggle eyes.
- Glue the other end of the dangling strip to the inside of the bookmark so the spider hangs slightly over the page edge.
4. Final Touches
- Slide the corner bookmark onto your book pages.
- The spider web will be visible on the outside, and the spider can dangle for a playful effect.
Optional: Decorate with tiny glitter dots for a magical touch.
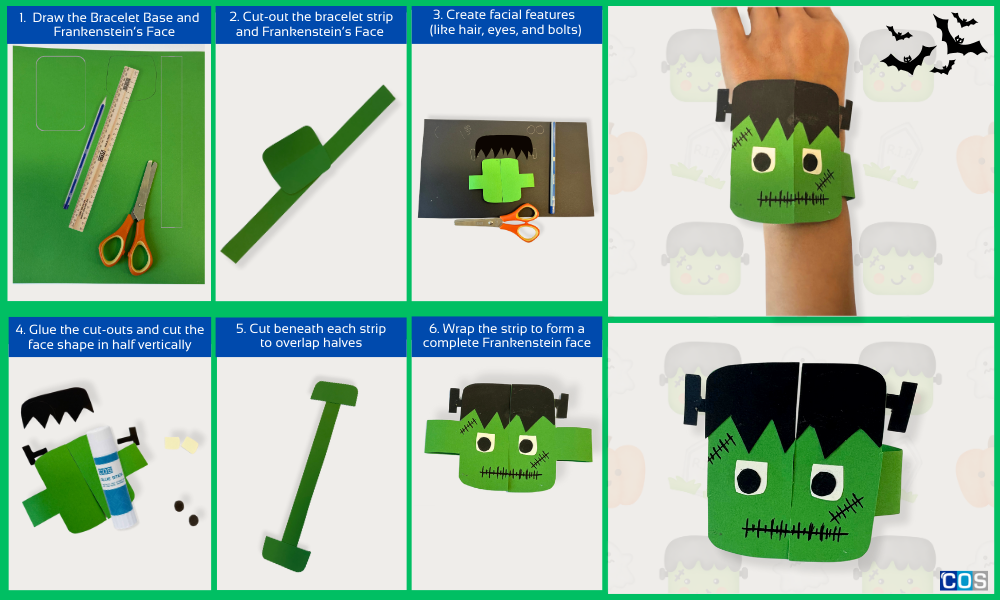
3. Spooky Frankenstein - Paper Bracelet
Materials Needed:
- Green and black copy paper
- Pencil
- Ruler
- Scissors
- Glue stick or tape
- Coloured markers
Step-by-Step Instructions:
1. Prepare the Bracelet Base
Cut a strip of green paper about 1cm wide x 8-10cm long (adjust the length to fit your wrist). This will serve as the bracelet band.
2. Create Frankenstein’s Face
- Cut a small rectangle of green paper for the face (2 cm wide × 1.5 cm long).
- On black paper, draw Frankenstein’s hair and cut a zig-zag edge at the bottom to fit the face.
Glue the hair onto the top of the face.
3. Add Facial Features
- Cut a small rectangle for the eyes and add two black circles for pupils. Glue them onto the face.
- Use a black marker to draw the mouth and stitches.
Cut small black rectangles for the bolts and glue them on each side of the face.
4. Attach the Face to the Bracelet Band
- Cut the Frankenstein face in half vertically.
- Stick one half to one end of the bracelet strip and the other half to the opposite end.
- Cut the bracelet strip underneath each face so the halves can overlap at the centre.
5. Wrap and Secure the Bracelet
Wrap the strip around your wrist and overlap the halves so the face comes together and forms one complete Frankenstein face.
4. 3D Hanging Bat
Material Needed:

Step-by-Step Instructions:
1. Cut Paper Strips
- Take a sheet of A4 copy paper.
- Using a ruler, draw 7-9 lines about 1 cm apart.
- Cut along the lines to create strips.
- You will need 7-9 strips to make one paper ball.
2. Make the Paper Ball Base
- Take two strips and glue them together at a right angle (forming a cross).
- Take two more strips and glue them on top of the first two, spacing them evenly.
- Continue adding the remaining strips in the same way, it should resemble a snowflake or star.
- Glue the ends together at the top to start forming a 3D ball shape.
3. Make the Wings
- Fold a piece of black paper in half.
- Draw a wing shape on the folded paper so that you can cut two identical wings at once.
Cut out the wings and fold a small flap at the base of each for gluing.
4. Assemble the Bat
- Apply glue to the folded flap of each wing and attach them to the paper ball.
Stick joggle eyes to the front to complete the bat.
5. Add a String for Hanging
- Cut a piece of string, ribbon, or thread and attach it to the top of the ball with glue or tape.
Your bat is now ready to hang anywhere.
For more Halloween craft ideas, check out Spooktacular DIY Halloween Bookmarks for Kids. Perfect for teachers, parents, or Halloween fans, these themed bookmarks are a fun and creative way to celebrate the season.
Or try Halloween Mystery DIY Boxes for Kids: Spooky and Spectacular Fun. From explosion boxes to pop-up mystery boxes, these hands-on projects spark creativity and imagination, making Halloween unforgettable for little ones.