

Get ready to dive deep into an underwater adventure filled with creativity, colour, and ocean fun. World Ocean Day is the perfect time for kids to explore the magical world beneath the sea through exciting hands-on craft activities.
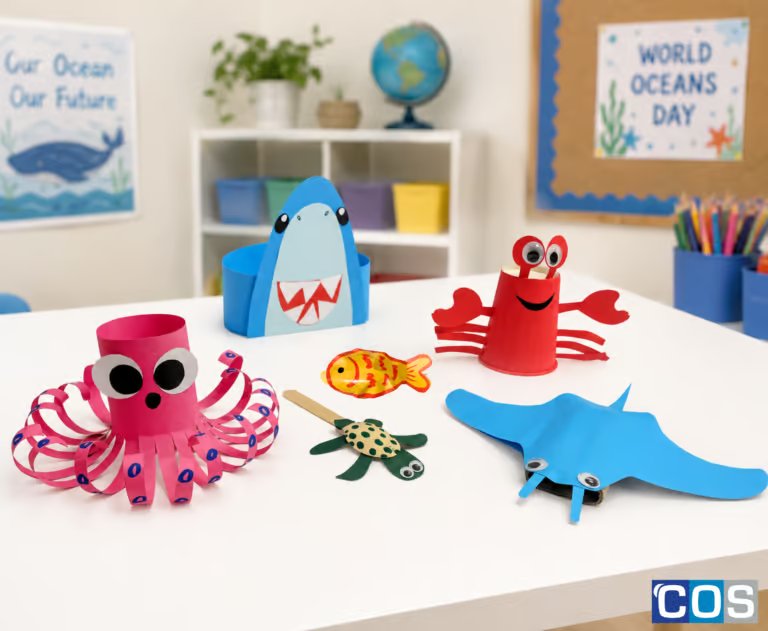
Using simple materials like paper cups, copy paper, wooden spoons, glue, and markers, children can transform everyday items into amazing sea creatures. Kids can wear their very own Ocean-Themed Shark Headband Craft, create a playful Bubble-Blowing Goldfish, design a Wiggly Paper Octopus, build a beautiful Magical Manta Ray, make a Crawly Paper Cup Crab, and decorate a cute Wooden Spoon Turtle Craft.
These easy step-by-step crafts are perfect for classrooms, holiday activities, or fun family craft time at home. Along the way, children can improve their fine motor skills, practise cutting and sticking, and learn more about the incredible animals that live in our oceans.
So grab your scissors, markers, paper, and imagination, and get ready to splash into a sea of creativity this World Ocean Day!
1. Ocean-Themed Shark Headband

Step-by-Step Instructions:
1. Make the Headband Strip
Take a sheet of coloured paper and carefully cut out a long strip measuring 28 cm x 6 cm. This strip will become the headband base that wraps around your head.
2. Create the Shark Head
Cut a large shark head shape from copy paper. Make the top rounded and the sides slightly angled.
3. Trace the Shark Head
Trace the shark head on another piece of copy paper, take a lighter shade and cut it 2cm smaller than the actual head. Glue it in the middle of the shark head.
4. Make the Teeth and Mouth
Take a red copy paper, draw the moth shapes and cut it out. Now take white paper and draw small white triangles. Cut them out and glue them along the mouth.
5. Add Eyes & Nose
Draw two eyes with on a copy paper or you can use Joggle eyes. Stick the eyes on each side near the top head. Draw 2 small oval shapes using marker inside the traced cut out near the eyes.
6. Attach the Shark Head
Glue the shark head to the front of the headband strip. Allow the glue to dry before wearing.
2. Bubble-Blowing Goldfish
Things You’ll Need:
- Coloured copy paper
- Scissors
- Markers, crayons, or pencil colours
- Tape
- Pencil
- Balloon
- Joggle eyes (optional)

Step-by-Step Instructions:
1. Draw the Fish
Take one sheet of paper and use a pencil to draw a fish shape. You can make your fish long, round, or even fancy with a big tail. Make sure the fish is big enough to fit a small balloon inside later.
2. Cut Out the Fish
Carefully cut out the fish shape using scissors. Try to cut smoothly around the edges so your fish looks neat.
3. Trace Another Fish
Place the fish cutout on top of another sheet of paper. Hold it still and trace around the edges with a pencil. This will create a second fish shape that matches the first one.
4. Cut the Second Fish
Cut out the second fish shape carefully. You should now have two matching fish pieces that will go together to hold the balloon inside.
5. Decorate the Fish
Use markers or crayons to decorate both fish cutouts. Draw fins, scales, gills, and a tail. You can add patterns, stripes, or bright colors to make your goldfish look unique and creative.
6. Add the Eyes
Glue on googly eyes if you have them, or draw eyes using a marker. You can make your fish look funny, happy, or surprised by changing the size and shape of the eyes.
7. Prepare the Balloon
Take a balloon and blow it up a little bit. Do not make it too big, or it may not fit inside the fish. Let a little air out so the balloon stays soft and easy to squeeze.
8. Place the Balloon
Put the balloon between the two fish cutouts. Line up the opening of the balloon with the fish’s mouth area so it looks like the fish is blowing bubbles.
9. Tape the Fish Together
Use tape to attach the two fish cutouts together around the edges. Make sure the balloon stays hidden inside the fish. Leave the mouth area slightly open so the balloon opening can stick out.
10. Make the Fish Blow Bubble
Gently press the middle of the fish with your hands. When you squeeze the balloon inside, the fish will look like it is blowing a bubble from its mouth.
3. Wiggly Paper Octopus
Things You’ll Need:
- Coloured copy paper
- Scissors
- Markers, crayons, or pencil colours
- Pencil
- Ruler
- Glue stick

Step-by-Step Instructions:
1. Prepare the Paper
Take a piece of copy paper and cut it to about 18 cm x 9 cm. This will be used to make the octopus body and tentacles.
2. Mark the Body Area
Measure and leave about 8 cm from the top of the paper. This top section will become the octopus’s body.
3. Mark the Tentacles
Use the bottom section of the paper to make the tentacles. With a ruler, mark lines that are 1 cm apart across the paper until you reach the end.
4. Draw the Suction Circles
Before cutting, use a marker to draw small circles on each strip. These circles will look like the suction cups on octopus tentacles.
5. Cut the Suction Circle Strips
Carefully cut along the marked lines from the bottom of the paper up to the body area. Do not cut into the top 8 cm section.
6. Curl the Suction Circle Strips
Take a pencil and gently roll each tentacle around it. Hold it for a moment, then let go so the strips curl up.
7. Make the Eyes
Draw two circles on another piece of paper and cut them out. These will be the octopus’s eyes.
8. Add the Face
Stick the eyes onto the top body section. Then use a marker to draw a small mouth.
9. Final Result
Your paper octopus is ready! The curled tentacles will make it look fun and playful.
4. Magical Manta Ray
Things You’ll Need:
- Coloured copy paper
- Scissors
- Cardboard rolls/toilet rolls
- Markers, crayons, or pencil colours
- Pencil
- Ruler
- Glue or tape
- Joggle eyes

Step-by-Step Instructions:
1. Choose Your Paper Colours
Take two sheets of paper. Use the coloured paper for the top of the manta ray and the white paper for the bottom. This will help your manta look more realistic and colourful.
2. Draw the Manta Shape
On the coloured paper, draw a large manta ray shape with wide wings and a rounded body. Make sure the shape is large enough to fit a toilet roll in the middle later.
3. Trace the Shape
Place the coloured manta cut-out onto the white paper and trace around it carefully. This will create the matching bottom piece for your manta ray.
4. Cut Out the Mantas
Use scissors to carefully cut out both manta ray shapes. You should now have two matching manta pieces, one coloured and one white.
5. Prepare the Cardboard Roll
Take a carboard roll and gently press it flat a little. This will make it easier to place between the two manta cut-outs.
6. Attach the Cardboard Roll
Place the cardboard roll in the middle between the two manta cut-outs. The coloured paper should be on top and the white paper should be on the bottom.
7. Glue the Manta Together
Use glue or tape to stick the manta cut-outs onto both sides of the toilet roll. Press gently so everything stays in place securely.
8. Add the Eyes
Use a marker to draw eyes, or stick on joggle eyes for a fun 3D effect. Place the eyes near the front of the manta ray.
9. Make the Tail and Antennae
Take another piece of copy paper and draw a long tail and two small antennae shapes. Cut them out carefully with scissors.
10. Attach the Tail and Antennae
Stick the tail onto the back of the manta ray. Then glue the antennae to the front, just underneath the joggle eyes.
11. Final Result
Your Magical Manta is now complete! Display your colourful manta ray and imagine it swimming through the ocean waves.
5. Crawly Paper Cup Crab
Things You’ll Need:
- Coloured copy paper
- Scissors
- Paper cup
- Markers, crayons, or pencil colours
- Paint
- Pencil
- Ruler
- Glue
- Joggle eyes

Step-by-Step Instructions:
1. Prepare the Paper Cup
Take a disposable paper cup and place it upside down on the table. This will become the crab’s body. Make sure the cup is clean and dry before starting the craft.
2. Colour the Crab Body
You can either paint the paper cup red or cover it using red copy paper. If you are painting the cup, make sure to leave it aside for a few minutes so the paint can dry completely. If you are using paper, wrap the red copy paper around the cup, trim the extra paper if needed, and secure it using glue or tape.
3. Draw the Crab Features
Take another sheet of copy paper and draw the crab’s features, including two claws, six legs, and two eye stalks. You can use a pencil first and then trace over the drawings with a marker to make them easier to see before cutting.
4. Cut Out the Pieces
Using scissors, carefully cut out all the crab parts you have drawn, including the claws, legs, and eye stalks. Take your time while cutting so the shapes stay neat and easy to attach to the cup.
5. Attach the Eyes
Glue the eye stalks to the top of the paper cup so they stand up slightly. Once attached, stick the joggle eyes onto the eye stalks to give the crab a fun and playful 3D look.
6. Add the Claws
Take the two claws and glue one onto each side of the paper cup. Hold them in place for a few seconds to make sure they stick properly.
7. Attach the Legs
Glue three legs onto one side of the cup and the remaining three legs onto the other side. Spread the legs out evenly so the crab looks balanced and realistic.
8. Let It Dry
Leave the crab aside for a few minutes so all the glue can dry properly. This will help all the parts stay securely attached.
9. Your Crab Is Ready!
Your colourful Paper Cup Crab is now complete and ready to display or play with. You can even decorate it further with glitter, stickers, or different colours to make it unique.
6. Wooden Spoon Turtle Craft
Things You’ll Need:
- Coloured copy paper
- Scissors
- Markers, crayons, or pencil colours
- Paint
- Pencil
- Ruler
- Glue stick or PVA glue
- Joggle eyes

Step-by-Step Instructions:
1. Take a Wooden Spoon
Take a wooden spoon and turn it upside down. The rounded part of the spoon will become the turtle’s shell, and the handle will help you hold the craft while decorating.
2. Draw the Turtle Features
Take a sheet of copy paper and draw the turtle’s features, including the head, two hands, two legs, and a small tail. You can make the shapes simple and rounded so they are easy to cut and stick.
3. Cut Out the Features
Carefully cut out all the turtle parts using scissors. Take your time while cutting so the head, hands, legs, and tail look neat.
4. Attach the Head
Stick the turtle’s head to the front of the spoon using glue or tape. Press it gently for a few seconds so it stays in place.
5. Add the Hands and Legs
Glue one hand on each side of the spoon. Then attach the legs near the bottom sides of the spoon so the turtle looks like it is crawling.
6. Attach the Tail
Stick the small tail at the back of the spoon, behind the turtle’s body. Make sure it is placed neatly so it can be seen from the top.
7. Decorate the Shell
Use a marker to draw dots or patterns on the rounded part of the spoon. This will make it look like the turtle’s hard shell.
8. Your Turtle Spoon Is Ready!
Your cute Turtle Spoon craft is now complete and ready to display or play with.
For more ocean-themed crafts, printable worksheets, and fun educational activities, explore our creative World Ocean Day resources designed to inspire kids to learn, create, and care for our oceans.
Explore our Reducing Plastic Waste in Oceans Worksheet, designed to teach children how small actions can help protect the ocean from pollution.
Children can also create their very own miniature underwater world filled with colourful sea creatures through fun hands-on craft activities.
For even more learning fun, explore our Ocean Waste Cleanup Worksheet, where kids colour marine animals while identifying and removing rubbish that pollutes ocean habitats.