Looking for a fun and creative way to keep kids happily entertained? We’ve got you covered with 6 exciting popstick craft projects that are perfect for little hands and big imaginations!
These crafts are designed to spark creativity and encourage hands-on learning, transforming simple materials into fantastic creations inspired by favourite animals and exciting objects.
Whether your kids are dreaming of launching rockets, friendly dinosaurs, or colourful sea creatures, these easy and imaginative projects bring their favourites to life using just popsicle sticks and a splash of creativity.
From delicate dragonflies to quirky crabs, each craft inspires young minds and hands while encouraging endless hours of play and exploration. Whether making them solo or with friends and family, these projects help build patience, focus, and the joy of creating something truly unique.
So, let’s dive in and start crafting these fantastic popstick creations together!
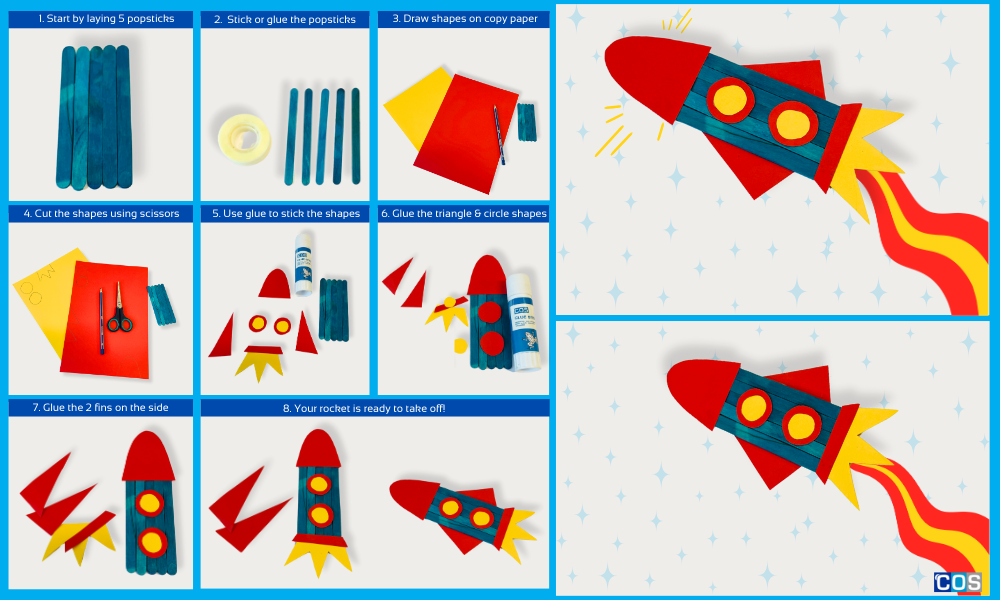
1. DIY Space Adventure With a Popstick Rocket
Materials Needed:
- Coloured popsticks
- Coloured copy paper
- Scissors
- Glue stick or tape
- Markers or stickers (for decoration)
Step-by-Step Instructions:
1. Build the Rocket Base
- Start by laying 5 wooden popsticks side by side in a straight row. Make sure the edges are aligned neatly to form a flat panel.
- Secure the sticks together by glueing or taping them on the back. Let it dry for a few minutes if using glue.
2. Design Your Rocket Parts
- Take a sheet of coloured paper (or multiple colours for extra flair).
- Using a pencil, draw the following shapes: a triangle or curved cone shape for the rocket tip (nose cone).
- 2 small circles for a window and 2 larger circles to go behind the window.
- Two fin shapes for the sides of the rocket (like triangles or trapezoids).
- A flame shape for the rocket’s fire or thrust at the bottom
Once you’re happy with your shapes, carefully cut them out with scissors.
3. Assemble and Decorate Your Rocket
- Stick the cone to the top of the popstick panel to form the rocket’s pointed nose.
- Place the larger circle in the centre of the rocket and glue the smaller circle on top of it; this will look like a window or porthole.
- Attach the fin shapes to the lower sides of the rocket to act as stabilisers or wings.
Glue the flame cut-out at the bottom of the popstick panel to show the rocket blasting off!
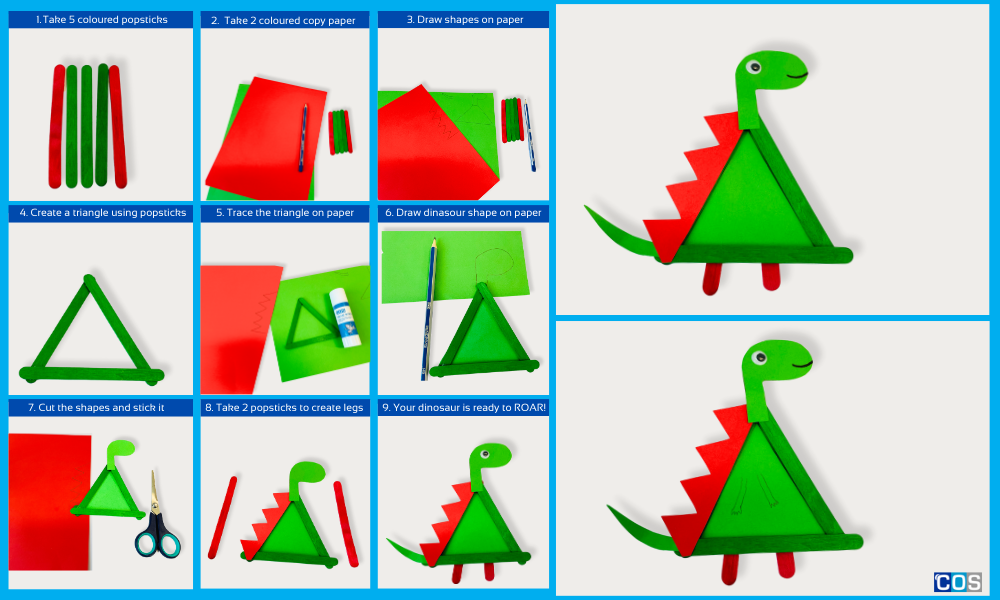
2. Make a Roaring Dinosaur with Popsticks
Materials Needed:
- 6 wooden popsticks (craft sticks)
- Green & red coloured copy paper (for spikes, tail, feet)
- Joggle eyes
- Glue (PVA or craft glue)
- Scissors
- Marker
Step-by-Step Instructions:
1. Build the Dinosaur Body
- Take 3 wooden popsticks and glue them together to form a triangle.
- On a piece of coloured copy paper, draw and cut out a triangle shape that matches the size of your popstick triangle.
Glue the paper triangle to the back of your popstick triangle; this becomes the dinosaur’s body.
2. Cut and Attach Dinosaur Features
- Head: Cut a dinosaur head shape (like a brontosaurus or t-rex) from green paper. Glue it to one side of the body.
- Tail: Cut a curved or pointed tail and glue it to the opposite end.
- Spikes or Plates: Use zigzag cuts from coloured paper to create spikes. Glue them along the top.
Legs: Take 2 popsticks and and glue them vertically to the bottom of the triangle to create legs.
3. Add Eyes and Details
- Stick on a joggle eye on the head.
Use a black marker to draw a mouth or hands.
4. Decorate (Optional)
Add pom-poms, glitter, or pipe cleaners for extra fun and personality!
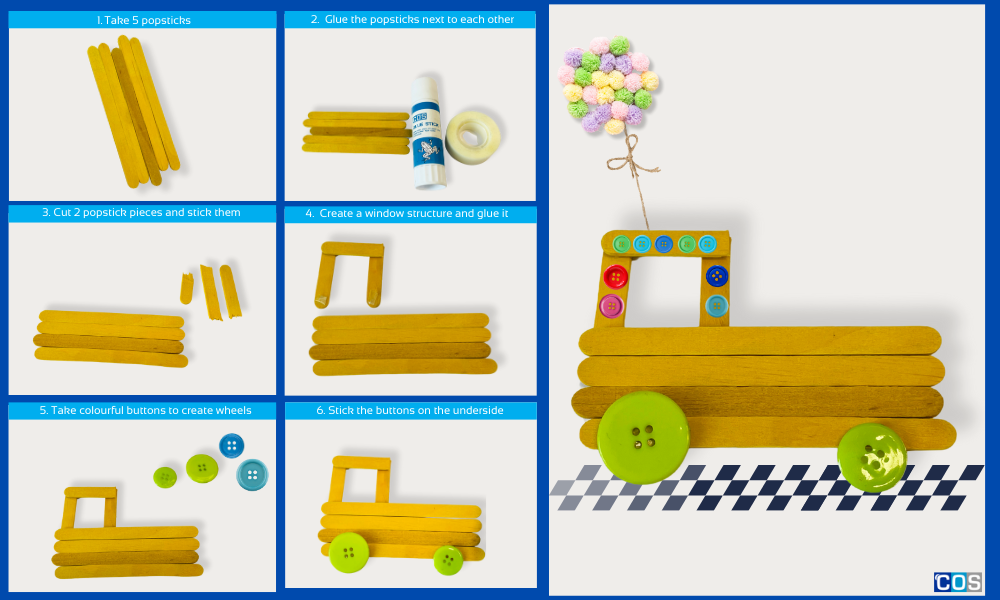
3. Roll Away with Your Own Popstick Car
Materials Needed:
- 6 popsticks (craft sticks)
- Buttons
- Pom-poms
- Craft glue/PVA/Tape
- Scissors or snap cutter
Step-by-Step Instructions:
1. Build the Car Frame
- Line up 4 popsticks side by side to form the car’s body.
- Secure them together using a glue stick or tape.
- Next, take two additional popsticks and cut each into three smaller pieces using a snap cutter.
- Use these pieces to create a window shape by gluing them onto the frame.
2. Attach the Button Wheels
- Glue one button to each corner on the underside to act as wheels.
3. Decorate Your Car (Optional)
- Use markers, paint, stickers, pom-poms or other craft supplies to make your car unique!
4. Under the Sea: DIY Popstick Fish
Materials Needed:
- Popsticks (craft sticks)
- Coloured copy paper
- Scissors/snap cutter
- Glue/tape
- Joggle eyes
- Small buttons, pom-poms, sequins, or rhinestones for decoration

🐟 Step-by-Step Instructions:
1. Create the Fish Body
- Lay down 4 full-sized popsticks side by side, flat on the table.
- Take the 4 popsticks and leave 1 popstick full-sized to place across the back horizontally and hold the others in place.
- Cut 1 popstick into a large piece and the other into a small piece to help shape the fish tail.
2. Glue the Body Together
- Glue the full popstick horizontally across the 4 laid-down sticks to keep them together (at the back).
- Attach the large and small cut pieces at one end of the body in a fan shape to create the tail.
3. Make the Fish Face
- Cut a triangle shape from coloured craft paper.
- Glue the triangle to the front end of the popstick body to form the fish’s face.
4. Create the Fins
- Cut two fin shapes from another coloured craft paper.
- Glue one fin to the top and one to the bottom of the fish body.
5. Add the Gills
- On a piece of coloured copy paper, draw and cut out small circles.
- Gently fold each circle in half and glue around the edge of the fish face triangle to resemble gills.
6. Decorate the Tail
- Decorate the tail using buttons, pompoms, or rhinestones for a colourful, textured effect.
7. Attach the Eye
- Glue a joggle eye onto the triangle face to complete your fish!
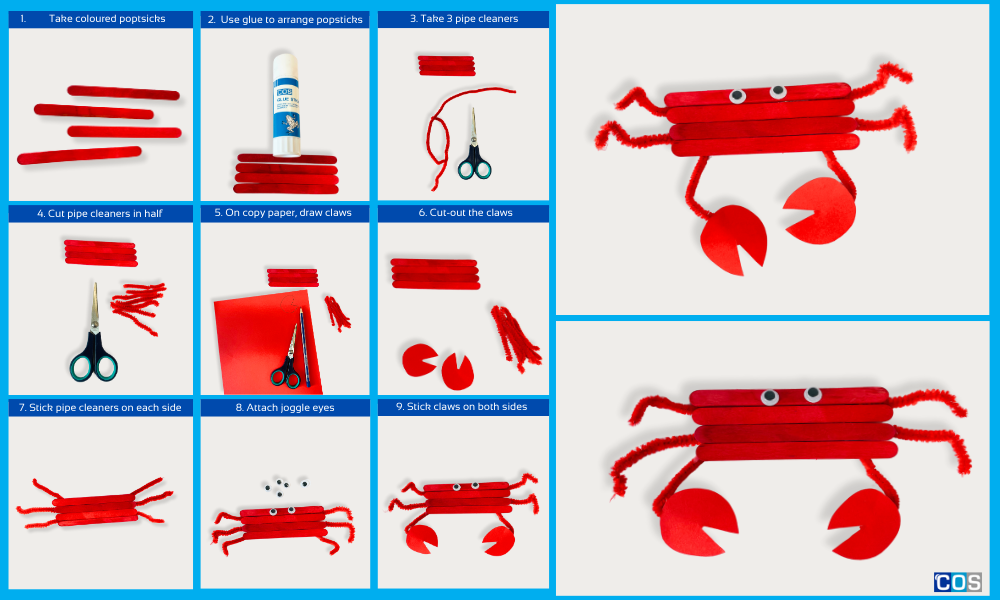
5. Snap Together Your Popstick Crab
Materials Needed:
- 5 popsticks (red)
- Red pipe cleaners
- Joggle eyes
- Glue stick
- Scissors
- Red paint (if using plain popsticks)
- Coloured copy paper for claws
Step-by-Step Instructions:
1. Create the Crab Body
- Line up 5 red popsticks side by side. If you don’t have red popsticks you can use paint to colour the popsticks.
- Apply glue across a horizontal popstick on the back to hold them together.
Let dry completely before moving to the next step.
2. Add Legs
- Cut 3 red pipe cleaners into 6 equal pieces (you’ll have 6 pieces total – 3 for each side).
Glue 3 legs on each side of the crab’s body, bending them slightly to look like crab legs.
3. Make the Claws
- Take a coloured copy paper and draw the claws and cut them out using scissors.
Attach them to the front of the crab’s body using glue stick.
4. Eyes & Face
- Glue on two joggle eyes at the top centre.
Use a black marker to draw a smiley mouth or any facial expression.
5. Let It Dry
Allow all glue to dry fully before handling or displaying.
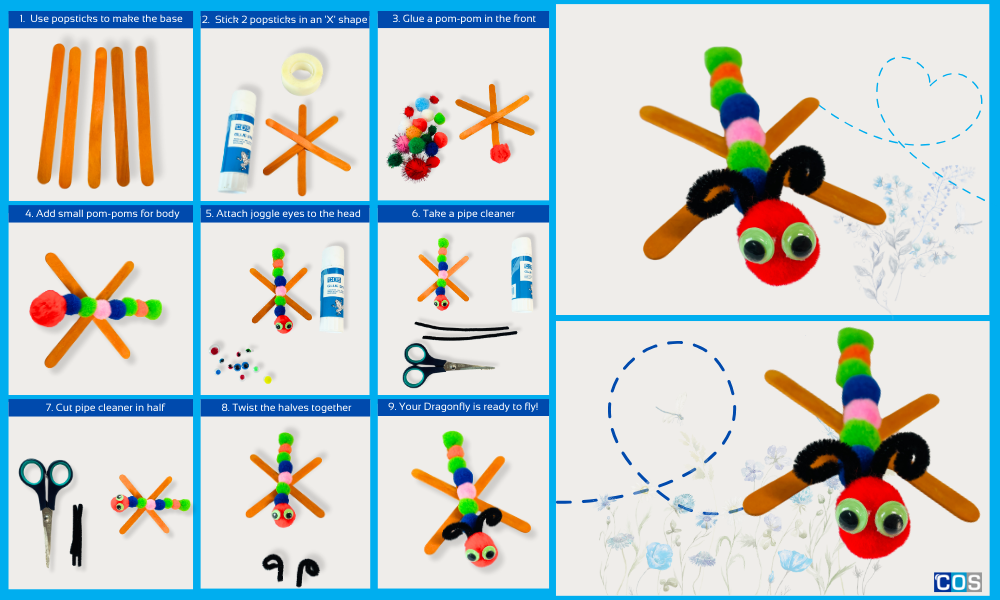
6. Fly Into Fun with Popstick Dragonflies
Materials Needed:
- 3 popsticks
- 1 pipe cleaner (for antenna)
- Colourful pom-poms (for the head and body)
- Joggle eyes
- Glue stick/PVA glue
Scissors
Step-by-Step Instructions:
1. Make the Wings and Base
- Take two popsticks and glue them together in an “X” shape to form the dragonfly’s wings and body base. Let the glue dry before moving to the next step.
2. Add the Pom- Poms
- Glue one large pom pom to the front of the top popstick, this will be the dragonfly’s head.
- Then, glue a few smaller pom poms behind the head to form the rest of the body.
- You can stack them or space them along the stick for a colourful, textured look.
3. Attach the Joggle Eyes
Glue two coloured joggle eyes onto the large pom pom (the head) to give your dragonfly a fun personality.
4. Make the Antennae
- Take a pipe cleaner and cut it in half.
- Twist each piece into a spiral or curl and glue them to the top of the head to create the dragonfly’s antennae.
5. Decorate the Wings (Optional)
- For some extra sparkle, decorate the popstick wings using rhinestones, sequins, buttons, or glitter glue.