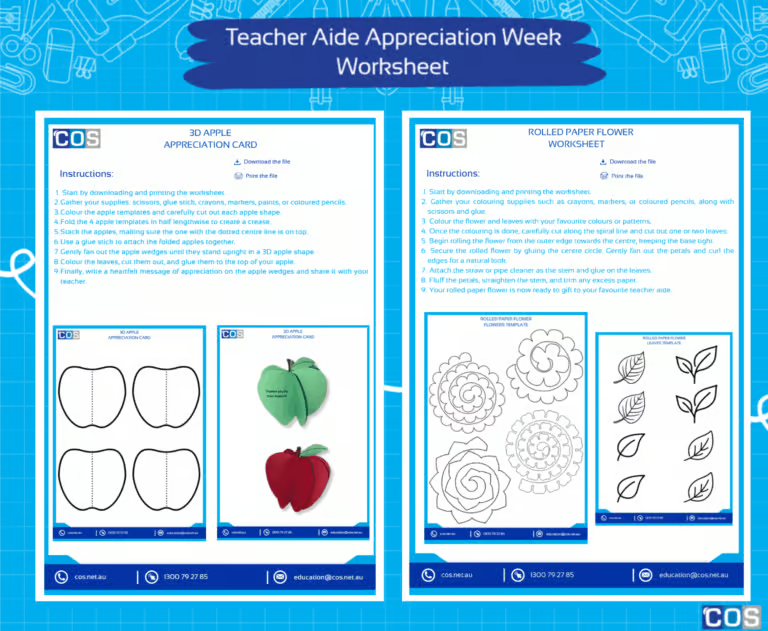
Teacher aides play an essential role in supporting teachers and enriching students’ learning experiences. Australian Teacher Aide Appreciation Week is the perfect time to show gratitude for their dedication, creativity, and hard work. What better way to celebrate than with engaging, hands-on activities that combine fun and learning?
We’ve created two fun worksheets that students can create to express their appreciation: a 3D Apple Appreciation Card and a Spiral Paper Flower Craft, a colorful and creative way to brighten any classroom.
These worksheets combine creativity, learning, and appreciation, providing students with a meaningful way to express their gratitude. Whether displayed in the classroom or gifted to a teacher aide, these DIY projects are sure to make the week extra special.
1. 3D Apple Appreciation Card 🍎
The 3D Apple Appreciation Card allows students to craft a vibrant, pop-up card that symbolises knowledge, gratitude, and care. Its three-dimensional design adds a playful twist to a traditional thank-you card, making it both a keepsake and a learning activity.
+Materials Needed
- Printed apple worksheet (4 apple templates + leaves)
- Scissors
- Glue stick
- Crayons, coloured pencils, or markers
Instructions
Step 1: Print Your Templates
- Start by downloading and printing the apple worksheet.
Make sure you have 4 apple templates and at least 1 or 2 leaf templates.
Step 2: Gather Your Supplies
- Collect everything you’ll need: scissors, glue stick, colouring tools (crayons, markers, coloured pencils, or paints), and a pen for writing your message.
Step 3: Colour the Apples
- Use your favourite colours to decorate the apples.
Colour both sides of each apple if you want the 3D card to look bright from every angle.
Step 4: Cut Out the Templates
- Carefully cut along the outlines of the 4 apples and the leaves.
Step 5: Fold the Apples
- Take each apple cut-out and fold it in half lengthwise (from top to bottom).
Press firmly so you get a clean crease in the middle.
Step 6: Stack the Apples
- Place the folded apples one on top of the other, keeping the folded edge lined up neatly.
Make sure the apple with the dotted centre line is on the very top.
Step 7: Glue the Apples Together
- Apply glue to one half of a folded apple and stick it to the half of the next folded apple.
- Repeat until all four apples are glued together in a stack.
Press firmly so they hold well.
Step 8: Create the 3D Shape
- Once the glue is dry, gently fan out the apple sections.
The pieces will spread out to form a round 3D apple that can stand upright.
Step 9: Prepare the Leaves
- Colour the leaf templates green (or any shade you like).
Cut them out neatly.
Step 10: Attach the Leaves
- Glue the leaves onto the top of your 3D apple, where the folds meet.
You can add one or two leaves for decoration.
Step 11: Add Your Message
- Open up the apple wedges and write your appreciation message inside, or write on the outer surfaces of the apples.
You can write something like “Thank you, Teacher!” or a personal note.
2. Spiral Paper Flower Craft 🌸
The Spiral Paper Flower Craft invites students to explore colours, patterns, and fine motor skills while creating a bright and cheerful paper flower. This craft is perfect for teaching patience, focus, and the joy of creating something with your own hands.
Materials Needed
- Printer worksheet (flower and leaves)
- Crayons, coloured pencils, or markers
- Drinking straw or pipe cleaner
- Scissors
- Glue stick
Step‑by-Step Instructions
Step 1: Gather Your Materials
- Download and print the flower template. You’ll also need scissors, tape, and a straw or pipe cleaner for the stem.
Step 2: Colour Your Template
- Decorate the flower template using your favourite colours or patterns. Be creative to personalise your flower.
Step 3: Cut the Spiral
- Carefully cut along the thick spiral line. Follow the curve smoothly and take your time for clean, even edges.
Step 4: Cut Out the Leaves
- Cut out 1–2 leaves along the printed outlines. You can colour them beforehand or leave them plain.
Step 5: Begin Rolling the Flower
- Begin rolling at the outside end of the spiral. Roll slowly and evenly to keep the petals uniform.
Step 6: Roll Towards the Centre
- Continue rolling until you reach the centre circle. Keep the base tight for stability, and allow the top edges to stay slightly loose for a natural, blooming look.
Step 7: Secure the Base
- Apply a small dot of glue on the centre circle and press the rolled flower into place. Hold for a few seconds until it sticks securely.
Step 8: Adjust the Petals
- Gently release the outer layers and fan out the petals. Curl the edges with your fingers if you want a more realistic effect.
Step 9: Prepare the Stem
- Attach a straw or pipe cleaner to the back of the flower using tape or glue. Make sure it’s straight and secure.
Step 10: Stick the leaves
- Glue your leaves along the stem. Slightly curl them for a natural appearance.
Step 11: Final Touches
- Fluff the petals, straighten the stem, and trim any excess paper.
For even more fun and creative ideas, there are additional worksheets that can keep the imagination flowing and make showing appreciation extra special.
The collection includes a 3D Folding Card Worksheet, allowing kids to create a unique and interactive card for their teachers, a Flower Craft Worksheet for crafting colourful paper flowers, and a Coffee Mug Paper Bouquet Worksheet, which lets little ones assemble a charming bouquet in a paper mug. Additionally, the DIY Flower Pot Worksheet provides a hands-on activity where kids can design and decorate their own miniature flower pots.


