Plastic-Free July is more than just a month-long challenge, it’s a chance to inspire children to care for the environment through simple, everyday actions. One of the easiest and most enjoyable ways to get involved is through upcycling, the creative process of transforming used or unwanted items into something new, useful, and fun.
Rather than throwing away plastic cups, bottles, spoons, or polystyrene packaging, encourage kids to see these everyday materials as opportunities for creativity. Upcycling helps reduce waste sent to landfill, conserves resources, and teaches children that even small changes can have a positive impact on the planet.
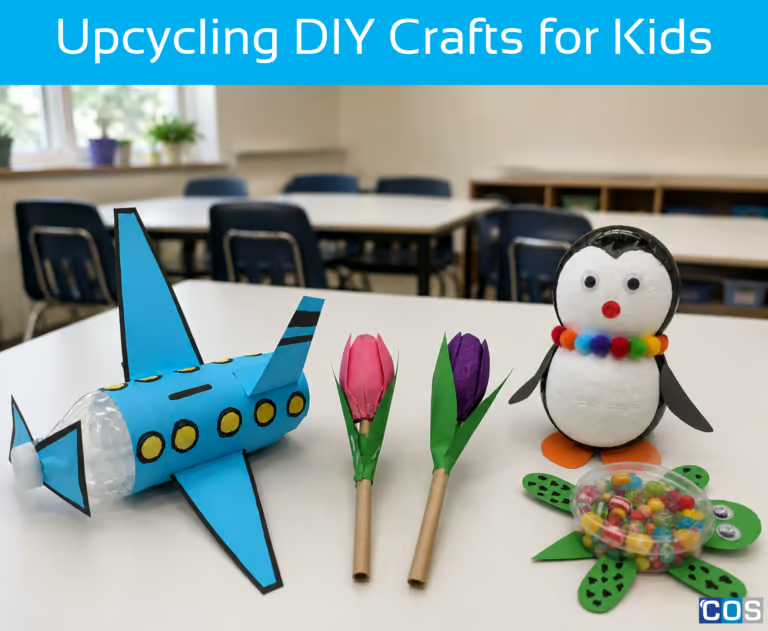
These hands-on craft activities are perfect for home, the classroom, or holiday programs, making sustainability both educational and entertaining. We’ve created 4 fun and easy upcycling projects that will breathe new life into everyday plastic items. Kids can make a Tortoise Treat Holder from a Plastic Cup, build an Airplane Piggy Bank with a Plastic Bottle, create a Cute Penguin with a Polystyrene Ball, and make Bright Tulips from Plastic Spoons.
Whether you’re looking for an engaging Plastic Free July activity or a creative way to teach kids about sustainability, these DIY projects are sure to inspire. So, gather your waste materials, unleash your imagination, and discover how a little creativity can turn everyday “waste” into something truly wonderful.
1. Make a Tortoise Treat Holder from a Plastic Cup
Materials required:
- Plastic glass
- Joggle eyes
- Coloured copy paper
- Glue gun
- Snap cutter
- Glue stick
- Ribbon
- Colouring suppliers (markers, paint, crayons, pencil colours)
- Pencil
- For decoration (pom-poms, buttons, beads, rhinestones, or jewels)

Step-by-step instructions:
Step 1: Create the Tortoise Shell
- Take a plastic glass and carefully cut the plastic glass in half.
- Keep the bottom part of the glass to use as the tortoise’s shell.
Step 2: Draw the Tortoise Body
- On a piece of copy paper, trace the glass cut-out and draw tortoise shape with head, four legs, and a tail
- Make the body large enough to fit under the plastic glass shell.
Step 3: Cut Out the Tortoise
- Carefully cut out the tortoise shape from the paper.
Step 4: Make a Candy Slot
- Cut a small slit or opening in the centre of the paper tortoise body.
- This opening will be used to insert lollies or treats into the treat holder.
Step 5: Attach the Shell
- Apply glue using a glue gun around the edge of the plastic cup bottom.
- Stick it onto the centre of the paper tortoise body, covering the treat slot. Allow the glue to dry.
Step 6: Decorate the Shell
- Decorate the plastic bottle shell using, markers, rhinestones, pom-poms, or glitter (optional).
Step 7: Add the Details
- Glue joggle eyes onto the tortoise’s head.
- Draw some shapes around the tortoise legs or any other facial features using a marker.
Step 8: Fill with Treats
- Insert treats or any other fillings of your choice through the slit in the bottom.
- The treats will sit under the plastic shell.
Step 9: Display and Enjoy
- Your Plastic cup Tortoise Treat Holder is now ready to display, gift, or use as a fun party favour!
2. Build an Airplane Piggy Bank with a Plastic Bottle
Materials required:
- Plastic bottle
- Coloured copy paper
- Snap cutter
- Marker
- Glue stick
- Scissors
- Pencil

Step-by-step instructions:
Step 1: Prepare the Bottle Base
- Take a clean, empty plastic bottle and remove any labels, glue, or residue.
- Make sure it is completely dry before starting, as this will be the main body of your airplane piggy bank.
2. Wrap the Bottle with Colour Paper
- Choose a coloured craft paper of your choice.
- Apply glue evenly on the bottle and carefully wrap the paper around it.
- Leave the bottle cap and upper neck area uncovered, as this will act as part of the airplane’s front design.
3. Create and Attach the Windows
- Draw small circles on a piece of paper to make airplane windows.
- Cut them out neatly using scissors.
- Stick these circles evenly on both sides of the bottle to create a realistic airplane look.
4. Make the Wings
- Draw a pair of airplane wings on a sheet of paper. Make sure they are symmetrical and large enough to stand out.
- Cut them out carefully, then apply glue and attach them securely to the middle sides of the bottle.
5. Design the Tail and Propeller
- Draw the airplane’s tail fin and front propeller (fan) on paper. Cut them out neatly.
- Use markers to outline or highlight the shapes for a more finished look before sticking them.
6. Attach the Tail and Propeller
- Stick the tail fin at the back end of the bottle and the propeller at the front near the cap area.
7. Add the Coin Slot
- Using a snap cutter, carefully cut a small slit on the top of the bottle. This will be the coin slot for your piggy bank.
8. Final Touch and Use
- Check all parts are securely attached and make any final decorations if desired.
- Your airplane piggy bank is now ready to use for saving coins and small notes.
3. Create a Cute Penguin with Polystyrene Balls
Materials required:
- Polystyrene ball
- Coloured copy paper
- Glue stick
- Glue gun
- Snap cutter
- Scissors
- Joggle eyes
- Colouring suppliers (markers, paint, crayons, pencil colours)
- For decoration (pom-poms, buttons, beads, rhinestones, or jewels)

Step-by-step instructions:
Step 1: Prepare the Polystyrene Balls
- Take two polystyrene balls.
- Carefully cut a small flat section at the bottom of each ball using a snap cutter so they can sit firmly and stick together without rolling.
2. Assemble the Penguin Body
- Using a hot glue gun, glue the two balls on top of each other.
- This will form the body and head of your penguin.
3. Mark the Penguin Shape
- Use a black marker to draw the outline of the penguin’s body.
- This will help guide where the black and white sections should be painted or coloured.
4. Colour the Penguin
- Paint or colour the back side of the penguin black, leaving the front side white to create the classic penguin look.
- Allow it to dry completely before moving to the next step.
5. Make the Wings and Feet
- Take a piece of copy paper and draw two flippers (wings) and two small feet. Cut them out carefully.
6. Attach the Body Parts
- Stick the wings on the sides of the penguin body and the feet at the bottom using glue.
- Make sure they are evenly placed so the penguin can stand properly.
7. Add Eyes and Facial Features
- Stick joggle eyes onto the head area to give your penguin a fun expression.
- You can also draw or add a small beak or lips using paper or marker.
8. Decorate Your Penguin
- Finish by decorating your penguin using rhinestones, beads, or glitter for extra charm and creativity.
- Let everything dry completely before displaying your craft.
4. Make Tulips from Plastic Spoons
Materials required:
- Plastic spoon
- Chenille stems
- Coloured copy paper
- Glue stick
- Scissors
- Colouring suppliers (markers, paint, crayons, pencil colours)
- For decoration (pom-poms, buttons, beads, rhinestones, or jewels)

Step-by-step instructions:
Step 1: Prepare the Spoons
- Take 10-15 plastic spoons.
- If desired, paint the spoon heads in bright tulip colours such as red, pink, yellow, purple, or orange.
- Allow the paint to dry completely.
Step 2: Remove the Handles
- Carefully cut off most of the spoon handles, leaving a short section attached to the spoon bowl.
Step 3: Create the Tulip Bud
- Take 2 spoons and place them in the centre with the curved side facing inward.
- Arrange 2 additional spoons around it, slightly overlapping to form flower petals.
- Glue the spoons together where they overlap. Hold until the glue sets.
Step 4: Attach the Stem
- Glue the bottom of the flower bud to a green chenille stem or a straw.
- Ensure it is secure before moving on.
Step 5: Make the Leaves
- Draw and cut two leaf shapes from green copy paper.
- Fold each leaf slightly down the centre to create a realistic look.
Step 6: Attach the Leaves
- Glue the leaves onto the stem below the flower.
- Position them on opposite sides for balance.
Step 7: Add Finishing Touches
- Check that all parts are securely attached.
- Add a ribbon around the stem if desired.
Step 8: Display Your Tulip
- Place your tulip in a vase, use it as a gift, or create a bouquet with multiple flowers in different colours.
Looking for even more ways to turn everyday waste into creative masterpieces? Explore our Plastic Free July: Fun Upcycling Crafts collection, featuring inspiring projects that encourage kids to reuse, recycle, and create. From transforming a plastic bottle into a cheerful bunny container to giving an old tissue box a new purpose as a toy car, these hands-on activities make sustainability both fun and meaningful.
You can also discover our 4 DIY Upcycling Craft Projects for Kids, where simple household items become exciting creations. Whether it’s a colourful piñata garland made from cardboard rolls or a charming wind chime crafted from paper cups, these easy projects spark imagination, develop creativity, and show children that small actions can make a big difference for the planet.