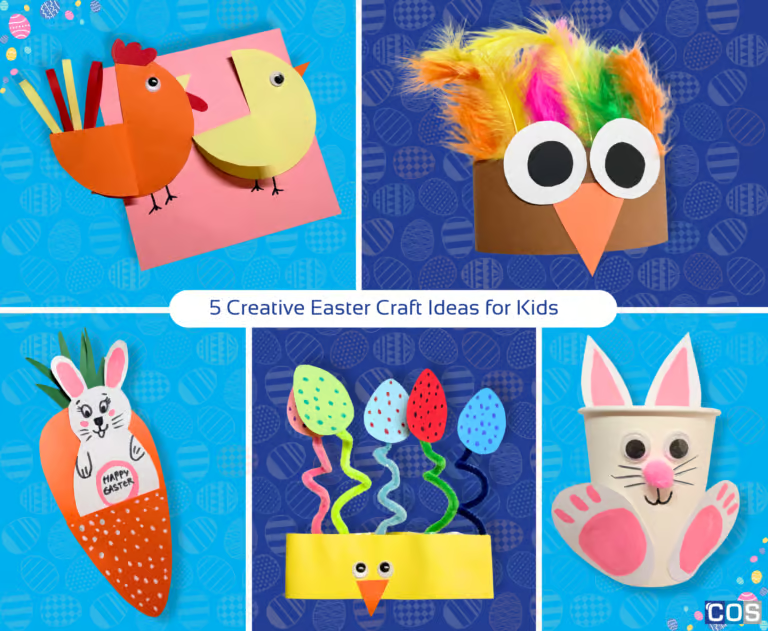
Are you ready to hop into some festive fun this Easter? Whether you’re crafting with kids, planning a classroom activity, or creating family memories, these 5 easy paper crafts are packed with charm, creativity, and colourful cheer.
From paper cup bunny basket and peeking bunny with a heartfelt message to vibrant Easter parade hats, each project is easy to make and will add a touch of joy to your celebrations.
With just a few materials like paper, markers, glue, and some colourful decorations, you can create adorable decorations, festive wearables, and keepsakes that will brighten up your Easter table, classroom, or home.
1. Paper Cup Bunny - DIY Treat Basket
Materials Needed:
- Paper cup
- Copy paper
- Coloured markers, crayons, or pencil colours
- Googly (joggle) eyes
- Small pom pom (for the nose)
- Scissors

Step-by-Step Instructions:
Step 1: Prepare the Cup
- Place the paper cup upside down on a flat surface. This will form the bunny’s body.
Step 2: Make the Ears
- Draw two long oval shapes from white paper. Use scissors to cut them out.
- Use a pink marker, crayons, or pencil colour to colour the inner part of each ear.
- Glue the ears to the top inside edge of the paper cup.
Step 3: Create the Legs
- Draw 2 oval circles on a white copy paper.
- Cut two small oval or rounded shapes from white paper for the legs.
- Add pink colour using a marker, crayons, or pencil colour if desired.
- Glue them to the front bottom of the cup.
Step 4: Add the Eyes
- Stick googly eyes onto the front of the cup to give your bunny a 3D effect.
Step 5: Attach the Nose
- Glue a small pom pom just below the eyes to form the bunny’s nose.
Step 6: Draw Facial Features
- Using a black marker, draw the mouth, whiskers, and any other facial details you like.
Step 7: Let It Dry
- Allow the glue to dry completely before handling.
2. Paper Carrot Peek-a-Boo Bunny
Materials Needed:
- Copy paper (orange, green, and white)
- Pencil
- Scissors
- Glue
-
Markers (black, pink or any colours you like)

Step-by-Step Instructions:
Step 1: Make the Carrot Shape
- Take an orange copy paper and draw a large carrot shape.
- Cut the carrot shape using scissors carefully.
Step 2: Create the Carrot Opening
- Trace the same carrot shape again on orange paper.
- Cut this second carrot shape in half lengthways.
- Glue the two halves onto the front of the full carrot shape, leaving the middle open to form a pocket.
Step 3: Add the Green Leaves
- Draw a leaf shape and cut the shape using scissors.
- Glue them to the top back of the carrot to create leafy carrot tops.
Step 4: Draw the Bunny
- On white copy paper, draw a bunny shape with long ears.
- Colour in the bunny using markers and draw facial features.
Step 5: Write the Message
- Write “Happy Easter” on the bunny using a marker.
Step 6: Insert the Bunny
- Slide the bunny into the carrot pocket so it peeks out from the top.
Step 7: Finish and Display
- Your Paper Carrot Bunny Easter craft is now ready to display or gift!
3. Adorable 3D Paper Hen
Materials Needed:
- Coloured copy paper (for the hen’s body)
- Red and Yellow coloured copy paper (for beak and details)
- Round object for drawing a circle
- 4 colourful paper strips (about 1 cm wide × 10 cm long)
- Pencil
- Scissors
- Glue
- Marker
- Googly (joggle) eyes

Step-by-Step Instructions
Step 1: Draw the Body
- Take a round object to trace a large circle on a coloured paper.
- Cut the circle shape using scissors.
Step 2: Make the Fold
- Make a cut from the edge of the circle to the centre.
- Overlap the cut edges slightly and glue them together to form a folded, cone-like shape. This creates the hen’s body.
Step 3: Create the Beak
- Draw a small triangle on paper for the hen’s beak.
- Draw hen’s comb and wattle on another coloured copy paper.
- Cut it out and glue it to the front of the body.
Step 4: Make the Tail Feathers
- Take the 4 colourful paper strips (1 cm × 10 cm).
Fan them out and glue one end together.
Step 5: Attach the Tail
- Glue the joined end of the paper strips to the back of the hen to form the tail.
Step 6: Add the Eyes
- Stick googly (joggle) eyes above the beak for a fun 3D effect.
Step 7: Final Touches
- Use a marker to draw extra details like feathers or feet if desired.
4. Festive Paper Turkey Hat

Step-by-Step Instructions
Step 1: Make the Hat Strip
- Draw a long strip on brown paper 15cm x 5cm enough to fit around your head.
- Cut it out and set aside.
Step 2: Create the Eyes
- Draw two large circles on paper for the eyes and cut them out.
- Draw and cut two small circles for the centres of the eyes.
- Glue the small circles onto the large circles.
Step 3: Make the Beak
- Draw a small triangle on coloured paper for the turkey’s beak and cut it out.
Step 4: Assemble the Face
- Glue the eyes onto the front of the hat strip.
- Glue the triangle beak below the eyes.
Step 5: Add the Feather Crown
- Glue or tape the feathers along the top edge of the hat strip to form a crown.
Step 6: Adjust the Hat
- Wrap the strip around the child’s head and secure the ends with glue or tape.
5. DIY Chick Hat for Easter Parade
Materials Needed:
- Coloured copy paper
- Paper strip (15 × 5 cm)
- Coloured markers
- Googly (joggle) eyes
- Pencil
- Ruler
- Scissors
- Glue or tape
-
Colourful chenille stems (pipe cleaners)

Step-by-Step Instructions:
Step 1: Make the Hat Band
- Cut a long paper strip measuring 15 × 5 cm.
- This will be the base of the chick hat.
Step 2: Create Egg Shapes
- Draw egg shapes on different coloured paper.
- Cut them out carefully.
Step 3: Decorate the Eggs
- Use markers to draw dots or patterns on the egg shapes.
Step 4: Add the Chick Face
- Stick googly (joggle) eyes in the centre of each egg shape.
- Draw a small triangle on coloured copy paper and cut it out for the beak below the eyes.
Step 5: Prepare the Chenille Stems
- Take colourful chenille stems and twist them slightly.
Step 6: Attach Eggs to Chenille Stems
- Glue or tape each egg shape onto one end of a chenille stem.
Step 7: Fix to the Hat Band
- Attach the other end of the chenille stems to the paper band using tape or glue.
Step 8: Fit the Hat
- Wrap the band around the head and secure the ends with tape or glue.
Looking for even more Easter craft inspiration for kids? From a cute Origami Paper Bunny to a fun Popstick Basket, there are plenty of easy projects that bring handmade charm to the season.
You can explore DIY Easter hat ideas, perfect for classrooms, parades, or family fun, whether you’re planning ahead or putting together a last-minute creation.
For teachers and parents, there’s a wide range of engaging crafts from pop-up Easter eggs and colourful paper bunnies to decorating lollipop sticks, that cater to all ages and skill levels. And don’t forget about easy Easter treat bags, perfect for egg hunts and hiding festive surprises that will get kids excited! These ideas are sure to add extra creativity and joy to your Easter celebrations.