The holiday season is the perfect time to let kids slow down, get hands-on, and let their creativity shine. There’s something truly special about watching little ones transform everyday materials into festive keepsakes.
To help bring that magic to your classroom or home, we’ve put together four simple but magical Christmas crafts. They’re easy enough for kids of all ages, fun to make in small groups or as a whole class, and guaranteed to sprinkle a little more cheer into the season.
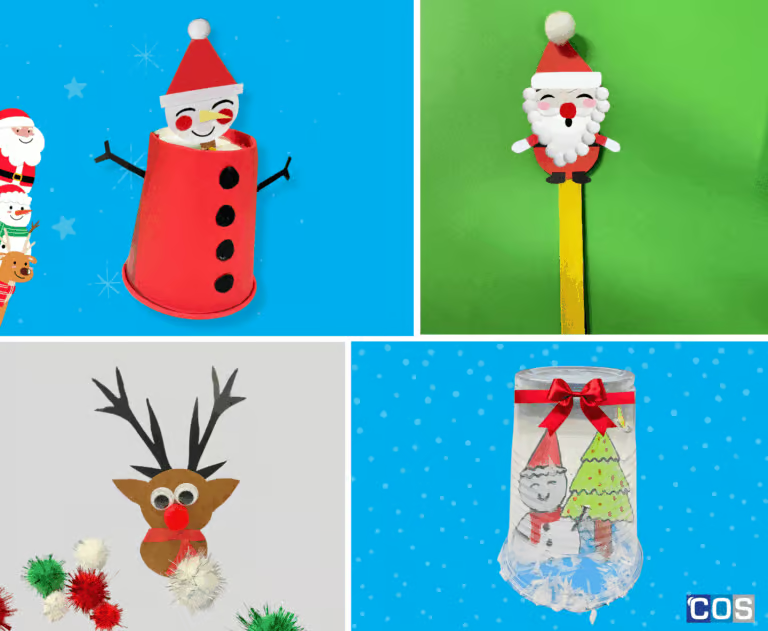
From a sparkling plastic cup snow globe that captures a tiny world of Christmas wonder, a wiggly dancing reindeer that brings giggles with every shake, a Santa popstick bookmark perfect for holiday reading sessions, and a bouncing paper cup snowman that’s full of personality.
Whether you’re looking to fill a lesson plan, keep kids entertained during the holidays, or simply create some festive memories together, these crafts are a delightful way to celebrate the season.
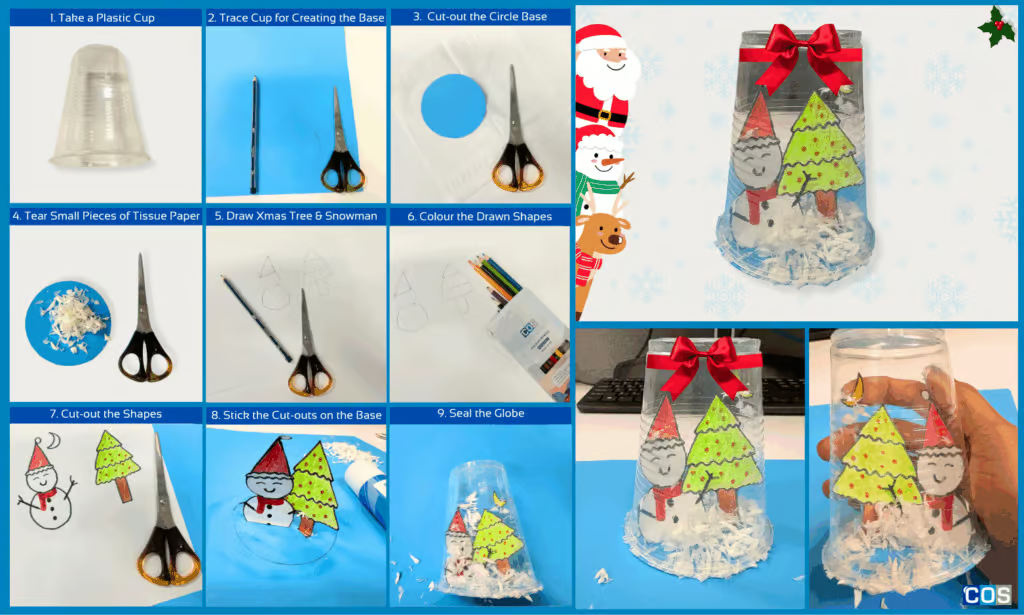
1. Plastic Cup: Snow Globe
Materials Needed:
- Clear plastic glass
- Coloured copy paper
- Scissors
- Pencil
- Glue (craft glue or glue stick)
- Coloured markers
- Tissue paper (white)
- For decoration (Pom-poms, rhinestones, sequins, or buttons)
- Glitter (optional)
Step-by-Step Instructions:
Step 1: Prepare the Base
- Place your glass jar upside down on a sheet of paper.
- Trace around the bottom of the jar to create a circle that will fit snugly inside.
Cut out the circle, this will be the base for your Christmas tree and snowman.
Step 2: Create the Paper Christmas Tree & Snowman
- On coloured copy paper, draw a Christmas tree and a snowman.
- Outline the shapes with a marker for definition.
- Use crayons, coloured pencils, or markers to fill in your designs.
Carefully cut out the tree and snowman.
Step 3: Assemble the Shapes Inside the Globe
- Glue the tree and snowman onto your paper circle base.
Allow the glue to dry completely before moving on to adding snow.
Step 4: Add the Snow
- Tear small pieces of white tissue paper to resemble snowflakes.
- Sprinkle the tissue paper around your tree and snowman on the base.
Optional: Add a tiny pinch of glitter for extra sparkle!
Step 5: Seal the Globe
- Carefully place the decorated circle inside the glass jar.
Secure it with a small amount of glue to keep the cut-outs in place.
Step 6: Final Touches
- Gently shake your snow globe to see the “snow” fall.
Display your homemade snow globe as a festive decoration!
2. Wiggly Dancing Reindeer
Materials Needed:
- A sheet of copy paper (A4 works well)
- Bottle cap (plastic)
- Pencil
- Scissors
- Joggle eyes
- Glue stick
- Coloured markers or coloured pencils (for decorating)
- Magiclay
- Pom-Poms or a ribbon for decoration

Step-by-Step Instructions:
Step 1: Create the Reindeer Base
- Take a medium-sized bottle cap and trace it onto brown copy paper.
- Draw two circle shapes, these will form the base of your reindeer.
- Carefully cut out the 2 circles.
Step 2: Decorate Your Reindeer
- Overlap and stick the two paper circles together to form the reindeer’s body.
- Attach joggle eyes to create a 3D effect.
- Add a small pom-pom to create a cute, festive nose.
- Create a scarf by drawing and cutting it from coloured paper, or use a small ribbon for a 3D effect, and glue it around the reindeer’s neck.
- Make the antlers by drawing and cutting them from brown or black paper, then attach them to the top of the reindeer’s head.
- Draw the ears, cut them out and stick it on both the sides.
Step 3: Assemble the Reindeer
- Use a glue stick to attach the scarf and antlers to the reindeer base.
- Make sure everything is secure before moving on.
Step 4: Make Your Reindeer Stand
- Place a small piece of modelling clay or playdough inside the bottle cap, this will keep your reindeer balanced.
- Glue the paper reindeer onto the top of the bottle cap.
- Press gently and allow the glue to dry completely.
Step 5: Add Fun Movement
- Put your reindeer on a flat surface.
- Give it a gentle push, and watch it wiggle or “dance”!
3. Santa Popstick Bookmark
Materials Needed:
- Popstick
- Coloured copy paper (red, black, and yellow)
- Scissors
- Glue stick
- Red pom-poms (for nose)
- Small white pom-poms (for beard decoration)
- Coloured markers (for blush/cheeks)
- Pencil

Step-by-Step Instructions:
Step 1: Create Santa’s Base
- Take a sheet of copy paper.
- Draw 2 circles stacked on top of each other: the top circle is Santa’s head and the bottom circle is his body.
Step 2: Draw Santa’s Accessories
On a second sheet of copy paper, draw:
- Hat
- Belt
- Hands
- Boots
- Draw a cloud-shaped beard for Santa.
Step 3: Cut Out the Shapes
- Carefully cut out all the shapes you have drawn: head & body, hat, belt, hands, boots, and beard.
Step 4: Assemble on the Popsicle Stick
- Glue the head and body circles onto the top part of the popstick.
- Attach the hat, belt, hands, and boots to their respective positions.
- Glue the cloud-shaped beard onto the head.
Step 5: Add 3D Details
- Glue a red pom-pom on the face for Santa’s nose.
- Use a marker to draw blush or cheek effects.
- Add small white pom-poms along the beard to give a 3D snowy effect.
Step 6: Use Your Bookmark
- Insert your completed Santa popstick bookmark into your favourite book and enjoy!
4. Bouncing Paper Cup Snowman

Materials Needed:
- Paper cup
- Copy paper (red) or red paint
- Copy paper (white, black, and yellow for snowman facial features)
- Coloured markers
- Scissors
- Glue stick
- Popstick
- Toothpick
- For decoration (Pom-poms, rhinestones, sequins, or buttons)
Snap cutter (or scissors)
Step-by-Step Instructions:
Step 1: Prepare the Paper Cup:
- Colour your paper cup red or cover it with red copy paper.
- At the bottom of the cup, cut a small rectangle (just big enough for the popstick to fit) using a snap cutter or scissors. This will hold your snowman upright.
Step 2: Create the Snowman Face:
- On a white sheet, draw a round shape for the snowman’s face.
- Draw the eyes, nose, and mouth on the face.
Step 3: Make the Snowman Accessories:
- Draw and cut out a hat and hands.
- Draw or cut out a nose (like a small carrot shape).
Step 4: Assemble the Snowman on the Popstick:
- Stick the snowman face, hat, and hands together.
- Create a small hole at the bottom of the snowman face on the popstick, just big enough for a toothpick to fit through.
- Insert the toothpick through the hole.
- Attach the popstick to the toothpick so the snowman stands on it.
Step 5: Attach Snowman to Cup:
- Insert the popstick with the snowman into the rectangle hole you made in the bottom of the cup.
Step 6: Add Finishing Touches:
- Draw buttons on the snowman’s body or stick on small actual buttons for a 3D effect.
Step 7: Test the Bouncing Snowman:
- Press the snowman gently on top and release to see it bounce inside the cup.
If you’re looking for simple, festive ways to make Christmas feel a little more special this year, these easy Origami Christmas Crafts are a great place to start. They’re fun for kids, perfect for the classroom, and a lovely way to add a handmade touch to your decorations at home. You can also try out our 6 Easy DIY Christmas Craft Projects using things like papier-mâché, craft clay, and colourful paper to create small holiday treasures. And if you want to make your gifts feel more personal, DIY Christmas gift boxes are a sweet idea that let kids get creative while learning something new.