

With World Teachers’ Day celebrated in Australia on Friday, 30 October 2026, it’s a wonderful opportunity for children, families and classrooms to recognise teachers and say thank you for the difference they make every day.
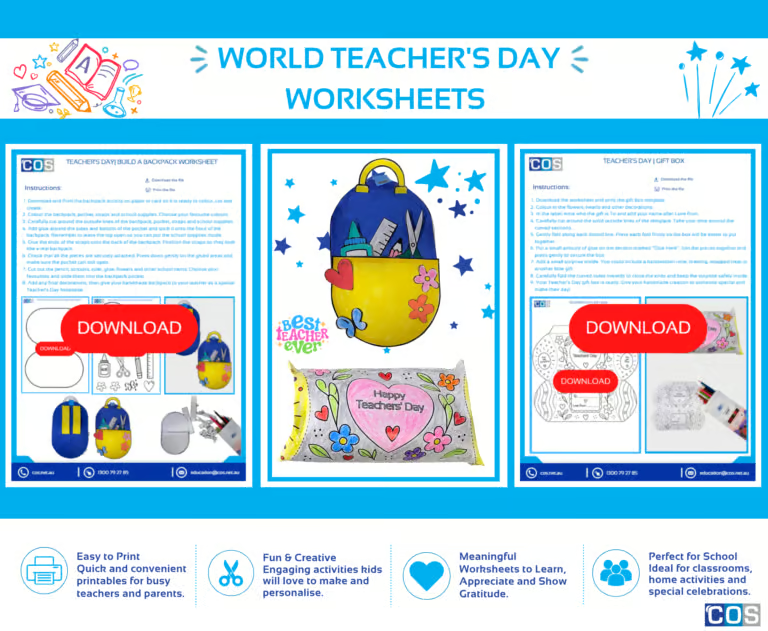
These two fun printable worksheets make it easy for children to turn a simple craft activity into a thoughtful, personalised gift. With colouring, cutting, gluing and assembling involved, they’re a great hands-on activity for classrooms, early learning environments or crafting together at home.
The Teacher’s Day Gift Box Worksheet allows children to colour, decorate and assemble their very own gift box. Once finished, they can fill it with a small surprise, handwritten message, drawing or special keepsake to create a Mother’s Day gift made with love.
The Teacher’s Day Backpack Worksheet is a fun way for children to celebrate their teachers. Children can colour and assemble their own paper backpack, complete with a pocket, straps and cut-out school supplies. They can then personalise it with decorations and add a special thank-you message for their teacher.
Both activities encourage children to colour, cut, glue, create and personalise, helping develop creativity while giving them something they can proudly present to someone special.
So, gather the colouring pencils, scissors and glue, print out the worksheets and let the creativity begin!
1. Teacher's Day| Build a Backpack Worksheet
Materials Required:
- Colouring pencils, crayons or markers
- Child-safe scissors
- Glue stick or craft glue
- Pencil or pen for writing a special message
- Optional rhinestones, stickers, glitter, gems or other craft decorations
Step-by-Step Instructions:
Step 1: Download and print the worksheet
Print the backpack activity on paper or card so it is ready to colour, cut and create
Step 2: Colour your backpack
Colour the backpack, pocket, straps and school supplies. Choose your favourite colours and add your own patterns or designs.
Carefully cut around the outside lines of the backpack, pocket, straps and school supplies.
Add glue around the sides and bottom of the pocket and stick it onto the front of the backpack. Remember to leave the top open so you can put the school supplies inside.
Glue the ends of the straps onto the back of the backpack. Position the straps so they look like a real backpack.
Check that all the pieces are securely attached. Press down gently on the glued areas and make sure the pocket can still open.
Cut out the pencil, scissors, ruler, glue, flowers and other school items. Choose your favourites and slide them into the backpack pocket.
Step 8: Make it special for your teacher
Add a special message, drawing or decoration for your teacher. You could write “Thank you!”, “You’re an amazing teacher!” or create your own message.
Add any final decorations, then give your handmade backpack to your teacher as a special Teacher’s Day keepsake.
Click the images below to download your free worksheets


2. Teacher's Day | Gift Box Worksheet
Materials Required:
- Colouring pencils, crayons or markers
- Child-safe scissors
- Glue stick or craft glue
- Pencil or pen for writing a special message
- Optional rhinestones, stickers, glitter, gems or other craft decorations
Step-by-Step Instructions:
Step 1: Print your worksheet
Print the gift box template on paper or card.
Step 2: Colour and decorate
Colour in the flowers, hearts and other decorations. Add your own drawings, patterns or a special message to make the box unique.
Step 3: Add your special message
In the label, write who the gift is To and add your name after Love from.
Step 4: Cut out the box
Carefully cut around the solid outside lines of the template. Take your time around the curved sections.
Step 5: Fold along the dotted lines
Gently fold along each dotted line. Press each fold firmly so the box will be easier to put together.
Step 6: Add the glue
Put a small amount of glue on the section marked “Glue Here”. Join the pieces together and press gently to secure the box.
Step 7: Fill your gift box
Add a small surprise inside. You could include a handwritten note, drawing, wrapped treat or another little gift.
Step 8: Close the box
Carefully fold the curved sides inwards to close the ends and keep the surprise safely inside.
Step 9: Give it with love
Your Mother’s Day gift box is ready. Give your handmade creation to someone special and make their day!
Click the images below to download your free worksheets


Looking for even more ways to make Teachers’ Day extra special? Explore our Teachers’ Day Pop-Up Card and Bookmarks article for fun, creative activities that help children show their appreciation in a meaningful way.
Or, brighten a teacher’s day with a beautiful Paper Flower Bouquet! Download our FREE template and let kids cut, colour and create a handmade gift filled with creativity, appreciation and joy.