

Father’s Day is a wonderful time for children to show Dad just how much they care with a thoughtful handmade gift. Instead of buying something from the store, why not let kids get creative and make a special surprise using simple craft materials? Handmade gifts are a fun way for children to express their love, appreciation and creativity while creating a keepsake Dad can treasure.
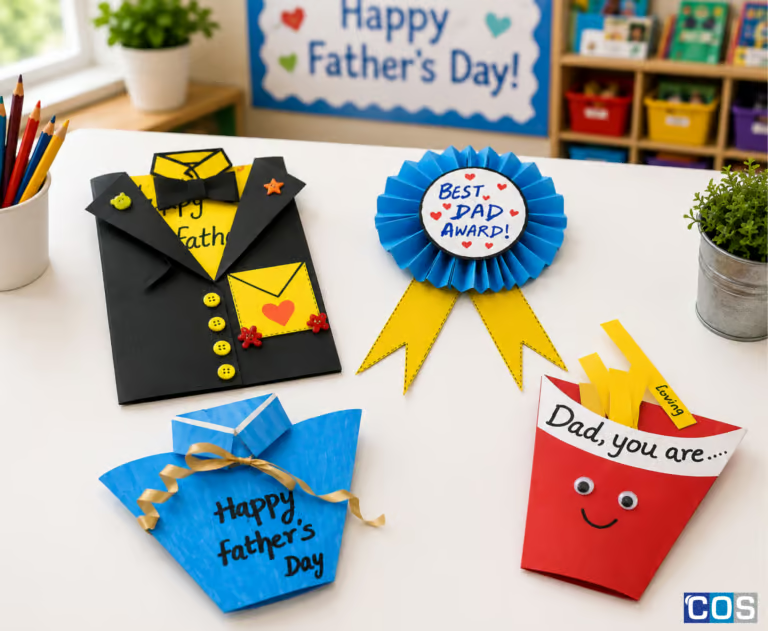
To help make Father’s Day extra special, we’ve put together 4 easy and fun Father’s Day DIY crafts for kids. These crafts are simple to make, colourful and perfect for children at home or in the classroom. They also provide a great opportunity for kids to practise cutting, colouring, folding and decorating while having fun.
From a “Best Dad” Badge that Dad can proudly wear to a playful “You’re Fry-tastic, Dad!” French Fries Box, there’s something for every little crafter. Kids can also make a Handmade Shirt Card with a special message inside and a Paper Cup Gift Box that can be filled with a small treat or surprise.
Gather your craft supplies, get creative and let the kids make something heartfelt for the special dads, grandads and father figures in their lives.
1. Best Dad Badge
What you’ll need:
- Coloured copy paper
- Pencil
- Ruler
- Scissors
- PVA glue or glue stick
- Markers, crayons, or pencil colours
- For decoration (pom-poms, buttons, beads, rhinestones, or jewels)
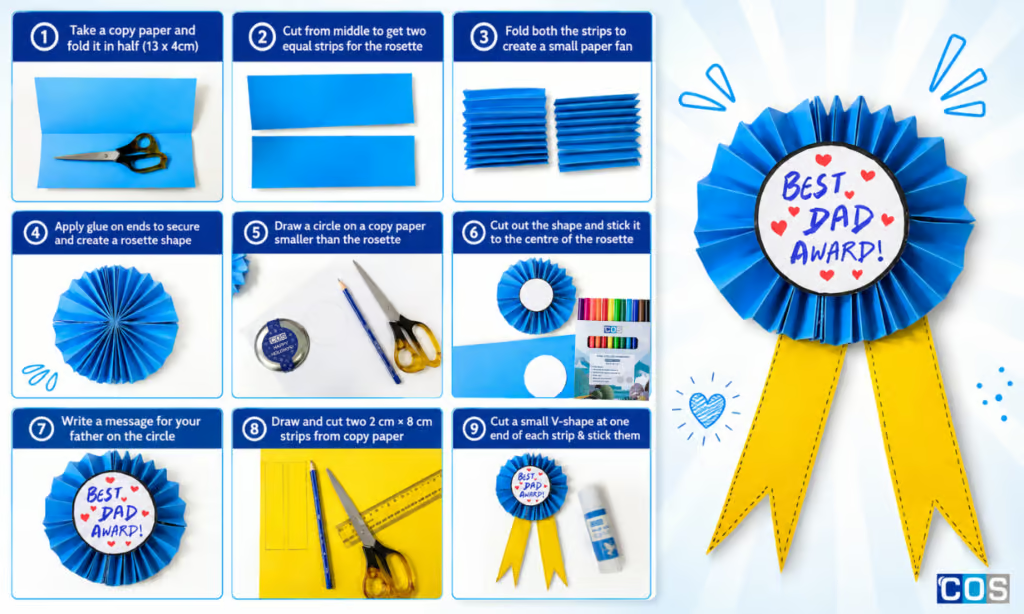
Step-by-Step Instructions:
Step 1: Prepare the paper
Cut the A4 coloured paper into two equal pieces vertically (4 x 13 cm each). Each piece will be used to create one half of the rosette.
Step 2: Make accordion folds
Take one piece of paper and fold it back and forth from one end to the other, creating evenly spaced accordion folds. Aim for folds of approximately 1–1.5 cm.
Step 3: Create the first fan
Fold the accordion strip in half. Apply glue along one of the inner edges and press the two sides together. Hold until the glue sets to create a small paper fan.
Step 4: Secure the fan
Apply a small amount of glue to the centre of the loose folds at the bottom of the fan. Press them together to secure the shape.
Step 5: Create the rosette
Repeat Steps 2–4 with the second piece of A4 paper. Glue the straight edges of both fans together to form a complete circular rosette. Cut a 6–7 cm white paper circle and glue it to the centre of the rosette.
Step 6: Make the ribbons
Take a sheet of copy paper and draw two strips (2 cm × 8 cm). Cut out the strips and snip a small V-shape at one end of each to create ribbon tails. Glue the other ends together.
Step 7: Attach the ribbons
Turn the rosette over and glue the two ribbon strips to the back, positioning them evenly.
Step 8: Personalise the badge
Turn the badge over and write “Best Dad Award”, “Best Dad Ever!”, or a special message for Dad in the centre.
Your Best Dad Badge is ready! Give it to Dad on Father’s Day and let him wear his special award with pride! ❤️🏅
2. French Fries Box: “You’re Fry-tastic, Dad!”
What you’ll need:
- Coloured copy paper
- Pencil
- Ruler
- Scissors
- PVA glue or glue stick
- Markers, crayons, or pencil colours

Step-by-Step Instructions:
Step 1: Make the Fries Box
Take a coloured sheet of copy paper measuring 15 × 15 cm. Fold it in half horizontally. Draw a triangle on each side and carefully cut along the lines to create the French fries packet shape.
Step 2: Create the Opening
Draw a curved shape along the top front of the packet to create the opening.
Step 3: Assemble the Box
Apply glue to the side edges and stick them together, leaving the top open.
Step 4: Add the Curved Label
Trace the curved shape onto another sheet of copy paper and cut it out, about 4 cm wide. Glue this piece over the curved opening of the box.
Step 5: Write a Message
Write a sweet message for Dad on the curved label.
Step 6: Make the Fries
Cut another sheet of copy paper into strips measuring approximately 2 x 6cm. Cut around 8-10 strips.
Step 7: Add Kind Words
Write a kind word or describing word about Dad on each strip, such as kind, loving, funny, caring, or amazing.
Step 8: Fill the Box
Fold the bottom of each strip slightly and place the “fries” inside the box.
Step 9: Finish Your Craft
Arrange the fries so the kind words are easy to see. Your special French fries box filled with kind words for Dad is ready! 🍟❤️
3. Handmade Shirt Card
What you’ll need:
- Paper cup
- Scissors
- PVA glue or glue stick
- Markers, crayons, or pencil colours
- Buttons, sequins, rhinestones or jewels for decoration

Step-by-Step Instructions:
Step 1: Fold the card
Take an A4 sheet of copy paper and fold it in half. Press firmly along the fold to create your card.
Step 2: Create the shirt collar
Starting from the middle fold, fold both sides inward diagonally to create a V-shaped shirt collar.
Step 3: Stick the shirt shape
Apply glue to the bottom and middle sections of the folded shirt. Leave the V-shaped collar area open.
Step 4: Create the pocket
Take another sheet of paper and draw a small shirt pocket. Add simple stitching lines and a heart to decorate it. Cut it out and glue it onto the shirt.
Step 5: Make the pull-up message
Take a sheet of paper and cut it to approximately the same size as the shirt. Write a special message on it, such as:
“Pull me up to see your special message!”
Step 6: Create the pocket for the message
Glue the sides and bottom of the shirt together, leaving the top open so the message can slide inside.
Step 7: Insert the message
Slide the message sheet into the shirt pocket, leaving a small section at the top visible so Dad can easily pull it up.
Step 8: Pull and reveal! 🎉
Pull the message upwards to reveal the special Father’s Day message inside!
4. Paper Cup Gift Box
What you’ll need:
- Coloured copy paper
- Scissors
- PVA glue or glue stick
- Markers, crayons, paint, or pencil colours
- Cord or ribbon
- Small gifts, lollies, or notes to place inside the box (optional)

Step-by-Step Instructions:
Step 1: Prepare the Cup
Take a plain paper cup and place it on a flat surface, ready to decorate.
Step 2: Cut the Rim
Carefully cut off the top rim of the cup.
Step 3: Decorate the Cup
Colour or paint the cup using crayons, pencil colours, or paint. Leave it to dry completely.
Step 4: Shape the Shirt
Gently press the cup flat. Make a 2 cm cut on each side, leaving the centre uncut.
Step 5: Create the Collar
Fold both cut sides inward towards the centre to form a shirt collar.
Step 6: Fill the Cup
Add lollies, chocolates, or small gifts inside the cup.
Step 7: Add the Ribbon
Thread a ribbon through the collar opening so it can be used to close the cup.
Step 8: Tie It Closed
Tie the ribbon into a neat bow to close the cup.
Step 9: Add a Message
Write “Happy Father’s Day!” or a special message for Dad on the front of the cup.